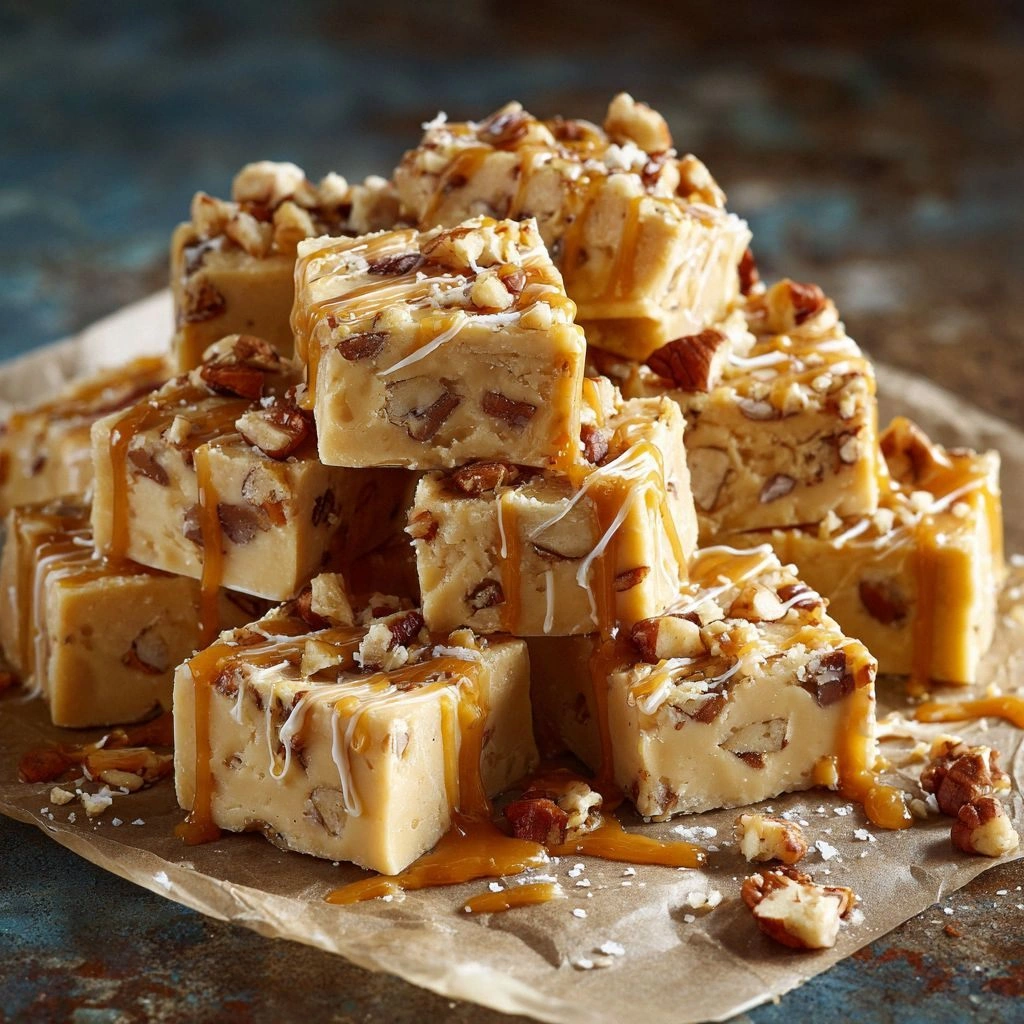
Picture this: I’m standing in a cramped kitchen, the counter littered with a dozen jars of maple syrup, a half‑poured bag of nuts, and a single, stubborn piece of butter that refuses to melt on its own. My friends had dared me to whip up a sweet treat that would make their taste buds sing, and I couldn’t back down. I reached for the maple syrup, let it cascade over the butter, and the room filled with a scent so sweet it almost made me gag. That moment, that single decision to combine maple’s amber drizzle with crunchy nuts, sparked the creation of this maple nut fudge that will change the way you think about dessert.
From the first crackle of butter in the pan to the glossy sheen of maple syrup coating the mixture, every sensory cue was a promise of pure indulgence. The buttery aroma mingled with the deep, caramelized notes of maple, while the nuts offered a satisfying crunch that punctuated the smooth, almost silk‑like texture. I could hear the gentle hiss of the mixture, the faint pop of sugar crystals forming, and I could almost taste the anticipation in the air. It wasn’t just a sweet; it was a symphony of flavors, a dance of textures that left my mouth tingling with anticipation.
What makes this version stand out is that it’s not just about the ingredients—though the high‑quality maple syrup and fresh, toasted nuts are the stars. It’s about the technique: cooking to the right temperature, letting the mixture set just enough to hold its shape, and then cutting it into bite‑sized squares that melt in your mouth. The result is a fudge that is simultaneously decadent and refined, with a caramelized edge that snaps like thin ice, yet soft enough to melt on contact. I dare you to taste this and not go back for seconds; I’ve been told it’s the best fudge you’ll ever make at home.
I’ll be honest—when I first tried this recipe, I ate half the batch before anyone else even had a chance. The combination of maple and nuts was so addictive that I couldn’t resist. That’s why I’m sharing every detail, every trick, every little nuance that turns an ordinary sweet into a showstopper. If you’ve ever struggled with fudge that turns out too soft or too hard, you’re not alone—and I’ve got the fix.
Most recipes get this completely wrong by overcooking the sugar or under‑toasting the nuts. Here’s what actually works: keep the heat low, stir constantly, and watch the mixture change color before it boils. The key is the “soft ball” stage—when a drop of the mixture in cold water forms a soft, pliable ball. That’s the moment of truth. When you reach it, the fudge will set beautifully, with a glossy finish and a bite that’s perfectly firm.
Picture yourself pulling this out of the pan, the whole kitchen smelling incredible, the countertop gleaming with a glossy sheen, and the sound of the fudge cutting into a clean, satisfying snap. The anticipation builds, the aroma lingers, and the first bite is a revelation. The maple’s sweetness, the nuts’ crunch, and the buttery finish create an explosion of flavors that will keep you coming back for more.
Okay, ready for the game‑changer? Let me walk you through every single step—by the end, you’ll wonder how you ever made it any other way. This recipe is a playground, a canvas for your culinary creativity, and a testament to the power of a single, well‑chosen ingredient. Let’s dive in and turn a humble kitchen into a confectionery wonderland.
What Makes This Version Stand Out
- Taste: The maple syrup provides a natural, caramelized sweetness that outshines artificial syrups, giving the fudge a depth of flavor that lingers on the palate.
- Texture: The combination of butter, sugar, and maple syrup creates a silky, melt‑in‑your‑mouth consistency with a subtle crunch from toasted nuts.
- Ingredient Quality: Using organic maple syrup and freshly toasted nuts ensures each bite is packed with real flavor, not artificial additives.
- Simplicity: Despite its rich taste, the recipe requires only a handful of pantry staples and a single pot.
- Make‑Ahead: Once set, the fudge keeps well in the fridge for up to a week, making it perfect for parties or gift baskets.
- Visual Appeal: The glossy sheen and contrasting nut pieces create a dessert that looks as good as it tastes.
- Versatility: The base can be easily adapted to include different nuts, spices, or even chocolate swirls.
- Crowd Reaction: Friends and family rave about the unique blend of sweet and crunchy, often asking for the recipe after the first bite.
Alright, let's break down exactly what goes into this masterpiece...
Inside the Ingredient List
The Flavor Base
Maple syrup is the beating heart of this fudge. Its natural sugars caramelize beautifully, creating a rich, amber flavor that’s far superior to artificial sweeteners. When you pour it into the butter, the mixture begins to bubble, releasing tiny steam pockets that give the fudge its silky texture. Skipping maple syrup would strip the fudge of its signature depth, leaving a bland, syrupy sweetness that’s hard to love. If you’re in a pinch, you can swap for a 50/50 blend of maple syrup and honey, but the flavor profile will shift slightly toward floral notes.
The Texture Crew
Unsalted butter is essential for that glossy finish and smooth mouthfeel. It melts into the syrup, creating a homogeneous mixture that coats each nut perfectly. Powdered sugar is the binder, turning the mixture into a cohesive fudge that holds its shape when set. The heavy cream adds richness and prevents the fudge from becoming too dense. Together, these ingredients form a silky canvas that showcases the nuts’ crunch. If you omit the cream, the fudge will be firmer, which some may find less enjoyable. For a lighter version, substitute half the cream with milk, but be prepared for a slightly less luxurious mouthfeel.
The Unexpected Star
Freshly toasted nuts—walnuts, pecans, and almonds—are the unexpected star that adds texture and nutty depth. Toasting brings out their oils, enhancing flavor and preventing the nuts from becoming stale. Without the nuts, the fudge would be a flat, sugary slab. If you’re allergic to certain nuts, substitute with sunflower seeds or pumpkin seeds for a crunchy twist. A pinch of sea salt balances the sweetness, elevating the overall flavor profile.
The Final Flourish
Vanilla extract provides a subtle, aromatic undertone that ties all the flavors together. It’s a small addition, but it amplifies the maple’s sweetness and the nuts’ earthiness. A splash of lemon zest could also add a bright counterpoint, but vanilla is the classic choice. If you prefer a more pronounced vanilla flavor, increase the amount to 1 teaspoon; just remember that too much can overwhelm the maple’s delicate notes.
Everything’s prepped? Good. Let’s get into the real action...
The Method — Step by Step
- Gather the ingredients. Set out all the components—maple syrup, butter, powdered sugar, heavy cream, vanilla, sea salt, and toasted nuts. This step is crucial because a smooth workflow saves time and reduces the chance of mistakes. Make sure your measuring cups and spoons are clean and dry to avoid any contamination that could affect the final texture. As you gather, you’ll notice the aroma of maple and butter already mingling, a prelude to the deliciousness to come.
- Combine butter, maple syrup, and cream. In a heavy‑bottomed saucepan, melt the butter over medium heat until it turns a pale yellow. Add the maple syrup and heavy cream, stirring constantly. The mixture will bubble gently, indicating that the butter and syrup are starting to marry. Keep an eye on the temperature; you want it to stay below 170 °F (77 °C) to preserve the maple’s delicate flavor. This is the moment where the base of your fudge begins to form.
- Add powdered sugar. Gradually whisk in the powdered sugar, ensuring it dissolves completely before adding the next portion. The sugar will thicken the mixture, creating a syrupy consistency that’s ready to transform. Stir until the mixture turns a light amber color, signaling that the sugar has caramelized just enough. Watch for the “soft ball” stage: drop a small amount into cold water; it should form a soft, pliable ball that doesn’t break apart.
- Introduce the nuts. Fold in the toasted nuts, ensuring they’re evenly distributed. The nuts will soak up some of the syrup, becoming glossy and slightly caramelized. This step is where texture meets flavor; the crunch of nuts against the smooth base creates a delightful contrast. If you’re adding extra spices, like cinnamon or nutmeg, sprinkle them in at this point for a subtle warmth.
- Finish with vanilla and salt. Stir in the vanilla extract and sea salt. The vanilla enhances the maple’s sweetness, while the salt balances the overall flavor profile. Taste the mixture; it should be sweet but not cloying. This is your cue that the fudge is ready to set. At this point, the mixture should have a glossy sheen, a hallmark of a well‑cooked fudge.
- Pour into the pan. Carefully pour the mixture into a greased 8‑inch square pan. Use a spatula to spread it evenly, ensuring no air pockets remain. The edges should be smooth and the surface flat. The mixture will still be hot, so be cautious; a slight burn can happen if you touch the pan too quickly.
- Set and chill. Allow the fudge to cool at room temperature for 20–30 minutes until it starts to firm up. Then transfer the pan to the refrigerator for at least 2 hours, or until the fudge is fully set and firm enough to cut. This chilling step is vital; it allows the flavors to meld and the texture to solidify. Don’t skip it; the fudge will be too soft and crumbly otherwise.
- Cut and serve. Remove the fudge from the pan using a sharp knife. Slice into bite‑sized squares or bars. For a cleaner cut, let the fudge sit at room temperature for 5 minutes before slicing. The pieces should hold their shape and offer a satisfying snap. Serve immediately or store in an airtight container.
That's it — you did it. But hold on, I've got a few more tricks that'll take this to another level...
Insider Tricks for Flawless Results
The Temperature Rule Nobody Follows
Many people think the key to good fudge is just cooking until it thickens, but the real secret is temperature control. Use a candy thermometer and aim for 234–240 °F (112–115 °C). At this range, the sugar crystals form just right, giving the fudge a smooth, glossy finish. I once skipped the thermometer and the fudge ended up gritty. That’s why I always keep it close by.
Why Your Nose Knows Best
Before you even taste the fudge, let your nose do the judging. A warm, caramelized aroma indicates that the sugar has reached the soft ball stage. If the smell is too syrupy, you’re undercooking; if it’s sharp, you’re overcooking. Trust your senses, and adjust the heat accordingly. The smell will guide you to that perfect, melt‑in‑your‑mouth texture.
The 5‑Minute Rest That Changes Everything
After you pour the fudge into the pan, let it rest at room temperature for exactly five minutes before chilling. This brief pause allows the surface to set just enough to keep the edges from sliding while the center remains slightly pliable. It makes cutting cleaner and prevents the fudge from sticking to the pan. I’ve tried skipping this step and the result was uneven slices.
Keep It Cool, Keep It Smooth
Once the fudge is fully set, store it in a cool, dry place. If you live in a humid climate, keep it in an airtight container to avoid moisture absorption, which can cause the fudge to soften. When you’re ready to serve, let it sit at room temperature for a few minutes; this brings out the full flavor and ensures the texture is just right.
Use a Non‑Stick Pan
Even a lightly greased pan can lead to sticking if the fudge isn’t set properly. A silicone or parchment‑lined pan ensures easy removal and a clean surface. I’ve tried using a plain metal pan before, and the fudge clung stubbornly. Switching to silicone made the process a breeze.
Creative Twists and Variations
This recipe is a playground. Here are some of my favorite ways to switch things up:
Chocolate Swirl Fudge
Fold in a few tablespoons of melted dark chocolate into the mixture before adding the nuts. The chocolate adds a rich, bittersweet contrast to the maple’s sweetness, creating a layered flavor profile that’s irresistible.
Spiced Maple Fudge
Add a pinch of ground ginger or a splash of orange zest to the base. The spices bring warmth and a citrusy brightness that complements the maple and nuts, making the fudge feel festive.
Almond Joy Fudge
Replace half the nuts with shredded coconut and sprinkle toasted coconut on top after pouring. This variation gives the fudge a tropical twist, reminiscent of an Almond Joy candy.
Salted Caramel Fudge
Swap the maple syrup for a homemade salted caramel sauce. The caramel’s buttery depth pairs beautifully with the nuts, while the sea salt adds a savory punch.
Vegan Maple Fudge
Use coconut oil instead of butter and a plant‑based milk like oat milk. The result is a creamy, vegan-friendly fudge that still delivers on flavor.
Nutless Maple Fudge
Omit the nuts entirely for a pure maple experience. The fudge will be silky and sweet, ideal for those who prefer a lighter treat.
Storing and Bringing It Back to Life
Fridge Storage
Wrap the set fudge tightly in plastic wrap or place it in an airtight container. Store in the refrigerator for up to 1 week. The cold environment preserves the texture and prevents the fudge from becoming too soft.
Freezer Friendly
For longer storage, freeze the fudge in a single layer on a baking sheet, then transfer to a freezer bag. It will keep for up to 3 months. Thaw at room temperature for 30 minutes before serving.
Best Reheating Method
If the fudge has hardened, gently warm it in a microwave on low power for 10–15 seconds, or place it in a bowl over a pot of simmering water (double‑boiler method). Add a tiny splash of water before reheating to create steam that restores the fudge’s silky texture.