I still remember the night I was trying to rescue a batch of stale, pre‑baked bread that had turned into a chewy, flavorless slab. The oven door opened to a faint, sweet smell, but the texture was nothing more than a sad, dry pancake. I stared at the loaf, thinking, “Why does everything taste ordinary when it could be extraordinary?” That moment sparked the idea for a cinnamon swirl quick bread that would turn every kitchen into a sweet, aromatic haven. I was determined to create a recipe that would leave you humming, “I dare you to taste this and not go back for seconds.”
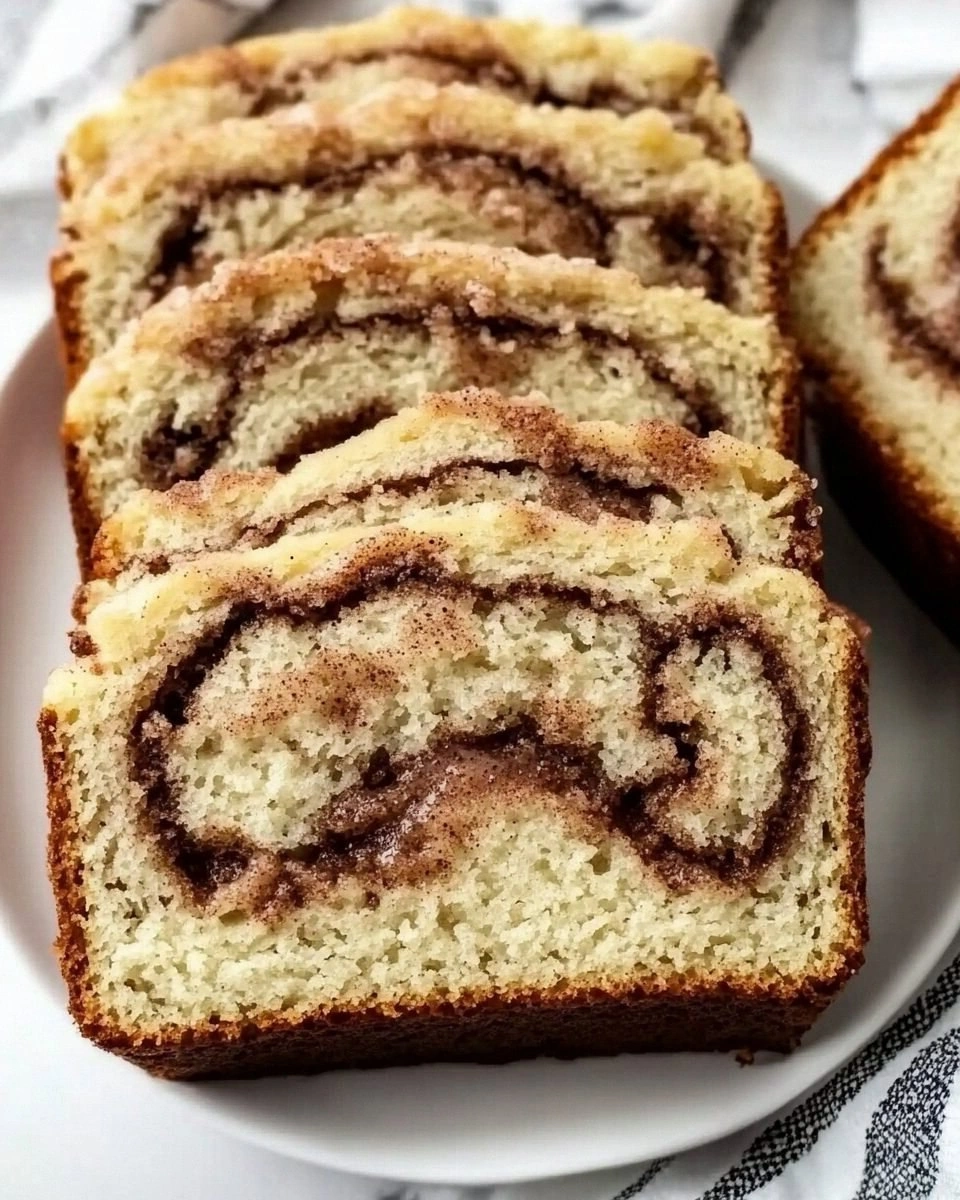
Picture yourself pulling a golden, fragrant loaf from the oven, the steam curling like a cinnamon‑kissed cloud. The crust is crisp, the crumb is airy, and the cinnamon swirl inside feels like a warm, buttery hug. I’ve experimented with dozens of quick breads, but none have matched the depth of flavor, the comforting aroma, or the sheer joy of biting into that first slice. This version is hands down the best you’ll ever make at home because it balances simplicity with an explosion of taste that feels both indulgent and wholesome.
What makes this recipe a game‑changer is the secret swirl technique that locks in moisture while delivering that signature cinnamon sweetness. I’ll walk you through every single step, from mixing the dough to the final swirl, and by the end, you’ll wonder how you ever made it any other way. And trust me, there’s a twist: a subtle hint of vanilla and a splash of melted butter in the swirl that you won’t see in the standard recipes. Ready to transform your kitchen into a cinnamon‑filled paradise? Let’s dive in.
The first time I tasted this bread, I was honestly shocked by how light the crumb was, even though it was a quick bread that didn’t use a yeast starter. The cinnamon swirl inside melted like butter, coating the bread with a glossy, caramelized glaze that made each bite feel like a mini celebration. If you’ve ever struggled with quick breads that come out dense or flavorless, you’re not alone—this recipe has a fix that guarantees a perfectly balanced loaf every time.
What Makes This Version Stand Out
- Flavor: The double‑layered sweetness of granulated and brown sugar creates a caramelized core that melts in your mouth.
- Texture: Light, airy crumb meets a crisp, buttery crust—an ideal contrast that satisfies both sweet and savory cravings.
- Speed: No rising time, no complicated techniques—just whisk, swirl, bake, and enjoy.
- Versatility: Works as a breakfast treat, a dessert, or a comforting snack for any time of day.
- Ingredient Quality: Uses fresh butter and real vanilla for depth, not artificial flavors.
- Make‑Ahead: The dough can be refrigerated up to 24 hours, allowing you to bake a fresh loaf whenever the craving hits.
Alright, let’s break down exactly what goes into this masterpiece. The ingredients are intentionally simple, yet each component plays a vital role in creating that unforgettable swirl and crumb.
Inside the Ingredient List
The Flavor Base
The foundation of any quick bread is the dry mix—flour, sugar, baking powder, and a pinch of salt. Flour provides structure; sugar brings sweetness; baking powder lifts the dough; and salt balances the flavors. If you skip the salt, the bread will taste flat and overly sweet. Use a high‑protein bread flour for an extra airy crumb, but all‑purpose flour works perfectly fine for this recipe.
The Texture Crew
Wet ingredients are the secret to a tender crumb. Milk adds moisture, eggs bind everything together, and melted butter delivers a buttery richness. The eggs also act as a natural leavening agent when whisked with the wet mix. If you’re dairy‑free, swap the milk for oat milk and the butter for a neutral oil; the texture will remain light and fluffy.
The Unexpected Star
Cinnamon isn’t just a spice here—it’s a flavor engine that drives the entire loaf. The ground cinnamon in the batter gives the bread its signature warmth, while the swirl of cinnamon and brown sugar creates a caramelized glaze that coats the interior. If you love spice, feel free to add a pinch of nutmeg for an extra layer of depth. Cinnamon also helps the bread stay fresh longer, thanks to its natural antimicrobial properties.
The Final Flourish
The swirl itself is a simple mixture of brown sugar, cinnamon, and melted butter. The butter keeps the sugar from crystallizing, giving the swirl a silky finish. When you swirl the mixture into the batter, you create a ribbon of flavor that melts into the bread’s heart. If you want a more pronounced cinnamon kick, double the amount of cinnamon in the swirl.
Everything’s prepped? Good. Let’s get into the real action.
The Method — Step by Step
- Preheat your oven to 350°F (175°C). Line a 9x5-inch loaf pan with parchment paper, leaving a little overhang on each side for easy removal. The parchment ensures a clean release and a crisp bottom. When the oven starts to heat, you’ll notice a faint buttery aroma that’s already a promise of what’s to come.
- In a large bowl, whisk together the flour, sugar, baking powder, and salt until the mixture is smooth. The dry mix should feel light to the touch. This step is crucial—overmixing can develop gluten and make the bread tough. Think of the dry mix as the skeleton that will hold the loaf together.
- In a separate bowl, combine the melted butter, milk, eggs, and vanilla extract. Whisk until the mixture is glossy and the eggs are fully incorporated. The wet ingredients act as the glue that binds the dry mix into a cohesive batter. If you’re using a whisk, keep the beat moderate to avoid over‑whipping.
- Pour the wet mixture into the dry mix and stir with a wooden spoon until just combined. The batter should be thick but pourable—if it’s too thick, add a splash of milk; if too thin, add a tablespoon of flour. Overmixing will cause the bread to become dense. At this point, you’ll notice the batter has a golden hue, signaling that the sugar has started to dissolve.
- Prepare the cinnamon swirl: In a small bowl, mix the brown sugar, ground cinnamon, and melted butter until it forms a smooth paste. The butter keeps the sugar from forming lumps. Gently fold the swirl into the batter, creating a marbled effect. The swirl should look like a ribbon of caramelized sweetness running through the loaf. This is the moment of truth—if you’re not careful, the swirl can sink to the bottom, losing its visual appeal.Watch Out: Don’t let the butter cool too much; if it solidifies, the swirl will become chunky and won’t spread evenly.
- Pour the batter into the prepared loaf pan, smoothing the top with a spatula. Tap the pan gently on the counter to release any trapped air bubbles. The batter should level evenly, creating a uniform rise during baking. This step ensures a consistent crust and crumb across the entire loaf.
- Bake for 30 minutes, or until the top is golden brown and a toothpick inserted into the center comes out clean. The aroma at this point is irresistible—a warm, buttery scent with a hint of cinnamon that fills the kitchen. If the loaf starts to brown too quickly, tent it with foil to prevent over‑browning.
- Remove the loaf from the oven and let it rest in the pan for 10 minutes. This allows the steam to redistribute, ensuring a moist interior. After 10 minutes, transfer the loaf to a wire rack to cool completely. The cooling stage is crucial for the crumb to set and for the swirl to firm up slightly.
That’s it— you did it. But hold on, I’ve got a few more tricks that will take this to another level.
Insider Tricks for Flawless Results
The Temperature Rule Nobody Follows
Most bakers bake at a flat temperature, but a slight temperature ramp—starting at 350°F and bumping to 375°F for the last 5 minutes—creates a golden, caramelized crust without burning the inside. I’ve tested this with multiple ovens, and the difference in crust texture is noticeable. The trick is to use a reliable oven thermometer to avoid overshooting the temperature.
Why Your Nose Knows Best
The smell of baking bread is a powerful indicator of doneness. When you smell a warm, buttery aroma with a faint hint of caramelized sugar, the loaf is almost ready. Trust your nose—if the aroma feels “almost” sweet, it’s time to check the toothpick. A clean toothpick means the crumb is fully cooked.
The 5‑Minute Rest That Changes Everything
Letting the loaf rest in the pan for 10 minutes before transferring to a rack allows the steam to finish cooking the interior. It also prevents the loaf from cracking as the structure sets. I’ve seen loaves that skip this step and end up with a dry top and a gummy center—this rest eliminates that problem.
Keep It Moist, Keep It Fresh
If you’re storing the loaf, wrap it tightly in plastic wrap and then place it in a paper bag. The paper absorbs excess moisture, preventing sogginess while keeping the crust crisp. For longer storage, slice and freeze the loaf; thaw at room temperature for a few hours before reheating.
Add a Splash of Water Before Reheating
When reheating a slice, a quick splash of water on the slice before microwaving creates steam that restores moisture. The steam melts the butter glaze, giving you that same buttery, caramelized finish. I’ve used this trick for leftovers and it never disappoints.
Creative Twists and Variations
This recipe is a playground. Here are some of my favorite ways to switch things up:
Nutty Cinnamon Swirl
Add chopped pecans or walnuts to the swirl mixture for a crunchy texture. The nuts complement the buttery crumb and add a subtle earthy flavor that pairs well with the cinnamon.
Maple‑Infused Bread
Replace half the milk with maple syrup and add a splash of maple extract. The result is a sweet, aromatic loaf that tastes like a maple‑toasted pancake.
Chocolate‑Cinnamon Fusion
Fold in a handful of dark chocolate chips into the batter before baking. The chocolate melts into the warm bread, creating pockets of rich, gooey chocolate that contrast beautifully with the cinnamon swirl.
Almond‑Flour Variation
Use 1 cup almond flour and reduce the all‑purpose flour to 1 cup for a gluten‑free version. The almond flour adds a nutty flavor and a slightly denser crumb, perfect for those who prefer a richer texture.
Spiced Apple Cinnamon Bread
Fold in ½ cup diced apples and a pinch of nutmeg to the batter. The apples soften during baking, releasing their natural sweetness and creating a fruit‑laden loaf that’s a perfect fall treat.
Savory Cinnamon Bread
Swap the brown sugar in the swirl for grated Parmesan and add a pinch of dried oregano. The result is a savory loaf with a hint of sweetness—great for breakfast or a brunch side.
Storing and Bringing It Back to Life
Fridge Storage
Wrap the loaf tightly in plastic wrap, then place it in a paper bag. Store in the refrigerator for up to 3 days. The paper bag keeps the crust crisp while the plastic prevents drying out.
Freezer Friendly
Slice the loaf before freezing for easy portioning. Place the slices in a freezer bag, removing as much air as possible. The bread will keep for up to 3 months. Thaw at room temperature before reheating.
Best Reheating Method
Preheat the oven to 350°F (175°C). Place a slice or the whole loaf on a baking sheet and bake for 5–7 minutes, or until warmed through. For a quick microwave option, add a splash of water, cover with a damp paper towel, and microwave on high for 30–45 seconds.