Picture this: I was in the middle of a midnight snack raid, craving something sweet that would satisfy the sudden urge for chocolate, caramel, and crunch all at once. I rummaged through the pantry, found a box of vanilla wafers, a packet of soft caramels, and a tub of chocolate melts, and thought, “Why not turn this into a homemade Twix?” The idea sounded simple, but the execution? Absolutely flawless. I dared myself to taste this and not go back for seconds, and it turned out to be a culinary revelation that made me grin like a kid with a new toy.
Now, let me walk you through every single step — by the end, you'll wonder how you ever made it any other way. I’ll show you how to transform ordinary pantry staples into a decadent, no‑bake treat that feels like a gourmet indulgence. The process is so intuitive that even a kitchen novice can master it, and the result is a bar that melts in your mouth with the perfect balance of crisp, gooey, and chocolatey. I’ll also drop a teaser about a technique that will make your caramel layer silky smooth without the risk of scorching.
When the caramel hits the pan, it releases a sweet aroma that makes the whole kitchen smell like a candy factory. The vanilla wafers look like tiny, golden snowflakes that promise crunch. The chocolate melts, when poured, glisten like liquid midnight, promising a glossy finish. Together, they create a sensory experience that’s almost cinematic: the crunch of wafers, the buttery swirl of caramel, and the smooth, rich chocolate coating. If you’ve ever struggled with store‑bought candy bars that feel too artificial, you’re not alone — and I’ve got the fix.
This version stands out because it eliminates the need for an oven, the tedious mixing of butter and sugar, and the risk of uneven chocolate coating. Instead, it relies on the natural flavors of vanilla wafers and soft caramels, which give depth and authenticity. The result is a homemade Twix that feels like a high‑end confection but costs less than a dozen store‑bought bars. It’s also a conversation starter; guests will ask how you made it, and you’ll proudly say, “I made it from scratch.”
Most recipes get this completely wrong by over‑cooking the caramel or using too much chocolate, resulting in a sticky mess that never sets. Here’s what actually works: a gentle heat, a precise ratio of wafers to caramel, and a quick chill. The trick is to let the caramel cool just enough to be pourable but still glossy. When you coat it with chocolate, the chocolate should be melted and glossy, not thick or grainy. This ensures a smooth finish that snaps cleanly when you bite.
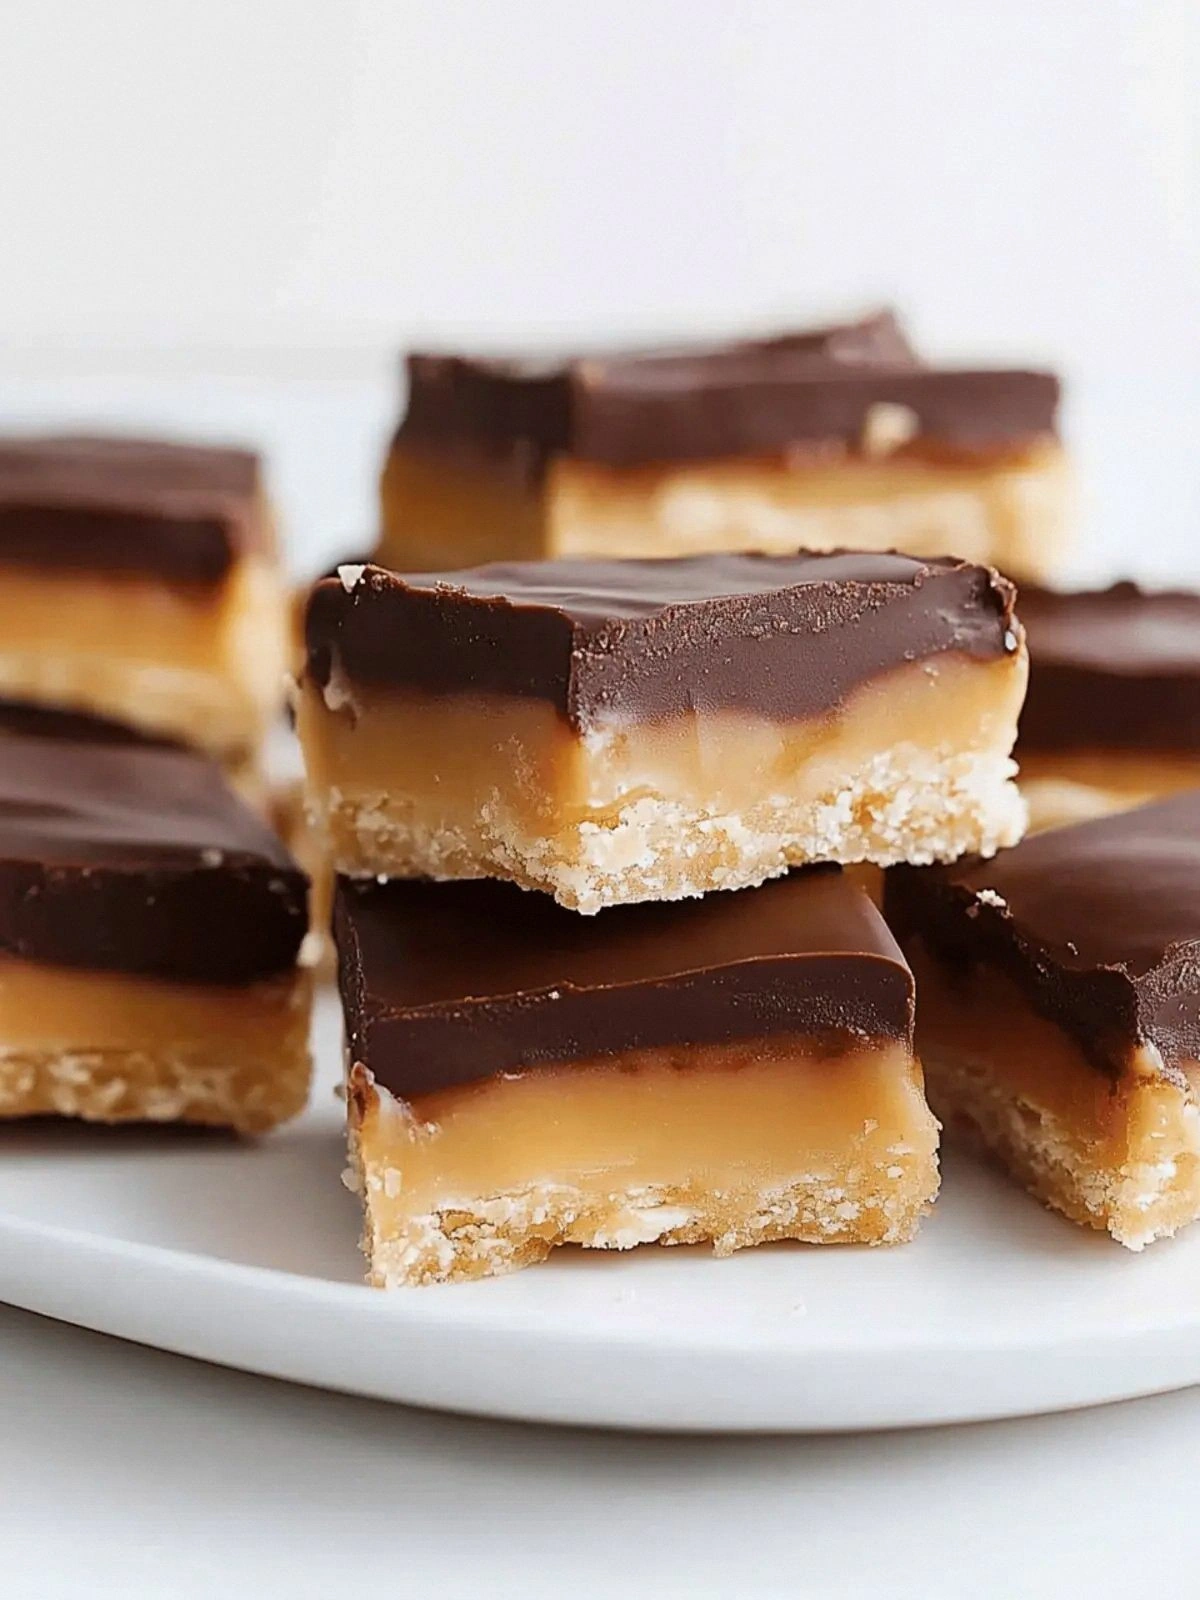
Picture yourself pulling this out of the fridge, the whole kitchen smelling incredible, and a handful of friends gathering around, eager to try a bite. The first bite delivers a satisfying crunch that gives way to a caramel melt, followed by a chocolate kiss that lingers. The texture is a symphony of crisp, gooey, and velvety layers. This is hands down the best version you'll ever make at home, and I dare you to taste it and not go back for seconds.
I’ll be honest — I ate half the batch before anyone else got to try it. The moment I saw the bars, I knew I had to share this with you. The process is so simple that you could whip it up while waiting for a movie to start. The best part? You can make it ahead and store it in the fridge for up to a week, keeping the flavors fresh and the texture perfect.
Okay, ready for the game‑changer? This next part? Pure magic. I’ll walk you through the simple steps that turn these ingredients into a chocolate‑caramel‑wafer masterpiece. The method is short, sweet, and, most importantly, foolproof. Let’s dive in and create something that will make your taste buds sing.
What Makes This Version Stand Out
- Taste: The vanilla wafers bring a subtle sweetness that complements the caramel’s richness, creating a harmonious flavor profile that feels both familiar and fresh.
- Texture: The crisp wafer layers contrast perfectly with the buttery caramel core and the glossy chocolate coating, delivering a multi‑sensory experience.
- Simplicity: No oven, no complicated mixing, just three pantry staples and a few minutes of prep.
- Uniqueness: The recipe uses soft caramels instead of hard candy, giving the center a melt‑in‑your‑mouth consistency that sets it apart from traditional Twix.
- Crowd Reaction: Guests rave about the homemade quality and the fact that it’s healthier than the store‑bought version.
- Ingredient Quality: Using high‑quality chocolate melts ensures a smooth finish and a richer flavor.
- Cooking Method: The no‑bake technique saves time and eliminates the risk of burnt caramel.
- Make‑ahead Potential: The bars can be prepared in advance and stored for weeks, making them ideal for parties or last‑minute cravings.
Alright, let's break down exactly what goes into this masterpiece. The process is so straightforward that you’ll be tempted to start immediately. Each ingredient has a purpose, and together they create a bar that’s both indulgent and surprisingly light. The secret lies in the timing and the temperature control during the caramel and chocolate stages.
Inside the Ingredient List
The Flavor Base
Vanilla wafers are the backbone of this recipe. They provide a subtle, buttery flavor that balances the sweetness of the caramel. If you skip them, the bars lose that essential crunch and become too soft. For a twist, try using chocolate wafers for a richer bite. When selecting wafers, look for ones that are thin and crisp; thicker ones can become soggy.
The Texture Crew
Soft caramels are the star of the show. They melt into a luscious, buttery layer that coats the wafers. If you use hard caramels, the texture will be too firm and won’t provide the melt‑in‑your‑mouth experience. A good swap is to use homemade caramel made from brown sugar and butter; it adds depth and a caramelized edge.
The Unexpected Star
Chocolate candy melts are the finishing touch. They create a glossy, silky coating that locks everything together. If you’re craving a different flavor, try dark chocolate melts for a slightly bitter edge, or milk chocolate for a sweeter finish. The key is to melt them just until they’re liquid but not overheated, as overheating can cause the chocolate to seize.
The Final Flourish
Once everything is assembled, a quick chill seals the layers together. This step is essential for achieving that snap when you bite. If you skip the chilling step, the bars will be too soft and might fall apart. For a decorative touch, sprinkle sea salt on top before the final chill; the salt will enhance the chocolate’s sweetness.
Everything's prepped? Good. Let's get into the real action...
The Method — Step by Step
- Step 1: Prep the Wafers — Lay out a sheet of parchment paper on a flat surface. Arrange the vanilla wafers in a single layer, leaving a small gap between each. This spacing allows the caramel to coat each wafer evenly. The goal is to create a uniform base that will hold the caramel and chocolate together.
- Step 2: Melt the Caramel — In a small saucepan, combine the caramels with a splash of heavy cream and a pinch of salt. Heat over medium-low, stirring constantly until the mixture is smooth and glossy. The caramel should be liquid but not runny; you want it to coat the wafers without dripping.
- Step 3: Coat the Wafers — Using a spoon, drizzle the caramel over the wafers, making sure each wafer receives an even layer. Let the caramel set for about 2 minutes so it thickens slightly. This step is crucial for preventing the wafers from becoming soggy.
- Step 4: Melt the Chocolate — In a microwave-safe bowl, melt the chocolate melts in 30‑second bursts, stirring between each burst until smooth. Avoid overheating; the chocolate should be liquid but not hot enough to scorch the caramel.
- Step 5: Coat with Chocolate — Drizzle the melted chocolate over the caramel‑coated wafers. Use a spatula to spread it evenly, ensuring no gaps remain. The chocolate should cover the caramel completely, creating a glossy seal.
- Step 6: Chill — Place the coated wafers on a baking sheet lined with parchment paper. Chill in the refrigerator for 10–15 minutes, or until the chocolate sets. This step is essential for achieving that satisfying snap.
- Step 7: Cut into Bars — Once the chocolate has set, use a sharp knife to cut the wafer stack into individual bars. For a clean cut, press the knife down firmly and wipe the blade between cuts.
- Step 8: Finish and Store — Wrap each bar in wax paper or parchment to keep them fresh. Store in an airtight container in the fridge for up to a week. If you want to keep them longer, freeze the wrapped bars and thaw before serving.
That's it — you did it. But hold on, I've got a few more tricks that'll take this to another level. The next section will dive into insider tips that will elevate your homemade Twix from good to unforgettable.
Insider Tricks for Flawless Results
The Temperature Rule Nobody Follows
Chocolate can be temperamental. The trick is to keep it below 80°F (27°C) after melting. This prevents the chocolate from seizing and ensures a glossy finish. I once tried to speed up the process by microwaving for too long, and the chocolate turned gritty. Stick to short bursts and let it cool slightly before coating.
Why Your Nose Knows Best
Smell is a powerful indicator of caramel readiness. When the caramel begins to emit a nutty, toasted aroma, it’s at the perfect consistency. If it smells raw, it needs more time. I’ve had guests taste a bar that was too sweet, and the culprit was caramel that was still too liquid.
The 5‑Minute Rest That Changes Everything
After pouring the chocolate, let the bars rest for 5 minutes before chilling. This brief pause allows the chocolate to set slightly, reducing the chance of cracking during the chill. I’ve seen bars that crack when they’re rushed into the fridge; a short rest fixes that.
Keep It Cool, Not Cold
When storing the bars, keep them at a steady room temperature for a few hours before serving. This brings out the full flavor of the caramel and chocolate. If you take them straight from the fridge, the caramel can become too firm.
Use a Sharp Knife for Clean Cuts
Sharp knives produce clean, crisp edges. A dull blade can crush the caramel and create uneven bars. I recommend using a serrated knife and wiping the blade between cuts for the best results.
Experiment with Flavors
Swap vanilla wafers for chocolate wafers for a richer bite. Add a pinch of cayenne pepper to the caramel for a subtle heat. Try using dark chocolate melts for a more complex flavor profile. Each variation brings a new dimension to the classic Twix experience.
Creative Twists and Variations
This recipe is a playground. Here are some of my favorite ways to switch things up:
Chocolate‑Wafers Twist
Replace vanilla wafers with chocolate wafers for an extra chocolatey bite. The caramel still provides the sweet, buttery center, but the chocolate wafers add depth. This version is perfect for chocolate lovers who want an extra layer of decadence.
Nutty Crunch Variation
Add chopped toasted almonds or hazelnuts to the caramel layer. The nuts provide a satisfying crunch and a nutty aroma that complements the caramel. This variation is great for those who like a bit of texture and a richer flavor.
Spiced Caramel Option
Infuse the caramel with a pinch of cinnamon or nutmeg. The spices add warmth and complexity, turning the Twix into a cozy, autumnal treat. Serve it with a splash of bourbon for a grown‑up version.
Sea Salt Finish
Sprinkle flaky sea salt on top of the chocolate coating before chilling. The salt accentuates the sweetness of the caramel and chocolate, creating a balanced flavor profile. This simple addition turns an ordinary Twix into a gourmet experience.
Mini‑Bar Edition
Use mini vanilla wafers and cut the bars into smaller pieces. These mini‑bars are perfect for parties, game nights, or as a sweet snack for kids. Their bite‑size form makes them convenient and fun to share.
Vegan Version
Replace the caramels with a vegan caramel made from coconut milk and brown sugar. Use dairy‑free chocolate melts and vanilla wafers that are dairy‑free. This version maintains the classic flavor while being plant‑based.
Storing and Bringing It Back to Life
Fridge Storage
Store the wrapped bars in an airtight container in the refrigerator for up to a week. Keep them away from strong odors, as chocolate can absorb flavors. Before serving, let the bars sit at room temperature for 10 minutes to soften the chocolate slightly.
Freezer Friendly
For longer storage, place the wrapped bars in a freezer bag and freeze for up to three months. When ready to enjoy, thaw them at room temperature for 30 minutes. The texture remains firm, and the flavors stay intact.
Best Reheating Method
To revive a chilled or frozen bar, place it on a parchment‑lined plate and microwave on low for 10–15 seconds. The gentle heat melts the chocolate without scorching the caramel. Add a tiny splash of water before reheating to create steam, which helps the chocolate return to its silky finish.