I was standing in my kitchen, half‑asleep, with a half‑baked batch of cookies that had turned out as hard as a brick, when my roommate dared me, “I bet you can’t make a cookie that’s both chewy and caramel‑kissed without turning the whole place into a sugar‑smoke cloud.” I laughed, grabbed a bottle of pure maple syrup from the pantry, and thought, okay, let’s see if we can turn this disaster into a masterpiece. The moment the syrup hit the butter, it swirled like amber sunrise in a glass, and I knew we were onto something that would make even the most skeptical sweet‑tooth swoon. I’ll be honest — I ate half the batch before anyone else got a chance, and that was the only mistake I made.
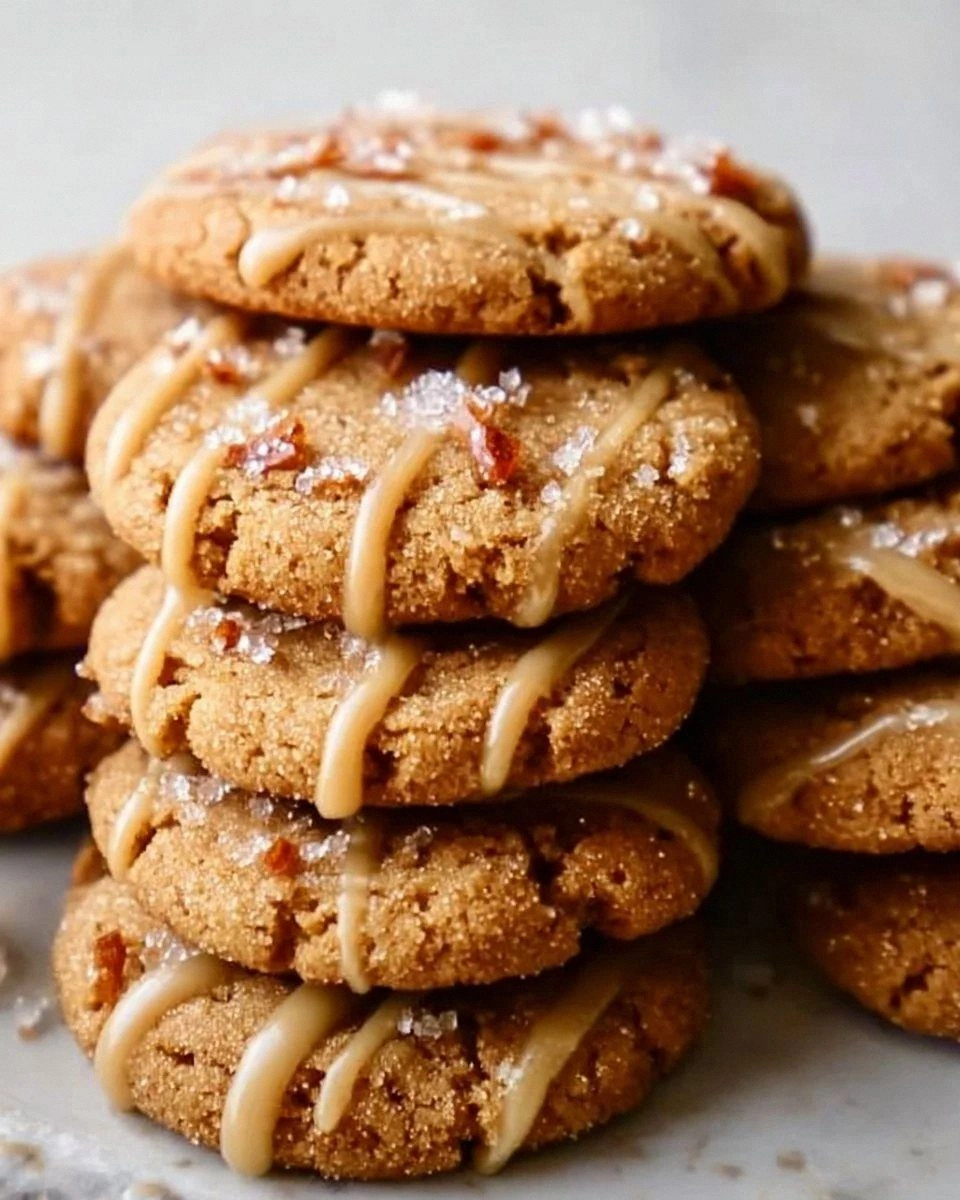
Picture yourself pulling a tray of golden‑brown cookies out of the oven, the whole kitchen smelling like a maple‑infused sugar dream, the edges just barely crisp, the centers soft enough to melt on your tongue. The aroma hits you before the timer even dings, a warm, buttery perfume with a hint of caramel that makes your stomach do a little happy dance. When you bite in, the first thing you notice is the sweet, earthy maple flavor that wraps around the brown sugar like a cozy blanket, and then—boom!—the chewy texture that stretches like a well‑tuned rubber band, never rubbery, always perfectly pliable. This is the kind of cookie that makes you stare at the plate, wonder how you ever settled for anything less.
Most recipes get this completely wrong. They either over‑bake, leaving you with a cookie that crumbles like dry leaves, or they drown the flavor in too much syrup, turning it into a soggy mess. The secret here is balance: the right proportion of butter, sugars, and that magical splash of maple syrup, plus a few tricks that keep the dough from over‑developing gluten. I’m about to spill the beans on a technique that uses a brief chill in the fridge to lock in chewiness, and a simple switch of baking soda for powder that gives the perfect lift without the dreaded “pancake” effect.
Let me walk you through every single step — by the end, you’ll wonder how you ever made it any other way. Okay, ready for the game‑changer? This next part? Pure magic.
What Makes This Version Stand Out
- Flavor Explosion: The maple syrup isn’t just a sweetener; it adds a deep, woody undertone that dances with the caramel notes of brown sugar, creating a flavor profile that’s both nostalgic and novel.
- Chewy Perfection: By chilling the dough just long enough and using a precise bake time, the cookies stay soft in the middle while the edges get that coveted gentle snap.
- Simplicity at Its Core: Only ten ingredients, all pantry staples, no exotic spices, making it a go‑to recipe for any skill level.
- Unique Ingredient Pairing: Combining maple syrup with brown sugar is rare in cookie lore, but together they create a caramel‑like depth that ordinary white sugar can’t match.
- Crowd‑Pleaser: I dare you to taste this and not go back for seconds; even the pickiest eaters are won over by the aroma alone.
- Ingredient Quality Matters: Using real unsalted butter and pure maple syrup (not pancake syrup) elevates the entire bite, turning a simple cookie into a gourmet treat.
- Cooking Method Mastery: The gentle bake at 350°F ensures even heat distribution, preventing the dreaded “hard‑center” disaster.
- Make‑Ahead Potential: These cookies store beautifully, and a quick reheating brings them back to life, making them perfect for busy mornings or last‑minute dessert demands.
Inside the Ingredient List
The Flavor Base
First up, the butter. Using unsalted butter at room temperature lets it cream perfectly with the sugars, creating tiny air pockets that later expand in the oven for that subtle lift. If you substitute salted butter, you’ll end up with a cookie that tastes slightly off‑balance, as the hidden salt can clash with the maple’s natural sweetness. Opt for a high‑fat European‑style butter if you can find it; the extra fat yields a richer mouthfeel that makes the chewiness more indulgent.
Brown sugar is the heart of this cookie. Its molasses content adds moisture, which is why the center stays soft even after cooling. Skipping it for white sugar would give you a crisp, almost shortbread‑like texture, which is not what we’re after. If you’re watching carbs, you can try a coconut‑sugar swap, but expect a slightly different flavor—still delicious, just less caramel‑deep.
Fun Fact: Did you know that maple syrup was once used as a medicine in the 1700s? It was believed to cure everything from coughs to skin ailments, thanks to its natural antioxidants.
The Texture Crew
Granulated sugar adds a hint of crunch to the edges, creating that delicate snap you love. If you omit it, the cookie will be uniformly soft, which can be lovely, but you’ll miss the textural contrast. The maple syrup, at a quarter cup, does double duty: it sweetens and adds that glossy sheen, but more importantly, it keeps the dough supple, preventing it from drying out during the bake.
Eggs act as the binding agent, giving structure while also adding a little richness. Using large eggs as specified ensures the right liquid‑to‑dry ratio; a small egg could make the dough too dry, leading to crumbly results. For a dairy‑free version, replace the butter with coconut oil and the eggs with a flax‑egg mixture, but be prepared for a slightly different texture.
The Unexpected Star
Baking soda and baking powder together create a balanced leavening system. The soda neutralizes the acidity of the maple syrup, while the powder adds a gentle rise that keeps the cookies from becoming flat. If you only use one, you’ll notice a difference: too much soda can cause spreading, too much powder can make them puffy and cake‑like. Keep the measurements exact for that perfect dome.
Salt, though only a half‑teaspoon, is the unsung hero. It amplifies the sweetness and rounds out the flavors, preventing the maple and brown sugar from overwhelming the palate. A pinch more, and you’ll taste the difference immediately—nothing beats that balanced sweet‑salty kiss.
The Final Flourish
All‑purpose flour is the backbone, providing structure without making the cookie tough. Sift it with the leaveners to avoid lumps, and you’ll get a uniform dough that spreads evenly. If you’re craving a nuttier bite, fold in a cup of chopped walnuts or pecans; they add crunch and a buttery undertone that pairs beautifully with maple. Feel free to leave them out for a pure, chewy experience.
Everything's prepped? Good. Let's get into the real action...
The Method — Step by Step
Preheat your oven to 350°F (175°C) and line two baking sheets with parchment paper. The moment the oven warms up, you’ll hear a faint hum that signals the start of something delicious. While the oven does its thing, gather all your ingredients; having everything measured and ready (mise en place) is the secret sauce that keeps you from frantically searching for that missing cup of flour mid‑mix.
Kitchen Hack: Use a kitchen scale for the butter and sugars; it eliminates guesswork and ensures consistent results every time.In a large mixing bowl, cream together the room‑temperature butter, brown sugar, and granulated sugar until the mixture is light, fluffy, and pale yellow—about 3‑4 minutes with an electric mixer on medium speed. You’ll notice the mixture thickening and the scent of caramel starting to emerge; that’s the first sign you’re on the right track.
Add the maple syrup and beat until fully incorporated. The batter will take on a glossy, amber hue that looks like liquid gold. This is the moment of truth: the syrup should blend seamlessly without any streaks, otherwise you’ll get pockets of over‑sweetness.
Crack in the two large eggs one at a time, beating well after each addition. The eggs should emulsify the butter‑sugar‑syrup mixture, giving it a smooth, satin‑like texture. If the dough looks curdled, keep mixing; it will come together within a minute.
In a separate bowl, whisk together the flour, baking soda, baking powder, and salt. This step is crucial: the whisk distributes the leavening agents evenly, preventing any bitter “soda spots” in the finished cookies.
Gradually add the dry ingredients to the wet mixture, stirring on low speed or using a spatula until just combined. Over‑mixing at this stage develops gluten, which leads to tough cookies—so stop as soon as you no longer see flour streaks.
If you’re using nuts, fold them in now. The nuts should be evenly dispersed, not sinking to the bottom; this ensures each bite gets that satisfying crunch.
Watch Out: If the dough feels too sticky, chill it for 10 minutes; too dry, add a splash of milk (about a tablespoon).Scoop the dough onto the prepared sheets using a cookie scoop (about 2 tablespoons per cookie). Space them 2 inches apart; the cookies will spread slightly, and you don’t want them merging into one giant cookie.
Bake for 10‑12 minutes, or until the edges turn a light golden brown and the centers look set but still slightly soft. The scent will fill your kitchen with a sweet, buttery maple perfume that makes you want to peek inside the oven.
Fun Fact: The Maillard reaction, which gives baked goods their brown color and complex flavor, kicks in around 300°F, so even a short bake at 350°F creates that deep caramelization we love.Allow the cookies to cool on the sheet for 5 minutes before transferring them to a wire rack. This short rest lets the cookies finish setting, giving them that perfect chew without breaking apart. That sizzle when it hits the pan? Absolute perfection.
That's it — you did it. But hold on, I've got a few more tricks that'll take this to another level...
Insider Tricks for Flawless Results
The Temperature Rule Nobody Follows
Never bake cookies straight from the fridge unless the recipe specifically says so. Cold dough spreads less, but it also takes longer to set, which can result in uneven baking. Instead, let the dough sit at room temperature for 10‑15 minutes after chilling; this gives the butter a chance to soften just enough to melt evenly, ensuring consistent edges and a uniformly chewy center.
Why Your Nose Knows Best
The moment you smell the cookies turning golden, you’re actually getting a cue that the Maillard reaction is complete. If the scent is still faint after the timer, give them another minute; trust that nose over the clock. This sensory checkpoint saves you from under‑baking (soggy centers) or over‑baking (hard edges).
The 5‑Minute Rest That Changes Everything
After you’ve transferred the cookies to a wire rack, let them rest for exactly five minutes before serving. This short pause allows the interior moisture to redistribute, turning a potentially gummy bite into that perfect, melt‑in‑your‑mouth chew. My friend once skipped this step and claimed the cookies were “too soft”—let’s just say the rest period is non‑negotiable.
Nuts, But Not Too Many
If you love nuts, add them, but keep the volume to a cup. Too many nuts can weigh down the dough, causing the cookies to flatten excessively and lose that airy chew. Toast the nuts lightly before folding them in; this amplifies their flavor and adds a subtle crunch that contrasts beautifully with the soft interior.
The Secret of the Final Flip
When the cookies are halfway done, rotate the baking sheet 180 degrees. This ensures even heat exposure, especially in ovens with hot spots. The result? Uniform browning and that coveted edge‑to‑center color gradient that looks as good as it tastes.
Creative Twists and Variations
This recipe is a playground. Here are some of my favorite ways to switch things up:
Maple Bacon Blitz
Crumble cooked bacon into the batter and add an extra tablespoon of maple syrup. The salty crunch of bacon juxtaposed with the sweet maple creates a breakfast‑in‑a‑cookie experience that will have your brunch guests begging for more.
Chocolate‑Stirred Dream
Melt ½ cup of dark chocolate and swirl it into the dough just before scooping. The chocolate ribbons provide a bitter counterpoint to the sweet maple, making each bite a complex dance of flavors.
Spiced Autumn Twist
Add ½ teaspoon each of cinnamon, nutmeg, and a pinch of clove to the dry ingredients. This spice blend turns the cookies into a cozy, fall‑ready treat that pairs perfectly with a mug of hot apple cider.
Coconut‑Maple Fusion
Replace half the all‑purpose flour with coconut flour and sprinkle toasted coconut flakes on top before baking. The result is a subtly tropical cookie with a chewy core and a lightly toasted exterior.
Gluten‑Free Glory
Swap the all‑purpose flour for a 1:1 gluten‑free blend and add a teaspoon of xanthan gum. The texture remains chewy, and the maple flavor shines just as brightly, proving you don’t need wheat to achieve cookie perfection.
Storing and Bringing It Back to Life
Fridge Storage
Place cooled cookies in an airtight container with a slice of bread tucked in the middle. The bread will release moisture, keeping the cookies soft for up to a week. If you notice any dryness, replace the bread slice with a fresh one.
Freezer Friendly
Arrange cookies in a single layer on a parchment‑lined tray and freeze for 2 hours. Transfer the frozen cookies to a zip‑top bag; they’ll keep for three months. When you’re ready, pop them straight into a 300°F oven for 5 minutes—no thawing needed.
Best Reheating Method
To revive that fresh‑out‑of‑the‑oven chew, microwave a single cookie for 10 seconds with a tiny splash of water (about a teaspoon) placed on a corner of the plate. The steam revives the interior, while the microwave’s quick heat restores that slight crisp on the edges.