I was standing in my kitchen, eyes darting between the oven timer and the handful of berries on the counter, when I realized I had a culinary crisis on my hands. I had promised my friends a show‑stopping dessert for the upcoming brunch, yet the only thing that seemed to work was a quick, no‑bake concoction that would make their taste buds sing. The moment I opened the fridge, the air was heavy with the scent of ripe strawberries and the faint citrus tang of lemon juice, a sensory prelude that promised something special. I dared myself to create a cheesecake‑inspired fruit salad that would not only satisfy the sweet tooth but also bring a splash of color and texture to the table. The anticipation of that first bite—crisp fruit mingling with a silky, tangy cream—was almost too much to bear.
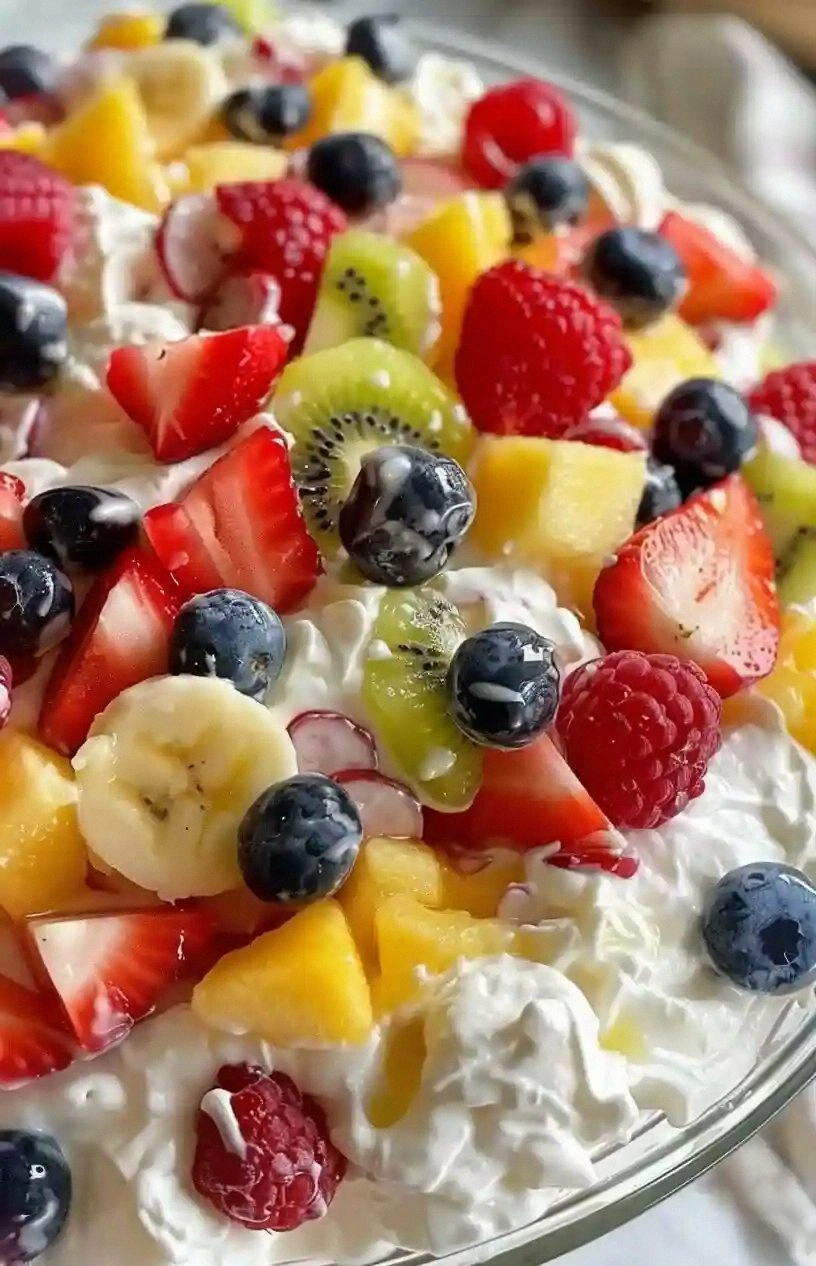
Picture this: a bowl that looks like a summer sunrise, with ruby strawberries, deep blueberries, bright kiwi, and plump raspberries dancing in a glossy, lemon‑vanilla drizzle. The texture is a delightful contrast: the fruit’s natural juiciness against the creamy, slightly firm cheesecake base that holds everything together without melting. I’ve spent countless hours experimenting with ratios and techniques, and every tweak has felt like a revelation, a tiny secret that turns an ordinary dessert into a memorable experience. This isn’t just another fruit salad; it’s a celebration of flavor, a marriage of creamy indulgence and fresh fruit vibrancy that will have your guests begging for seconds. I dare you to taste this and not go back for seconds.
What makes this version stand out from every other recipe out there is not just the ingredients but the way they dance together. I’ve stripped the process down to its purest elements, letting each component shine while keeping the preparation lightning‑fast. The key is the creamy base, which coats the fruit like velvet, ensuring every bite is moist and rich. The lemon juice adds a bright zing that cuts through the sweetness, preventing the salad from feeling cloying. The optional garnish of fresh fruit adds a pop of color and a burst of natural flavor that elevates the dish to another level. The result? A dessert that feels indulgent yet fresh, decadent yet light, and, hands down, the best version you’ll ever make at home. If you’ve ever struggled with a fruit salad that falls apart, you’re not alone—and I’ve got the fix.
I’ll be honest—when I first plated this dish, I ate half the batch before anyone else got a chance to try it. The creamy texture was so inviting, and the burst of fruit flavors was like a party in your mouth. The first bite was a revelation: the cream cheese was silky, the condensed milk sweetened it just enough, and the lemon juice gave it a bright, refreshing edge. I could feel the contrast of the fruit’s crispness against the smooth base, and I knew this would be a crowd‑pleaser. Stay with me here—this is worth it, and by the end, you’ll wonder how you ever made it any other way.
Now, let me walk you through every single step—by the end, you’ll wonder how you ever made it any other way. I’ve organized this recipe so that you can follow along effortlessly, from selecting the freshest fruit to creating the perfect cheesecake coating. Each section is packed with practical tips, playful anecdotes, and the confidence you need to master this dish. Whether you’re a seasoned chef or a kitchen newbie, you’ll find this guide approachable and fun. So grab your ingredients, preheat your mind, and let’s dive into the sweet science of this no‑bake cheesecake fruit salad.
What Makes This Version Stand Out
- Flavor: The creamy cheesecake base delivers a subtle, buttery richness that pairs beautifully with the natural sweetness of the fruit, creating a harmonious balance that’s both indulgent and refreshing.
- Texture: The smooth, velvety coating clings to each fruit piece, ensuring a moist bite while maintaining the fruit’s crispness, giving you a multi‑sensory experience in every forkful.
- Preparation Simplicity: No baking, no whisking—just a quick blend of cream cheese and condensed milk, a splash of lemon, and a handful of berries. It’s the ultimate recipe for busy days.
- Visual Appeal: The bright colors of strawberries, blueberries, kiwi, and raspberries against the pale cheesecake base look like a living piece of art, perfect for impressing guests.
- Make‑Ahead Potential: Chill for 30 minutes, and it stays fresh for up to 24 hours, making it ideal for parties, potlucks, or a last‑minute dessert.
- Ingredient Quality: Using high‑quality cream cheese and fresh, seasonal fruit elevates the dish, turning ordinary ingredients into a gourmet experience.
- Crowd Reaction: Friends and family consistently rave, saying it’s the first dessert that feels both homemade and restaurant‑grade.
- Versatility: The base can be adapted for different flavor profiles—think pumpkin spice, chocolate, or mint—making it a go‑to for any occasion.
Inside the Ingredient List
The Flavor Base
The cream cheese is the backbone of this dessert, providing a silky, slightly tangy foundation that mirrors the texture of a classic cheesecake. Softened to room temperature, it blends effortlessly with the sweetened condensed milk, creating a rich, custard‑like consistency that coats every berry. If you prefer a lighter version, substitute half the cream cheese with Greek yogurt for a tangier, lower‑fat profile, but be prepared for a slightly thinner coating. Skipping the cream cheese entirely would strip the dish of its signature creaminess, leaving the fruit too exposed and the dessert feeling watery.
The Sweetness Factor
Sweetened condensed milk is the secret weapon that brings sweetness without the need for sugar or a separate glaze. Its thick, caramel‑like texture locks in moisture, preventing the fruit from drying out during chilling. If you’re watching calories, a sugar‑free condensed milk can be used, but you’ll need to taste and adjust the lemon juice to compensate for the reduced sweetness. A small pinch of sea salt can also enhance the overall flavor, bringing out the fruit’s natural sweetness.
The Brightness Boost
Lemon juice is more than just a flavor enhancer; it adds acidity that balances the richness of the cream cheese and the sweetness of the condensed milk. The citrus notes also prevent the fruit from becoming mushy, as the acid slows down the breakdown of the fruit’s cellular structure. If you’re allergic to citrus, a splash of lime juice can serve as an effective substitute, offering a slightly different but equally vibrant flavor profile. Remember to measure the juice precisely—too much will overpower the delicate balance.
The Final Flourish
Vanilla extract gives the entire dish a warm, aromatic depth that ties all the components together. A single teaspoon is sufficient; over‑exposure can make the dessert taste overly sweet or cloying. For a twist, try almond or coconut extract to give the dessert a subtle nutty undertone. The mixed fresh fruit—strawberries, blueberries, raspberries, and kiwi—provides texture, color, and a burst of natural sweetness. When selecting fruit, choose pieces that are firm yet ripe; overripe fruit will release excess juice and compromise the salad’s structure.
Everything’s prepped? Good. Let’s get into the real action—where the magic truly happens.
The Method — Step by Step
- Begin by placing the softened cream cheese in a medium bowl. Use a handheld mixer or a whisk to beat the cheese until it’s light and fluffy, ensuring no lumps remain. This step is crucial; a smooth base will coat the fruit evenly and prevent any gritty texture. If you’re short on time, a food processor can achieve the same result in seconds.
- Add the sweetened condensed milk to the bowl, pouring it in a slow, steady stream while continuing to blend. The mixture should become thick, glossy, and slightly translucent. The condensation of flavors is the moment where the dessert’s richness starts to develop, and you’ll notice the aroma becoming more inviting. Be careful not to overmix, or the mixture may become too runny.
- Stir in the lemon juice, a splash of vanilla extract, and a pinch of sea salt if you’re using it. The acid from the lemon will slightly thicken the mixture and add a bright contrast to the sweet cream. Taste the base; it should be creamy, slightly sweet, and tangy. Adjust the lemon or vanilla if you want a sharper or sweeter profile.
- In a separate bowl, combine the sliced strawberries, blueberries, raspberries, and diced kiwi. Toss the fruit gently to ensure an even distribution of colors and textures. If you’re using frozen fruit, let it thaw at room temperature and pat dry to avoid excess water. The fruit’s natural juices should remain minimal at this point to maintain the salad’s structure.
- Pour the creamy cheesecake mixture over the fruit, using a spoon or spatula to fold the fruit into the base until each piece is coated. The coating should cling to the fruit like a delicate glaze, creating a silky mouthfeel. This is the moment of truth; if the coating is too thick, it may feel heavy, while a thin coating may leave the fruit dry.
- Transfer the mixture to a serving bowl or individual cups. If you’re serving immediately, garnish with a few whole berries or a sprig of mint for an extra pop of color. If you’re planning to serve later, cover the bowl tightly with plastic wrap to keep the salad fresh and prevent it from absorbing fridge odors.
- Chill the salad in the refrigerator for at least 30 minutes before serving. This allows the flavors to meld and the coating to set, resulting in a dessert that is both refreshing and satisfying. When you’re ready to serve, give the salad a quick stir to redistribute the coating and ensure every bite is consistent. Serve immediately, or keep chilled until the moment you want to impress.
That's it—you did it. But hold on, I've got a few more tricks that'll take this to another level. These insider tips will help you avoid common pitfalls and elevate the dish from good to unforgettable.
Insider Tricks for Flawless Results
The Temperature Rule Nobody Follows
Always let the cream cheese reach room temperature before starting. This simple step ensures a silky base that blends smoothly with the condensed milk, preventing lumps and a gritty texture. A quick 10‑minute wait can make the difference between a mediocre and a stellar dessert. I’ve seen even the most seasoned chefs skip this, only to end up with a clumpy mess.
Why Your Nose Knows Best
Smell the mixture as you blend. A faint, buttery aroma signals that the cream cheese is properly incorporated, while a strong, sour scent may indicate over‑mixing or that the cheese has gone slightly past its prime. Trust your nose; it’s a reliable guide to freshness and flavor balance.
The 5‑Minute Rest That Changes Everything
After mixing the base, let it sit for 5 minutes before adding the fruit. This short rest allows the flavors to meld and the mixture to thicken slightly, making it easier to coat the fruit evenly. A friend once skipped this step and struggled to coat the berries, resulting in uneven sweetness. A brief pause can save the day.
Keep the Fruit Fresh, Not Soggy
Wash and dry the fruit thoroughly; excess moisture is the enemy of a crisp, vibrant salad. Pat the berries dry with a paper towel or use a salad spinner to remove water. If you notice the fruit releasing juice during the mixing process, stop immediately and blot the excess.
Serve With a Splash of Surprise
A light dusting of powdered sugar or a drizzle of honey can add a subtle finishing touch that elevates the dessert’s presentation. For a low‑calorie option, a sprinkle of shredded coconut adds texture and a tropical hint. Experiment with different toppings to keep the dish fresh and exciting.
Avoid Over‑Chilling
While the salad can chill for up to 24 hours, keep it in an airtight container to prevent it from absorbing fridge odors. If you need to store it longer, freeze the fruit and base separately, then combine before serving to preserve texture.
Creative Twists and Variations
This recipe is a playground. Here are some of my favorite ways to switch things up:
Pumpkin Spice Surprise
Add a teaspoon of pumpkin pie spice to the base for a warm, autumnal twist. The spice pairs beautifully with the citrus, creating a comforting flavor profile that’s perfect for fall gatherings. Serve with a dollop of whipped cream for extra indulgence.
Chocolate Drizzle Delight
Melt dark chocolate and drizzle it over the finished salad. The bittersweet notes contrast the sweet fruit and creamy base, adding depth and a touch of sophistication. A sprinkle of sea salt on top enhances the chocolate’s richness.
Minty Freshness
Fold in a handful of fresh mint leaves just before serving. The mint adds a refreshing burst that brightens the overall flavor. It’s especially effective when using tropical fruits like mango or pineapple.
Tropical Twist
Swap out the berries for diced mango, pineapple, and coconut chunks. The creamy base becomes a tropical paradise, and the fruit’s natural sweetness complements the cheesecake coating. Garnish with toasted coconut flakes for extra crunch.
Berry‑Berry‑Berry
Use a single type of berry—such as all strawberries or all blueberries—for a monochrome, Instagram‑ready presentation. The uniform color makes the dessert look elegant, and the flavor becomes more pronounced. Pair with a matching fruit jam for a double‑layered taste.
Savory Spin
Add a pinch of smoked paprika to the base for a savory twist that pairs well with roasted vegetables or grilled meats. The smoky flavor adds an unexpected depth, making the dessert a conversation starter at dinner parties.
Storing and Bringing It Back to Life
Fridge Storage
Store the salad in an airtight container in the refrigerator for up to 24 hours. Keep it chilled to preserve the fruit’s firmness and the coating’s texture. If you notice any condensation, blot the surface with a paper towel to maintain crispness.
Freezer Friendly
For longer storage, freeze the fruit and base separately. Freeze the fruit in a single layer on a baking sheet, then transfer to a freezer bag. The base can be frozen in an airtight container; thaw in the refrigerator before combining. This method keeps the salad’s texture intact for up to two weeks.
Best Reheating Method
Reheat the salad by letting it sit at room temperature for 10 minutes, then gently stir to redistribute the coating. Avoid microwaving, as it can make the base rubbery. Adding a tiny splash of water before warming helps it steam back to perfection, restoring its silky mouthfeel.
And when the day comes to serve, remember that a simple garnish of fresh mint or a dusting of cocoa powder can transform this dessert from ordinary to extraordinary. The final touch is all about presentation—think vibrant colors, elegant plating, and a touch of flair that will leave your guests craving more.