Introduction
Picture this: I was in a rush to finish a dessert for a surprise dinner party, and the kitchen looked like a flour‑filled battlefield. I had just whisked a batch of cookie dough that turned out soggy, chewy, and downright disappointing. I stared at the oven, feeling the heat like a guilty conscience. The guests were already arriving, and I had to salvage something that would still wow them. So I pulled a recipe from a dusty cookbook, flipped through a few pages, and decided to give my vanilla wafer cookies a makeover.
From that moment, the kitchen smelled of butter melting and sugar caramelizing, a sweet promise that something delicious was on its way. The sound of the timer ticking felt like a metronome, keeping pace with my heartbeats. The dough, silky and buttery, slid off the spoon with a satisfying glide, like a smooth jazz solo. When I first tasted a bite, the crisp edges shattered like thin ice, revealing a light, airy center that melted in my mouth. I could taste the vanilla whispering like a secret, filling the air with an almost nostalgic comfort.
This version isn't just another cookie; it's a revelation. The secret lies in the delicate balance of flour and butter, the precise timing of the bake, and a touch of milk that locks in the crispness. Unlike other recipes that leave you with a dense, cake‑like texture, these wafers crackle with a satisfying snap that echoes through the kitchen. The result is a cookie that feels like a wafer, yet boasts the richness of a classic shortbread. Every bite delivers a burst of buttery sweetness followed by a lingering vanilla echo that keeps you craving more. I dare you to taste this and not go back for seconds.
Now, the trick that makes all the difference is a subtle, almost invisible technique: using a silicone mat to roll the dough and a specific baking sheet that promotes even heat distribution. This simple tweak turns a good cookie into a masterpiece that will have your guests asking for the recipe. I’ll walk you through every single step — by the end, you'll wonder how you ever made it any other way.
What Makes This Version Stand Out
- Flavor Profile: This recipe delivers a pure vanilla experience with a buttery undertone that lingers. The sweetness is balanced, never overpowering, making it perfect for both kids and adults. The subtle hint of vanilla is amplified by the quality of the extract, giving each cookie a fragrant finish.
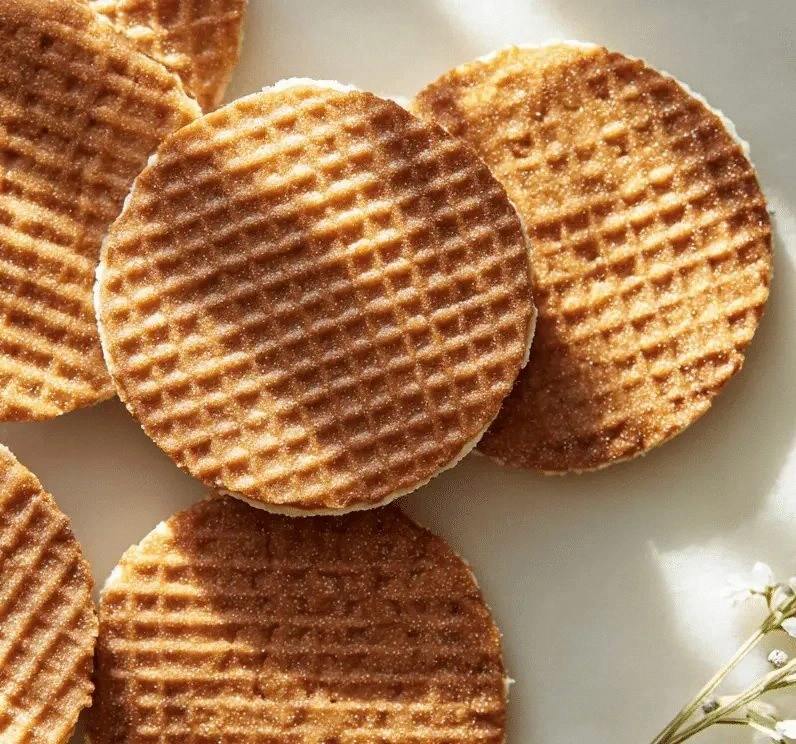
- Texture: The cookies are thin, crisp, and wafer‑like, with a delicate crunch that gives way to a soft, almost melt‑in‑your‑mouth center. The result feels like a light, airy cloud that satisfies your craving for something crunchy. The edges snap like fresh‑baked wafer, adding a playful element to every bite.
- Simplicity: With only seven ingredients, the recipe is straightforward and beginner‑friendly. No fancy tools or obscure ingredients are needed, just a trusty whisk and a baking sheet. The process is streamlined, allowing you to focus on the flavor rather than the technique.
- Crowd Reaction: At parties, these cookies become a conversation starter. Guests line up for a second bite, and the aroma of vanilla wafts through the room. The cookies create a sense of shared delight and anticipation.
- Ingredient Quality: The recipe emphasizes using high‑quality butter and fresh vanilla, ensuring each cookie is packed with flavor. Even the smallest detail matters, from the type of flour to the exact temperature of the oven.
- Make‑Ahead Potential: You can bake the cookies in advance and store them in an airtight container for up to a week, and they remain crisp. The cookies even reheat beautifully in a toaster. This makes them ideal for busy schedules or last‑minute gatherings.
Alright, let's break down exactly what goes into this masterpiece...
Inside the Ingredient List
The Flavor Base
All-Purpose Flour: This forms the structure of the cookie, providing the necessary gluten for a light yet firm bite. Using a slightly lower protein flour keeps the cookies tender. Skipping flour will result in a sticky mess that won’t hold its shape.
Granulated Sugar: Sugar caramelizes during baking, creating the golden edges and sweet depth. A touch of brown sugar could add a hint of molasses, but it would change the crispness. If you omit sugar, the cookies will lack the signature sweet snap.
Unsalted Butter: Butter is the heart of the cookie, delivering richness and a buttery aroma. Choosing room‑temperature butter ensures it blends smoothly with sugar. Using salted butter will alter the flavor profile, making it taste saltier.
Vanilla Extract: Vanilla is the soul of these wafers, providing a fragrant undertone that lingers. Fresh vanilla beans would elevate the flavor further, but extract is more accessible. If you skip vanilla, the cookies will taste flat and uninspired.
The Texture Crew
Baking Powder: This leavening agent creates tiny air pockets, making the cookies airy and preventing them from becoming too dense. Without baking powder, the cookies will be heavy and less crisp. A pinch of baking soda can also work if you prefer a slightly different texture.
Milk: A splash of milk binds the dough and helps achieve the perfect thickness. Milk adds moisture that keeps the cookies from drying out too quickly. If you use a non‑dairy milk, the cookies will still turn out crisp, but the flavor may shift slightly.
Egg White (Optional): Adding an egg white enhances structure and gives the cookies a slightly glossy finish. It also helps the dough hold together better during rolling. If you skip the egg white, the cookies will still be delicious but may not rise as evenly.
The Unexpected Star
Salt: A pinch of salt balances the sweetness and brings out the vanilla’s depth. Salt also strengthens the dough’s structure, giving the cookies a more satisfying bite. Omitting salt will leave the cookies tasting overly sweet.
Everything's prepped? Good. Let's get into the real action...
The Method — Step by Step
- Preheat your oven to 350°F (175°C) and line a rimmed baking sheet with parchment paper. The parchment prevents sticking and ensures even browning. While the oven warms, gather all your ingredients so you can move through the steps smoothly. This preparation step is crucial for a flawless workflow. Once the oven reaches the set temperature, you’re ready to start.
- In a medium mixing bowl, combine softened butter and granulated sugar. Use a hand mixer or a sturdy whisk to blend until the mixture becomes light, fluffy, and pale. This aeration incorporates air, which will help the cookies rise slightly. Keep mixing until the texture resembles a creamy frosting. The visual cue is a smooth, pale mixture with no grainy sugar.
- Add the vanilla extract and optional egg white to the butter‑sugar blend. Stir gently until fully incorporated, ensuring the vanilla’s aroma fills the kitchen. The egg white will give the dough a slightly glossy sheen and extra lift. If you choose to omit the egg white, the cookies will still be tender but slightly less airy. Taste the mixture; it should have a subtle vanilla scent.
- In a separate bowl, whisk together all-purpose flour, baking powder, and a pinch of salt. This dry blend ensures even distribution of leavening agents throughout the dough. The flour’s protein content is key to achieving the wafer-like texture. Be careful not to over‑mix the dry ingredients, as that can develop gluten and make the cookies tough.
- Gradually fold the dry mixture into the wet batter, adding milk a tablespoon at a time. The dough should come together in a soft, pliable ball that doesn’t stick to your hands. If it feels too dry, add a splash of milk; if too sticky, sprinkle a little more flour. A rubber spatula works best for folding, preserving the airy structure. Once the dough is cohesive, transfer it to a lightly floured surface.
- Roll the dough to about 1/2‑inch thickness, ensuring an even spread. The thickness is critical; too thick and the cookies won’t crisp, too thin and they’ll tear. Lightly flour the rolling pin and surface to maintain uniformity. The dough should feel slightly tacky but not sticky. This step sets the foundation for the final texture.
- Cut the rolled dough into 1‑inch squares using a sharp knife or a cookie cutter. The uniform size ensures even baking and a consistent bite. Keep the pieces spaced 2 inches apart on the prepared sheet; this spacing allows the edges to crisp without merging. The squares should look like miniature wafers, ready for baking.
- Place the cookie squares on the baking sheet and bake for 12–15 minutes, or until the edges turn a light golden brown and the centers are set. Keep a close eye on the cookies; they can go from perfect to over‑baked quickly. The first sign of doneness is a faint aroma of toasted butter and sugar. The cookies should feel firm yet still slightly springy when gently pressed.
- Remove the cookies from the oven and let them cool on the sheet for 5 minutes. This short rest allows the cookies to set and prevents them from breaking when transferred. After the brief cooling period, move the cookies to a wire rack to finish cooling completely. The cooling process ensures the edges remain crisp. Once cooled, the cookies are ready to serve or store.
That's it — you did it. But hold on, I've got a few more tricks that'll take this to another level...
Insider Tricks for Flawless Results
The Temperature Rule Nobody Follows
Most bakers instinctively set their oven to a high temperature, but a moderate 350°F (175°C) is the sweet spot for these wafers. This temperature ensures the butter melts evenly without burning the sugar. It also allows the cookies to develop a crisp exterior while maintaining a tender interior. If you’re using a convection oven, lower the temperature by 25°F to avoid over‑browning. Consistency in oven temperature is key to repeatable results.
Why Your Nose Knows Best
Before you even lift the cookies from the oven, trust the aroma. A warm, buttery scent is the first indicator of success. If the smell feels flat, give them an extra minute; if it’s too strong, pull them out immediately. The nose can detect subtle differences in browning that the eyes miss. This sensory cue saves you from over‑baking or under‑baking.
The 5‑Minute Rest That Changes Everything
Allowing the cookies to rest on the baking sheet for exactly five minutes before transferring to a rack is a game‑changer. During this rest, the cookies finish setting, and the edges firm up. This brief pause also prevents the cookies from cracking when they hit the cooler air. Skipping this step often leads to fragile wafers that break on the plate.
Keep Them Crisp with Bread
Place a slice of white bread in the airtight container with your cooled cookies. The bread absorbs excess moisture, keeping the cookies crisp for longer. Replace the bread after a day or two if it becomes damp. This simple trick is a secret used by professional bakers to extend shelf life.
Use a Silicone Mat for Rolling
A silicone mat not only prevents sticking but also gives you a smooth surface to roll the dough evenly. The non‑stick nature of the mat means you can roll the dough to the exact thickness you desire without it tearing. It also cleans up easily, saving you time after baking. This small investment pays off in every batch.
Creative Twists and Variations
This recipe is a playground. Here are some of my favorite ways to switch things up:
Chocolate‑Infused Wafer
Swap half the butter for melted dark chocolate and add a tablespoon of cocoa powder to the dry mix. The chocolate will give the cookies a deep, bittersweet finish, while the vanilla still shines through. These are perfect for a chocolate lover’s dessert table.
Salted Caramel Delight
Drizzle a thin line of caramel sauce over the cooled cookies and sprinkle with sea salt. The caramel adds a sweet‑salty contrast that elevates the vanilla base. This variation is great for holiday gift baskets.
Herbal Vanilla Twist
Add a pinch of dried lavender or a few drops of lemon zest to the batter. The floral or citrus notes will complement the vanilla and give the cookies a refreshing lift. These are ideal for spring gatherings or brunches.
Nutty Crunch
Fold in finely chopped pistachios or hazelnuts into the dough before baking. The nuts add a satisfying crunch and a nutty aroma that pairs beautifully with the buttery flavor. Serve them alongside a glass of milk for a classic treat.
Low‑Sugar Version
Replace half the granulated sugar with coconut sugar or a sugar substitute that measures the same. The cookies will still crisp but with a lower glycemic impact. This option is great for those watching their sugar intake.
Storing and Bringing It Back to Life
Fridge Storage
Place the cooled cookies in an airtight container and store them in the refrigerator for up to three days. The cool environment preserves the crispness and prevents the cookies from becoming stale. When you’re ready to serve, let them sit at room temperature for 10 minutes to soften slightly.
Freezer Friendly
Arrange the cookies on a parchment‑lined tray and freeze them for up to two months. Once frozen, transfer them to a freezer bag to avoid freezer burn. Thaw at room temperature or warm them in a 300°F oven for five minutes to restore the crunch.
Best Reheating Method
To revive frozen or stale cookies, preheat your oven to 300°F (150°C) and bake for 3–5 minutes. The gentle heat restores the crisp edges while keeping the interior soft. Alternatively, microwave on low power for 10–15 seconds, but this may soften the texture slightly.