It all started with a brutally burnt crepe that tasted like a frisbee in a desert. I stared at the charred mess, muttering how I could never get that thin‑and‑crispy vibe right, and then my roommate dared me: “Make something with just ONE ingredient and still taste amazing.” I laughed, grabbed a sack of chickpea flour, added water, and the rest is a love story you’ll want to taste. The kitchen was filled with the faint smell of roasted nuts, the stovetop sang a sizzle‑song, and my curiosity turned into a full‑blown obsession.
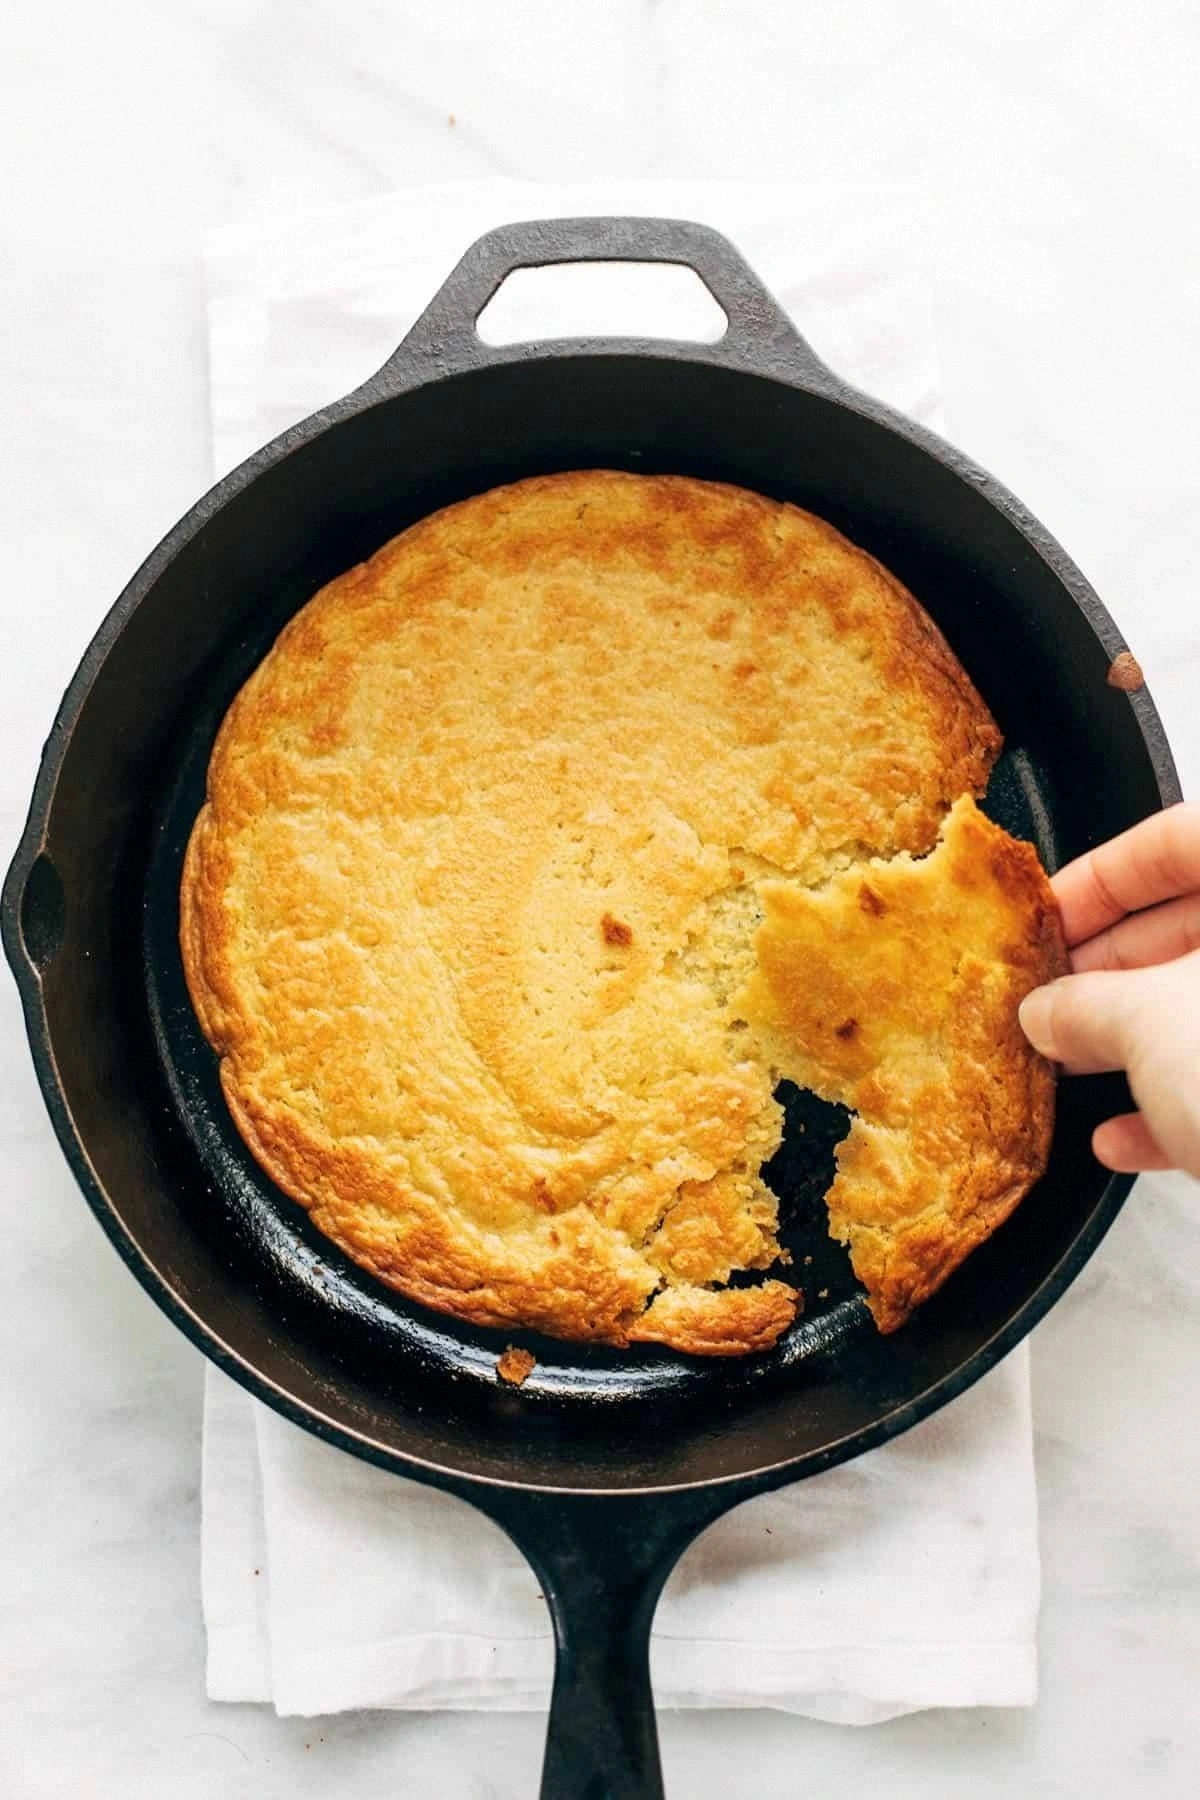
Picture this: a golden‑brown, speckled pancake the size of a dinner plate, the edges crisped to a delicate shatter that gives way to a tender, almost buttery interior. The aroma hits you like a warm hug from a French‑kissed café on the Riviera, while the first bite delivers a subtle nuttiness that dances with a whisper of salt. The texture? Think of a perfect tortilla that’s airy yet sturdy enough to hold a smear of olive oil without disintegrating. I swear, I could hear it whisper, “Come back for seconds.”
Why does this version stand out from the sea of Socca recipes littering the internet? Most of them overcomplicate things with fancy toppings, exotic spices, or a laundry list of ingredients that turn a simple snack into a kitchen marathon. I stripped it down to the bare essentials, letting the chickpea flour shine like a lead vocalist on stage. The result is a crisp‑edge, melt‑in‑your‑mouth wonder that’s unbelievably easy, requiring almost no prep time. The secret? A blistering hot cast‑iron pan and a dash of intuition that you’ll pick up after the first try.
And here’s the kicker: I’m going to reveal a technique that most cooks overlook—a brief “rest” for the batter that unlocks a deeper flavor and a more uniform rise. It’s the kind of hack that feels like cheating, yet it’s 100 % legit. Trust me, if you’ve ever struggled with a soggy middle, you’re about to have your mind blown.
Let me walk you through every single step — by the end, you’ll wonder how you ever made it any other way.
What Makes This Version Stand Out
- Flavor: The chickpea flour’s natural nuttiness is amplified by the high heat, creating a caramelized crust that’s pure bliss.
- Texture: A contrast of crisp edges and a soft, slightly airy center that shatters like thin ice under your fork.
- Simplicity: One core ingredient (plus water, salt, and oil) means you can throw together a snack in under 30 minutes.
- Uniqueness: Most recipes add herbs or spices; this version lets the flour speak for itself, delivering a pure, authentic taste.
- Crowd Reaction: Expect gasps, requests for seconds, and the inevitable “What’s in this?” question that you’ll get to answer with a smug grin.
- Ingredient Quality: Using freshly milled, high‑protein chickpea flour makes all the difference; cheap brands leave you with a gummy mess.
- Cooking Method: A screaming‑hot cast‑iron pan gives you restaurant‑grade sear without the pricey equipment.
- Make‑Ahead Potential: You can prep the batter the night before, letting it rest for deeper flavor and a smoother texture.
Inside the Ingredient List
The Flavor Base
At the heart of this socca is chickpea flour, a gluten‑free powerhouse that packs a buttery, nutty flavor. When exposed to high heat, the sugars in the flour undergo the Maillard reaction, gifting you that irresistible golden crust. Skipping this ingredient or swapping it for regular flour yields a completely different texture—more like a pancake than a true socca. If you can’t find chickpea flour, sifted gram flour is a solid alternative, but expect a slightly denser bite.
The Texture Crew
Water is the silent sidekick that turns dry powder into a pourable batter. The ratio of water to flour determines how airy the final product will be; too little and you get a tough, rubbery slab, too much and it becomes a soupy mess that can’t hold its shape. I recommend lukewarm water, as it helps the flour dissolve evenly. For a little extra silkiness, you can replace a quarter of the water with sparkling water—yes, the bubbles help lighten the batter.
The Unexpected Star
Salt isn’t just a seasoning; it accentuates the natural nuttiness of the chickpea flour, pulling out flavors you didn’t even know were there. A pinch too much will dominate, but a precise teaspoon for four servings ensures balanced seasoning. If you’re watching sodium, a dash of sea salt works just as well, and you can sprinkle a pinch of flaky salt on top right before serving for crunch.
The Final Flourish
Olive oil serves two purposes: it prevents sticking in the pan and adds a fragrant Mediterranean note that pairs perfectly with the chickpea flavor. Use a high‑smoke‑point oil (like light olive oil or grapeseed) for the pan, saving a drizzle of extra‑virgin olive oil for drizzling after cooking. Skipping oil will result in a sticky disaster that tears the socca when you try to flip it.
Everything's prepped? Good. Let's get into the real action...
The Method — Step by Step
Gather a sturdy cast‑iron skillet (or a heavy‑bottomed steel pan) and place it on the stove over medium‑high heat. Let the pan heat for at least 5 minutes until it’s smoking hot—this is where the magic begins. The sizzling sound when you splash a few drops of water on the surface should be like a tiny fireworks show; if it just sizzles weakly, crank the heat up a notch.
Kitchen Hack: Pre‑heat the pan with a thin coat of oil, then wipe it clean with a paper towel. This creates a semi‑non‑stick surface without excess oil, ensuring the socca lifts cleanly.While the pan heats, whisk together 2 cups of chickpea flour, 1 tsp salt, and 2 cups lukewarm water in a large bowl. Use a whisk to avoid lumps; the batter should be the consistency of heavy cream—smooth, pourable, and without any grainy pockets. Let the mixture rest uncovered for 30 minutes, allowing the flour to fully hydrate. I dare you to taste this and not go back for seconds after the first bite.
After the resting period, give the batter a quick whisk and check its thickness. It should flow slowly, coating the back of a spoon but not pooling like pancake batter. If it feels too thick, thin it with a splash of sparkling water; if too runny, add a tablespoon of flour. This adjustment is crucial—too thick and you’ll get a dense brick, too thin and it becomes a soggy pancake.
Prepare your oil station: pour a tablespoon of light olive oil onto a small heat‑proof dish. Using a silicone brush, lightly oil the hot pan—just enough to glisten, not to pool. The oil will sizzle immediately; that’s the sound of a crispy edge forming. This next part? Pure magic.
Pour a ladleful (about ¼ cup) of batter into the center of the pan, then swirl the pan in a circular motion to spread the batter thinly across the surface, aiming for a 10‑inch diameter. The batter should hiss as it meets the pan, forming tiny bubbles that rise to the surface—those are your clues that the heat is spot on.
Let the socca cook undisturbed for 2‑3 minutes. You’ll notice the edges turning golden and pulling away from the pan, while the center becomes opaque. That sizzle when it hits the pan? Absolute perfection. Resist the urge to poke or flip; the crust needs time to set fully before it releases.
Watch Out: If you flip too early, the socca will tear and lose its delicate crispness. Trust the visual cues—edges should be deep golden and slightly curled.When the edges are crisp and the surface looks dry, slide a thin metal spatula under the socca and carefully flip it over. Cook the second side for another 1‑2 minutes, just enough to seal the bottom and create a uniform golden tone. This side won’t brown as dramatically, but you’ll hear a faint crackle as the steam escapes—listen for it.
Remove the socca from the pan and place it on a cooling rack for a minute. Drizzle a whisper of extra‑virgin olive oil over the top, sprinkle a pinch of flaky sea salt if you like, and serve immediately. The aroma at this stage is intoxicating, like walking out of a Provençal market with sun‑kissed vegetables in a basket.
If you’re making a batch, repeat steps 4‑8, adjusting the heat if the pan starts smoking excessively. Keep the finished pieces warm in an oven set to 200 °F (90 °C) while you finish the rest. This keeps the texture crisp yet pliable, ready for that final bite.
That’s it — you did it. But hold on, I’ve got a few more tricks that'll take this to another level, like topping with caramelized onions, fresh herbs, or a smear of labneh. Stay with me here — this is worth it.
Insider Tricks for Flawless Results
The Temperature Rule Nobody Follows
Most home cooks set the burner to “medium” and hope for the best. The truth is, the pan must be screaming hot—around 450 °F (230 °C). If you have an infrared thermometer, use it. If not, sprinkle a few drops of water; they should dance and evaporate instantly. This high heat creates that signature blistered surface that defines a perfect socca.
Why Your Nose Knows Best
Never rely on a timer alone; trust the scent. When the batter begins to release a nutty, toasted aroma, you’re within a minute of perfect doneness. If you smell a faint burnt note, pull it out ASAP—overcooking turns a delicate crisp into a bitter chip.
The 5‑Minute Rest That Changes Everything
After whisking, let the batter sit for at least five minutes, preferably thirty. This rest allows the flour to fully hydrate, eliminating gritty texture and improving the rise. I once skipped this step and ended up with a dense, pancake‑like result that made my guests sigh in disappointment.
Oil Distribution Mastery
Instead of dumping a generous glug of oil, use a brush to coat the pan in a whisper of oil. Too much oil makes the socca greasy; too little causes sticking. The brush method ensures an even, ultra‑thin film that yields a flawless release.
Cooling Rack Rescue
As soon as you lift the socca from the pan, place it on a cooling rack, not a plate. The airflow prevents steam from softening the crust, preserving that coveted crunch. If you stack them on a plate, the bottom piece gets soggy—a fate no socca deserves.
Creative Twists and Variations
This recipe is a playground. Here are some of my favorite ways to switch things up:
Rosemary & Garlic Infusion
Stir in a teaspoon of minced fresh rosemary and a clove of finely grated garlic into the batter before resting. The herbaceous aroma adds a Mediterranean flair, perfect for serving alongside a glass of crisp white wine.
Spicy Harissa Drizzle
After cooking, drizzle a thin line of harissa mixed with a splash of olive oil. The heat from the sauce complements the nutty base, delivering a bold, tongue‑tingling experience for those who love a kick.
Sweet Cinnamon Sugar
For a dessert twist, sprinkle a mix of cinnamon and sugar over the hot socca, then finish with a dusting of powdered sugar. The caramelized edges become a sweet, crunchy treat that pairs beautifully with a dollop of mascarpone.
Cheese‑Lover’s Melt
Scatter grated Gruyère or sharp cheddar over the batter just before flipping. The cheese melts into a gooey blanket, creating a cheesy crust that’s impossible to resist.
Veggie‑Loaded Stack
Layer roasted bell peppers, thinly sliced zucchini, and a smear of hummus between two socca discs. This creates a vibrant, protein‑packed mini‑sandwich that’s perfect for lunch or a light dinner.
Herb‑Infused Oil Finish
Finish each piece with a drizzle of oil infused with thyme, oregano, and a hint of lemon zest. The bright citrus lifts the earthiness of the chickpea flour, delivering a fresh palate cleanser with every bite.
Storing and Bringing It Back to Life
Fridge Storage
Allow the socca to cool completely, then place them in an airtight container lined with a paper towel to absorb excess moisture. They’ll stay fresh for up to three days in the refrigerator. When you’re ready to eat, reheat in a hot skillet for a minute per side to revive the crispness.
Freezer Friendly
Wrap each socca individually in parchment paper, then seal them in a zip‑top bag. Freeze for up to one month. To reheat, skip the thawing step—directly pop them into a preheated 375 °F oven for 5‑7 minutes, or pan‑fry for a quicker crunch revival.
Best Reheating Method
For the ultimate crunch, use a dry cast‑iron skillet over medium heat. Add a tiny splash (about a teaspoon) of water to the pan before laying the socca in; the steam instantly revives the interior while the bottom crisps up again. Flip once, and you’ve got a fresh‑out‑of‑the‑oven experience.