I still remember the morning I ruined a perfectly good batch of cinnamon rolls by trying to rush the dough rise. The kitchen smelled like disappointment and burnt sugar, and I stood there in my flour-dusted pajamas wondering if I'd ever master the art of breakfast pastry. Fast forward through three failed attempts, a grocery store emergency run, and one very patient neighbor who taste-tested my disasters, and I finally cracked the code. But here's the twist — instead of the traditional raisin filling that makes half the population gag, I swapped in jewel-like raspberries that burst into pockets of tart jam, and I crowned the whole thing with a lemon glaze so bright it practically sings. The result? A cinnamon roll that made my notoriously picky brother text me at 6 AM demanding the recipe. If you've ever bitten into a dry, bready roll that tastes like disappointment with a side of regret, this recipe will restore your faith in breakfast magic. Picture this: soft, pillowy dough wrapped around a ruby-red filling that tastes like summer sunshine, all topped with a glaze that balances sweetness with a citrus punch that makes your taste buds do a happy dance. The best part? You don't need a culinary degree or fancy equipment — just a willingness to get a little flour on your face and maybe eat half the batch before anyone else wakes up. Trust me, I've been there, and I have zero regrets. Let me walk you through every single step — by the end, you'll wonder how you ever made it any other way.
What Makes This Version Stand Out
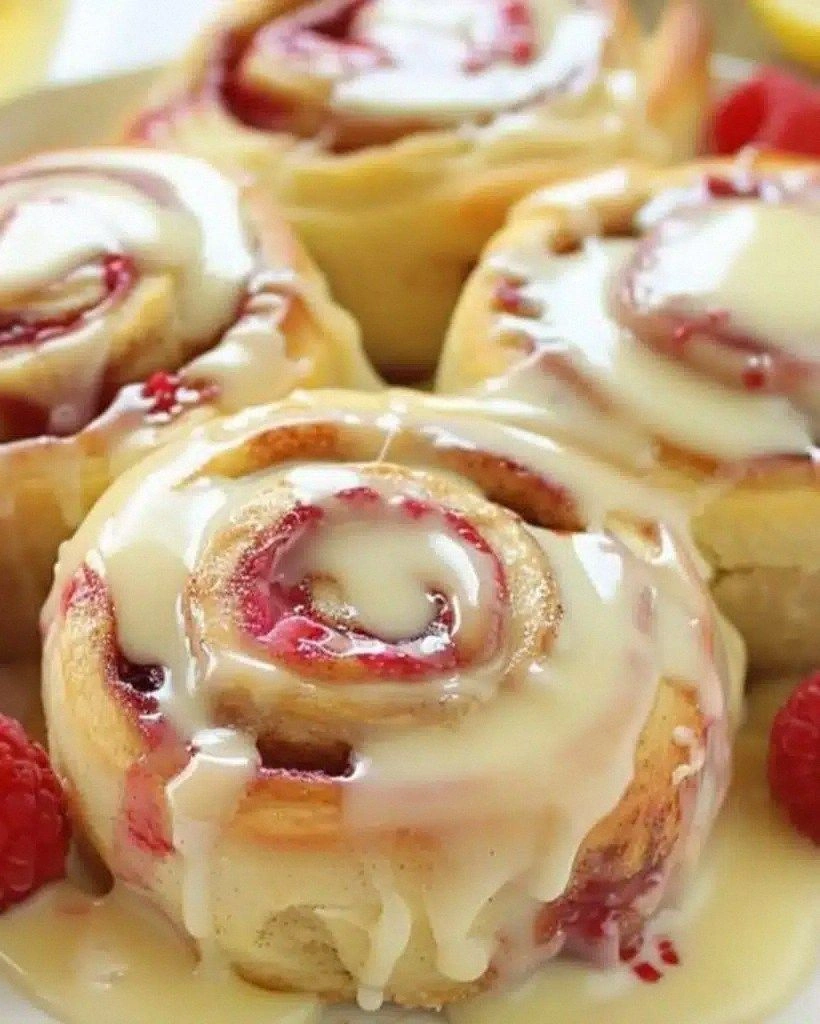
Flavor Bomb: Most recipes play it safe with plain cinnamon sugar, but we're going full rebel by adding fresh raspberries that burst during baking, creating pockets of tart fruit that cut through the sweetness like a refreshing summer breeze through a stuffy room. The combination of warm spice and bright fruit creates a complexity that makes people close their eyes involuntarily when they take the first bite — it's that good.
Texture Paradise: These rolls achieve the holy grail of pastry textures: a soft, cloud-like interior that pulls apart in feathery layers, while the bottom caramelizes into a sticky, gooey layer that'll have you scraping the pan like a raccoon in a dumpster. The secret lies in the butter distribution and the way we handle the dough — no tough, bready disappointments here.
Beginner-Friendly: I know what you're thinking — homemade dough sounds intimidating. But here's the truth: if you can stir a spoon and read a thermometer, you can nail this recipe. I've included every single visual cue and timing detail so you'll know exactly when each step is done, no guesswork required. Even my friend who once burned water managed to pull these off.
Make-Ahead Magic: These rolls are the ultimate party trick because you can prep everything the night before, pop them in the fridge, and bake them fresh in the morning. Your guests will think you're a domestic superhero who wakes at dawn to handcraft breakfast, when really you're just smart enough to plan ahead. The flavor actually improves overnight as the filling melds with the dough.
Crowd Psychology: Serve these at brunch and watch grown adults turn into competitive vultures. I've seen polite society devolve into primal behavior over the last roll. The combination of familiar comfort (cinnamon rolls) with unexpected sophistication (raspberry-lemon) makes people feel both nostalgic and fancy, a powerful emotional cocktail.
Raspberry Season Savior: Got a raspberry plant that's going bonkers? This recipe uses a hefty amount, making it perfect for summer berry gluts when you can't face another smoothie. Frozen berries work too, so you can enjoy this year-round. The berries' natural pectin helps create a jammy filling without added thickeners.
Lemon Glaze Game-Changer: That citrus glaze isn't just pretty — it provides a crucial acidic balance that prevents these from becoming sugar bombs. The lemon enhances the raspberry flavor through some food science magic, making both taste more intense. It's like turning up the color saturation on your favorite photo.
Alright, let's break down exactly what goes into this masterpiece...
Inside the Ingredient List
The Flavor Base
Let's start with the foundation that makes everything sing: fresh raspberries, the ripest you can find. I once grabbed a sad pint of sour berries and the whole batch tasted like disappointment with seeds. You want berries that smell like summer and give slightly when pressed — they're going to break down into jammy pockets of joy that balance the sweet dough. If fresh aren't available, frozen work beautifully; just don't thaw them first or they'll turn into mush and bleed purple streaks through your dough like a goth kid's art project. The cinnamon deserves respect too — skip that ancient jar from 2019 and get fresh Ceylon cinnamon if you can. The difference is like comparing a live orchestra to a tinny phone speaker. Fresh cinnamon has warm, sweet notes that make the cheap stuff taste like cardboard.
The Texture Crew
Bread flour is your best friend here — the higher protein content creates the gluten network that gives these rolls their signature chew and structure. All-purpose works in a pinch, but you'll get a more cake-like texture that lacks that satisfying pull. The eggs aren't just for richness; they create that gorgeous golden color and help the dough rise higher. Make sure they're room temperature or they'll shock the yeast into sluggish behavior. Butter quality matters more than you'd think — European-style butter with higher fat content creates flakier, more tender layers. I've tested with cheap butter and the difference is noticeable enough that my taste-testing neighbor called me out on it. The milk should be warm but not hot — think baby bottle temperature. Too hot and you'll murder your yeast, too cold and the rise takes forever.
The Unexpected Star
Here's where we get a little wild: a touch of cardamom in the filling. This Nordic spice has a lemony, minty quality that makes raspberries taste like they hired a PR team. It's subtle — people won't identify it, but they'll know something magical is happening. A pinch of salt in the filling isn't optional; it makes the sweet elements taste sweeter and prevents that cloying one-note sweetness that ruins so many breakfast pastries. The lemon zest in the dough might seem extra, but it brightens everything and creates a through-line to the glaze. Use a microplane and only the yellow part — the white pith tastes like bitter regret.
The Final Flourish
That lemon glaze isn't just powdered sugar and juice — we're adding a touch of cream to create a glossy finish that sets like a dream. The cream helps prevent that crusty, crackly texture that lesser glazes develop. Use real lemon juice, not the bottled stuff that tastes like cleaning product. The vanilla extract in the glaze might seem odd with lemon, but it rounds out the flavors and prevents the citrus from being too sharp. If you can find Meyer lemons, grab them — they're sweeter and more floral than regular lemons, creating a glaze that tastes like liquid sunshine.
Everything's prepped? Good. Let's get into the real action...
The Method — Step by Step
- Start by warming your milk to exactly 110°F — use a thermometer because guessing leads to yeast homicide or a dough that rises slower than my motivation on Monday mornings. Whisk in the sugar and sprinkle the yeast over the top like you're feeding fish, then let it bloom for 5-7 minutes. You'll know it's ready when it looks like a science experiment gone right — foamy, bubbly, and smelling like a brewery in the best way possible. This step isn't optional; skip it and your dough will rise like a teenager asked to clean their room.
- While your yeast gets its party started, whisk together the flour and salt in the bowl of your stand mixer. Create a well in the center like you're making pasta, then add the eggs, melted butter, and that fragrant yeast mixture. Using the dough hook, mix on low for 2-3 minutes until a shaggy dough forms. It'll look like a mess — that's perfect. Increase to medium speed and knead for 8-10 minutes until the dough becomes smooth and elastic, pulling away from the sides of the bowl. The dough should pass the windowpane test: stretch a small piece thin enough to see light through without tearing.
- Time for the first rise — grease a large bowl with butter (don't use oil here, butter adds flavor), turn the dough to coat, and cover with plastic wrap. Find a warm spot — I use my oven with the light on — and let it rise for 1-2 hours until doubled in size. Here's the key: don't rush this. A slow rise develops better flavor. If your kitchen is cold, it'll take longer — be patient. The dough is ready when you poke it with a finger and the indentation stays without springing back like memory foam.
- While the dough rises, make the filling by combining brown sugar, cinnamon, cardamom, and a pinch of salt. The brown sugar adds molasses notes that complement the berries beautifully. Take a moment to smell this mixture — it should make you want to roll around in it like a dog in spring grass. Set aside 2 tablespoons of this mixture; we'll use it for the bottom of the pan to create that coveted sticky layer.
- Roll the dough into a 16x12-inch rectangle on a lightly floured surface. The rectangle should be even — use your hands to gently stretch the corners. Brush with melted butter, leaving a 1-inch border on the far edge. Sprinkle the cinnamon-sugar mixture evenly, then scatter the raspberries over the top. Here's the magic: don't press them in — they'll naturally sink as you roll, creating those beautiful jammy pockets.
- Roll the dough tightly from the long edge, using the parchment to help you create a tight spiral. The tension is crucial — loose rolls unravel during baking and create a hot mess. Pinch the seam to seal, then use dental floss or a sharp knife to cut into 12 even slices. The floss method prevents squishing — slide it under the roll, cross the ends, and pull for perfect cuts every time.
- Arrange the rolls in a greased 9x13-inch baking pan, leaving space between each roll for expansion. Cover with plastic wrap and let rise for 30-45 minutes until puffy and touching. Meanwhile, preheat your oven to 350°F. The second rise is crucial — skip it and you'll get dense, sad rolls that taste like regret. They're ready when they look like they're hugging each other.
- Bake for 25-30 minutes until golden brown and the filling is bubbling up like lava. The smell will drive you insane — resist opening the oven door or they'll collapse like my willpower around chocolate. They're done when an instant-read thermometer inserted into the center reads 190°F. Let cool for 10 minutes before glazing — too hot and the glaze melts into oblivion, too cool and it sets up like concrete.
- For the glaze, whisk together powdered sugar, lemon juice, cream, and vanilla until smooth. It should ribbon off the spoon like liquid velvet. Drizzle over the warm rolls, letting it seep into every spiral. The glaze will set slightly as it cools, creating that perfect coffee-shop finish that makes people think you apprenticed in Vienna.
That's it — you did it. But hold on, I've got a few more tricks that'll take this to another level...
Insider Tricks for Flawless Results
The Temperature Rule Nobody Follows
Here's the thing that separates bakery-quality rolls from amateur hour: temperature control at every stage. Your ingredients should be room temperature before mixing — cold eggs shock the yeast, cold butter won't incorporate properly, and cold milk slows fermentation. I set everything out 30 minutes before I start, even the eggs. But here's the counterintuitive part: after the first rise, refrigerate the dough for at least 2 hours or overnight. This cold fermentation develops flavor like you wouldn't believe, plus cold dough is infinitely easier to roll and shape. The butter firms up, so when you roll it out, you get distinct layers instead of a greasy mess. I learned this from a French baker who laughed at my room-temperature rolling attempts. The cold dough also prevents the filling from melting and bleeding during assembly.
Why Your Nose Knows Best
Forget timers — your nose is the most sophisticated kitchen tool you own. During the final rise, when the rolls smell distinctly yeasty and slightly tangy, they're ready to bake. If they just smell like dough, give them more time. Same with baking — when your kitchen fills with the scent of toasted butter and caramelized sugar, start checking for doneness. The smell of perfectly baked cinnamon rolls is unmistakable: warm, sweet, with hints of caramel and fruit. If you smell something sharp or burnt, you've gone too far. This might sound woowoo, but professional bakers rely on aroma cues constantly. My neighbor thought I was nuts until I taught her to trust her nose — now she bakes like a pro without ever setting a timer.
The 5-Minute Rest That Changes Everything
After baking, let the rolls rest in the pan for exactly 5 minutes before inverting or removing. This brief rest allows the caramelized bottom to set slightly, preventing the dreaded stick-and-tear situation that leaves half your roll glued to the pan. But here's the critical part: don't go longer than 5 minutes or the sugar will harden like concrete, welding your rolls to the pan. Set a timer — seriously, walk away and you'll need a chisel. During this rest, the filling redistributes, so each bite has the perfect ratio of fruit to dough. I once got distracted by a phone call and returned to find my rolls permanently bonded to the baking dish. Learn from my pain.
The Butter Brushing Secret
Just before glazing, brush the tops of the warm rolls with melted butter. This creates a barrier that prevents the glaze from soaking in completely, giving you that professional two-texture finish: a slightly crisp top with a soft, glazed exterior. Use clarified butter if you want pure flavor without any browning, or regular butter for extra nutty notes. The butter also helps the glaze adhere evenly without pooling in weird spots. This step takes 30 seconds but elevates your rolls from good to bakery-quality. My sister calls it "the shine factor" — she's not wrong.
The Raspberry Ratio Rule
Don't go overboard with the berries — too many and they release so much juice that your rolls become soggy at the bottom. The sweet spot is 1 1/2 cups for 12 rolls, distributed in a single layer. If your berries are extra juicy, toss them with a teaspoon of flour before adding. This prevents the dreaded purple swamp situation that makes the bottom layer gummy. Frozen berries actually work better than overripe fresh ones because they hold their shape. The goal is distinct berries that burst into jammy pockets, not a homogeneous purple filling that tastes like generic fruit.
Creative Twists and Variations
This recipe is a playground. Here are some of my favorite ways to switch things up:
Blackberry-Lavender Dream
Swap raspberries for blackberries and add 1/2 teaspoon of culinary lavender to the filling. The floral notes make people ask "what's that amazing flavor?" without being able to place it. Blackberries have a deeper, wine-like flavor that pairs beautifully with the lemon glaze. Reduce the brown sugar slightly since blackberries are naturally sweeter than raspberries. This version tastes like a sophisticated tea party in pastry form.
Peach-Maple Bourbon
Replace raspberries with diced peaches and swap the brown sugar for maple sugar. Add a tablespoon of bourbon to the filling — it bakes off but leaves behind complex caramel notes. Use maple extract instead of vanilla in the glaze. This version screams autumn and makes your kitchen smell like a cabin in Vermont. The peach pieces create little pockets of molten fruit that taste like pie filling.
Cherry-Almond Indulgence
Use fresh or frozen cherries (pitted, obviously) and add 1/2 teaspoon of almond extract to the dough. Replace the lemon glaze with an almond glaze using almond extract and a touch of amaretto. The cherry-almond combination is classic for a reason — it's like eating a bear claw that went to finishing school. The cherries create a dramatic red and white swirl that's visually stunning.
Tropical Mango-Coconut
Sub mango chunks for raspberries and add shredded coconut to the filling. Use coconut milk instead of regular milk in the dough. The glaze gets a hit of lime juice instead of lemon, and toasted coconut sprinkled on top. This version transports you to a beach vacation with every bite. The mango becomes almost candy-like when baked, creating golden pockets of tropical sunshine.
Apple-Cheddar Savory-Sweet
For the adventurous, try diced apples with a sharp cheddar cheese filling. Use half the sugar and add fresh thyme. The glaze becomes a simple maple drizzle. This version works as an impressive brunch item that bridges breakfast and lunch. The cheddar creates salty, crispy edges while the apples stay tender but not mushy. It's like apple pie and grilled cheese had a beautiful baby.
Mixed Berry Medley
Can't decide? Use a mix of raspberries, blueberries, and chopped strawberries. The different berries create a complex flavor profile with varying levels of tartness and sweetness. Add a touch more thickener (1 teaspoon cornstarch) to prevent excess juiciness. This version looks like a stained glass window and tastes like summer in every bite. Kids love the rainbow effect, and adults appreciate the sophisticated flavor layers.
Storing and Bringing It Back to Life
Fridge Storage
Store cooled rolls in an airtight container at room temperature for up to 2 days — any longer and they start tasting stale. Don't refrigerate unless your kitchen is hot and humid; the fridge actually speeds up staling by causing the starch to retrograde. If you must refrigerate, wrap tightly in plastic wrap then foil, and bring to room temperature before reheating. The glaze may weep slightly — just blot with paper towel and add fresh glaze before serving. For best results, only glaze what you'll eat immediately.
Freezer Friendly
These freeze beautifully either baked or unbaked. For baked rolls, cool completely, then wrap individually in plastic wrap and freeze in a zip-top bag for up to 2 months. Reheat from frozen at 300°F for 15-20 minutes. For unbaked rolls, prepare through the cutting stage, freeze on a baking sheet, then transfer to a bag. When ready to bake, thaw overnight in the fridge, let rise at room temperature for 1 hour, then bake as directed. The frozen version tastes nearly identical to fresh — I've served them to guests who couldn't tell the difference.
Best Reheating Method
The key is gentle heat that warms without drying. Wrap rolls in foil with a tiny splash of water (1 teaspoon) to create steam, then warm at 300°F for 10-12 minutes. This restores the soft texture without making them soggy. Skip the microwave unless you enjoy rubbery pastry — it changes the texture irreparably. If reheating glazed rolls, add fresh glaze after warming for the best appearance. For that fresh-baked taste, warm them just until the filling starts to bubble slightly again.