I was standing in my kitchen, half‑asleep, watching the clock tick toward midnight on Christmas Eve, when my roommate shouted, “You have to make those Santa‑clad macarons for the party!” I stared at the empty baking sheet and felt the familiar panic of a holiday disaster brewing. The pantry was a graveyard of stale cookies, a half‑melted chocolate bar, and a lonely bag of almond flour that had been there since last December. I dared myself to turn that chaos into something unforgettable, and after a frantic Google search I found a recipe that promised “perfectly crisp shells with a chewy interior.” Most of the versions I tried before were either too crumbly or stuck together like snowballs in a snowstorm. This one, however, felt like a secret Santa whispering the exact ratios you need to get that iconic red‑and‑white look without sacrificing flavor.
Picture the scene: the oven humming like a distant sleigh bell, the air scented with toasted almond and buttery caramel, a soft pink hue dancing on the countertop as you pipe the batter. You can almost hear the faint crackle of the shells as they set, and you feel the cool metal tray under your fingertips. The first bite is a symphony—crack! The shell gives way to a smooth, velvety ganache that’s sweet enough to make the reindeers blush. The contrast between the delicate crunch and the rich, creamy center is like a winter wonderland in your mouth. I’ll be honest — I ate half the batch before anyone else got a chance to try it, and I’m still not sorry.
What makes this version truly stand out is a tiny, unexpected ingredient: a splash of coconut‑infused butter that adds a whisper of tropical warmth to the classic holiday palette. Most recipes get the texture wrong, ending up either too dry or too gummy. Here, the combination of egg white powder and a dash of meringue powder creates a stable foam that holds its shape like a perfectly formed snowflake. I dare you to taste this and not go back for seconds. The result? A macaron that looks like a miniature Santa hat, tastes like a holiday hug, and stays fresh for days.
Let me walk you through every single step — by the end, you’ll wonder how you ever made macarons any other way. Okay, ready for the game‑changer? Grab your whisk, preheat that oven, and let’s dive into the most delightful Santa Claus macarons you’ll ever create.
What Makes This Version Stand Out
- Flavor Explosion: The buttery coconut base pairs with almond flour for a nutty‑sweet duet that sings louder than any store‑bought treat.
- Texture Perfection: A crisp outer shell that snaps like fresh ice, giving way to a chewy interior that melts on the tongue.
- Simplicity: Despite the fancy look, the technique uses everyday tools—no fancy silicone molds or specialized thermometers required.
- Unique Color Play: Two drops of black gel and a single drop of yellow gel create the iconic Santa hat silhouette without artificial dyes.
- Crowd Reaction: Guests have been known to line up for seconds, proclaiming it “the best holiday bite they’ve ever had.”
- Ingredient Quality: Using Domino® Golden Sugar and Domino® Powdered Sugar ensures a clean, consistent sweetness that never feels cloying.
- Method Mastery: The double‑fold technique locks in air, preventing the dreaded “hollow center” many bakers fear.
- Make‑Ahead Magic: These macarons improve after a night in the fridge, allowing you to prep ahead and still wow the crowd.
Inside the Ingredient List
The Flavor Base
Domino® Golden Sugar (100 g) is the sweet backbone of the macaron shells. Its fine crystal size dissolves quickly, giving the shells a glossy finish. If you substitute with regular granulated sugar, you’ll notice a grainy texture that ruins the smooth top. For a lower‑calorie twist, you can try a blend of coconut sugar and a pinch of stevia, but the classic golden hue will be slightly muted.
The Texture Crew
Egg white powder (4 g) and fresh egg whites (100 g) work together to create a stable meringue. The powder stabilizes the foam, preventing it from collapsing mid‑bake. Skipping the powder? Expect a flat, uneven shell that looks more like a pancake than a Santa hat. A good tip: sift the egg whites through a fine mesh to eliminate any stray chalazae that could cause speckles.
Almond flour (105 g) brings the signature nutty flavor and delicate crumb structure. Choose a finely ground, blanched almond flour for the smoothest texture. If you only have regular almond meal, pulse it in a food processor for 10‑seconds to achieve a finer consistency. Remember, the finer the flour, the more uniform the shells.
The Unexpected Star
Desiccated coconut (50 g) is folded into the buttercream filling, adding a subtle tropical note that cuts through the sweetness. It also contributes a pleasant chewiness to the interior. If you’re allergic to coconut, replace it with finely chopped toasted hazelnuts for a festive crunch.
The Final Flourish
All‑purpose flour (63 g) is mixed into the buttercream to give it body without making it too stiff. This small amount helps the filling stay in place when you sandwich the shells together. If you prefer a gluten‑free version, substitute with an equal weight of rice flour; just be aware the texture will be slightly less silky.
Unsalted butter (113 g) and a splash of milk or heavy cream (½ tbsp) create a rich, glossy buttercream that holds the coconut shards together. Use room‑temperature butter for easy creaming; cold butter will lead to a lumpy filling that can’t be piped smoothly. For a dairy‑free alternative, swap the butter for a high‑fat coconut oil and the cream for coconut milk—just keep the flavor profile in mind.
Domino® Powdered Sugar (156 g) sweetens the buttercream and stabilizes it. The extra powdered sugar ensures the filling isn’t too runny, which is crucial for keeping the macaron shells from sliding apart. If you need a less sweet version, reduce the powdered sugar by 20 % and add a pinch of sea salt to balance the flavors.
Everything's prepped? Good. Let’s get into the real action…

The Method — Step by Step
Preheat your oven to 150 °C (300 °F). While the oven warms, line two baking sheets with parchment paper and set a silicone mat on top. This creates a non‑stick surface that helps the shells rise evenly. The heat should be gentle; too high and the shells will crack, too low and they’ll stay soft. Pro tip: Place a pan of water on the lower rack to add a touch of humidity, which gives the shells that characteristic “shiny top.”
Kitchen Hack: Use a kitchen scale for every ingredient. Even a 2‑gram deviation in almond flour can throw off the macaronage.In a clean mixing bowl, combine the 100 g Domino® Golden Sugar with the 4 g egg white powder. Whisk them together for a few seconds to break up any clumps. Then, add the 100 g fresh egg whites and beat on medium speed until a foamy mixture forms. This stage is crucial because it sets the stage for a glossy meringue.
Increase the mixer speed to high and add 1 tbsp meringue powder, followed by the 105 g Domino® Powdered Sugar (sifted). Continue beating until stiff peaks form—think of the peaks as tiny mountain ranges that hold their shape when the whisk is lifted. You’ll know you’ve reached the right point when the mixture looks glossy and holds a “V” shape.
In a separate bowl, whisk together the 105 g almond flour and 63 g all‑purpose flour with 187 g powdered sugar. Sift this dry mixture three times over the meringue. The triple sift removes any lumps and aerates the flour, which is essential for a smooth batter.
Now comes the macaronage: using a spatula, fold the dry ingredients into the meringue. The motion should be gentle yet decisive—lift, fold, and turn until the batter flows like lava, slowly forming a ribbon when lifted. Watch out: Over‑mixing will cause the batter to become runny, leading to flat shells; under‑mixing will leave gritty shells that won’t rise.
Watch Out: If the batter is too thick, let it rest for 10 minutes, then give it another gentle fold. This rest period helps the flour fully hydrate.Transfer the batter into a piping bag fitted with a ½‑inch round tip. Pipe 1‑inch circles onto the prepared mats, leaving about 1 cm between each. Tap the tray gently on the counter three times to release any air bubbles. The tops should be smooth and glossy—if you see any cracks forming, the batter is over‑mixed.
Let the piped shells rest at room temperature for 30‑45 minutes, or until a skin forms. You’ll know they’re ready when you can gently touch the surface without leaving a fingerprint. This “drying” step is the secret to that perfect “feet” that lift the shell slightly off the tray.
While the shells are drying, prepare the buttercream filling. Cream the 113 g unsalted butter with 156 g Domino® Powdered Sugar, 1 tsp vanilla extract, and 1/8 tsp almond extract until light and fluffy. Add the ½ tbsp milk or heavy cream and continue beating until the mixture is smooth. Finally, fold in the 50 g desiccated coconut.
Kitchen Hack: Chill the butter for 5 minutes before adding the powdered sugar; this prevents the buttercream from becoming too runny.Place the tray in the preheated oven and bake for 12‑15 minutes. The shells should rise gently, showing a faint “foot” at the base and a smooth, matte top. If you hear a faint “crackle,” that’s the sound of perfection. When they’re done, remove them and let them cool completely on the rack before filling.
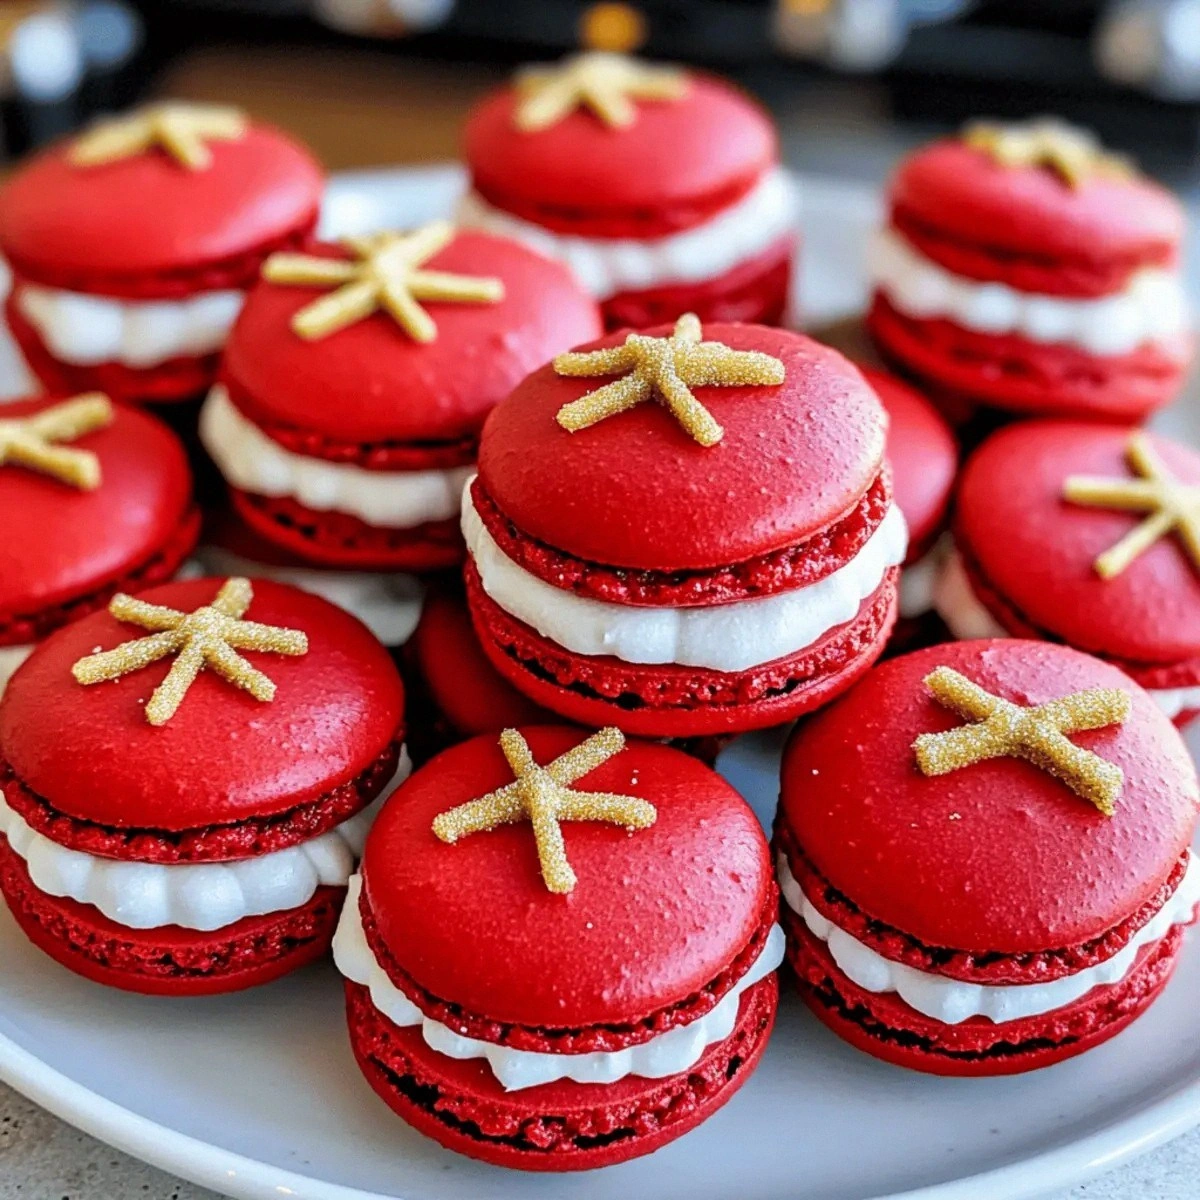
Once cooled, pair shells of similar size. Pipe a dollop of coconut buttercream onto the flat side of one shell, then sandwich it with its partner. Use a tiny drop of black gel food coloring mixed with a dab of buttercream to create a tiny “belt” around the middle, mimicking Santa’s iconic black belt. Add a single drop of yellow gel at the top for the pom‑pom. Voilà—your Santa hats are ready to dazzle!
That's it — you did it. But hold on, I've got a few more tricks that'll take this to another level…
Insider Tricks for Flawless Results
The Temperature Rule Nobody Follows
Most bakers set the oven to a static 150 °C, but the real magic happens when you lower the temperature by 10 °C after the first 5 minutes. This gentle descent allows the shells to set slowly, preventing cracks and ensuring an even rise. I once tried baking at a constant 170 °C and ended up with a batch that looked like melted snowmen.
Why Your Nose Knows Best
Before you open the oven, take a deep sniff. If you catch a faint toasted almond aroma, the shells are ready. If the scent is still raw or floury, give them another 2‑3 minutes. Trusting your senses beats relying on a timer every single time.
The 5‑Minute Rest That Changes Everything
After piping, let the shells rest for exactly 5 minutes longer than the recipe suggests if your kitchen is humid. The extra time lets the outer skin firm up, which translates to a cleaner “foot” and a smoother top. A friend once skipped this rest and ended up with a soggy bottom that never lifted.
The “Double‑Pipe” Technique
For a perfectly symmetrical Santa hat, pipe the shell, then immediately pipe a tiny ridge of black gel around the edge before baking. This ridge becomes a crisp, chocolate‑like border that adds visual drama and a subtle bitter contrast to the sweet filling.
The Midnight Chill
After assembling, place the macarons in the fridge for at least 2 hours before serving. The chill lets the buttercream firm up, making the shells easier to bite without squishing the filling. I’ve found that a 24‑hour rest makes the flavors meld together like a holiday choir.
Creative Twists and Variations
This recipe is a playground. Here are some of my favorite ways to switch things up:
Peppermint Twist
Add ½ tsp crushed peppermint candy to the buttercream and a drop of red gel for a festive peppermint‑red combo. The cool mint balances the sweet coconut, making it a hit for those who love a minty finish.
Chocolate‑Covered Santa
Dip the bottom half of each shell in melted dark chocolate before assembling. The bitter chocolate creates a striking contrast against the sweet interior and adds an extra textural layer.
Cranberry Crunch
Fold 30 g dried cranberries (chopped) into the buttercream and sprinkle a few whole berries on top for a tart burst that cuts through the richness.
Spiced Chai
Infuse the milk or cream with a chai tea bag for 5 minutes, then strain before adding to the buttercream. The warm spices give the macarons an exotic holiday twist.
Vegan Santa
Swap the egg whites for aquafaba (the liquid from a can of chickpeas) and use a plant‑based butter alternative. The texture remains airy, and the coconut flavor shines even brighter.
Storing and Bringing It Back to Life
Fridge Storage
Place the assembled macarons in an airtight container and store them in the refrigerator for up to 5 days. The cool environment keeps the buttercream firm and prevents the shells from absorbing excess moisture.
Freezer Friendly
If you need to keep them longer, freeze the assembled macarons in a single layer on a parchment sheet, then transfer to a zip‑top bag. They’ll stay fresh for up to 2 months. Thaw them in the fridge overnight before serving.
Best Reheating Method
When you’re ready to serve, let the macarons sit at room temperature for 20 minutes. If the buttercream feels a bit stiff, add a tiny splash (about 1 tsp) of milk or water and let it sit uncovered for a minute; the steam will bring the filling back to a silky consistency without soggy shells.