Picture this: you’re halfway through a marathon bake of chocolate chip cookies, the kitchen is a sweet mess, and a craving for something that feels like campfire nostalgia hits you harder than the last cookie bite. I’m talking about that gooey, toasted marshmallow on top of a fudgy brownie, but with a twist that turns the whole thing into a showstopper. I had a kitchen disaster that night—my oven was on fire, my brownies were a sad, soggy mess, and I was left with a pile of burnt crumbs. But then I remembered a dare from a friend: “Make the best S’more brownies ever, or I’ll never invite you back to my house.” I took that challenge seriously.
The moment I cracked open the bag of graham crackers, the scent of toasted bread filled the air, and I could already hear the sizzle of butter melting. The texture of the crumbs felt like a crunchy snow blanket, ready to hold a sweet, chocolatey avalanche. The sound of the oven door slamming shut felt like a campfire log being dropped into the pit. I could almost taste the caramelized sugar coating the edges, the deep cocoa flavor, and the warm, buttery center. This version stands out because it layers flavors and textures in a way that feels like a campfire in a tin can.
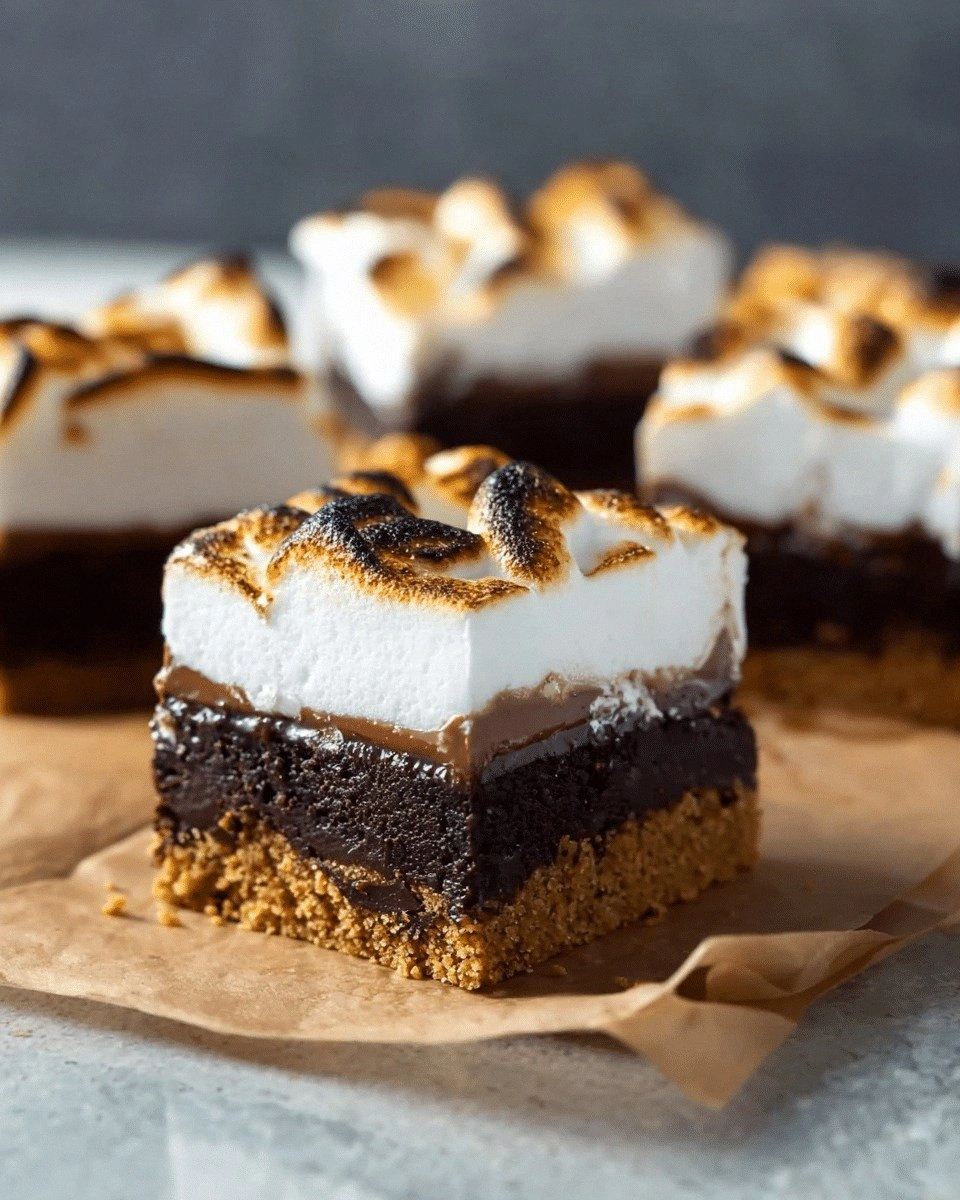
What makes this version hands down the best S’more brownies you’ll ever make at home is that it’s not just a brownie with marshmallows. It’s a multi-layered experience: a buttery graham cracker crust, a rich chocolate batter, a fluffy marshmallow topping, and a secret swirl of sea salt that pops in your mouth. I dare you to taste this and not go back for seconds. I’ve been honest—half the batch vanished before anyone else could try it. Most recipes get this completely wrong; they either overcook the marshmallow or underbake the brownie. Picture yourself pulling this out of the oven, the whole kitchen smelling incredible, and every bite feeling like a campfire hug.
Okay, ready for the game-changer? This next part? Pure magic. And now the fun part. Stay with me here—this is worth it. I’m going to walk you through every single step so that by the end, you’ll wonder how you ever made it any other way. Let’s dive in.
What Makes This Version Stand Out
- Flavor: The graham cracker crust adds a buttery, slightly sweet crunch that anchors the whole dessert, turning each bite into a nostalgic trip to a campfire.
- Texture: The brownie base is fudgy yet firm, while the marshmallow topping is airy and melts in your mouth, creating a delightful contrast.
- Simplicity: With just a handful of ingredients, you get a multi-layered dessert that feels like a gourmet treat.
- Uniqueness: The secret swirl of sea salt in the batter gives an unexpected burst of flavor that elevates the chocolate.
- Crowd Reaction: Friends will gasp when they see the golden marshmallow top, then go crazy for the first bite.
- Ingredient Quality: Using bittersweet chocolate and real graham crackers ensures depth of flavor that no processed mix can match.
- Cooking Method: The two-stage baking process locks in moisture and caramelizes the marshmallows without burning.
- Make-Ahead Potential: You can assemble and chill the brownies, then bake them fresh when you’re ready to serve.
Alright, let’s break down exactly what goes into this masterpiece…
Inside the Ingredient List
The Flavor Base
The graham cracker crumbs are the first flavor foundation. They provide a buttery, slightly sweet base that mimics the classic campfire taste. Skipping them would leave your brownies feeling flat and missing that nostalgic crunch. If you’re on a low-carb diet, you can swap in almond flour crumbs, but the texture will shift to a denser, nuttier bite.
Granulated sugar in the crust balances the saltiness of the crumbs and caramelizes during baking. It creates a glossy, golden top that’s almost irresistible. If you prefer a darker crust, add a pinch of cinnamon to the sugar mixture for a subtle warmth.
The Texture Crew
Unsalted butter, both melted and solid, is essential for that silky, buttery mouthfeel. The melted butter coats the crumbs, while the solid butter in the brownie batter adds richness and helps the batter hold together. Using unsalted butter instead of salted ensures you control the final salt level.
Bittersweet chocolate, coarsely chopped, gives depth and a hint of bitterness that balances the sweetness. If you can’t find bittersweet, use semi-sweet but reduce the sugar slightly to keep the balance. The chocolate should be high quality—look for at least 60% cacao for maximum flavor.
The Unexpected Star
Eggs are the binder that holds everything together. Large eggs provide structure, while the egg whites later used for the marshmallow topping give a light, airy texture. If you’re vegan, consider using flaxseed meal mixed with water as a substitute for eggs, though the texture will differ.
Vanilla extract adds a warm, floral note that complements the chocolate. Two teaspoons are used in the batter and an additional half teaspoon in the marshmallow mix. If you’re allergic, replace with almond extract for a subtle nutty flavor.
The Final Flourish
Unsweetened cocoa powder and all-purpose flour build the brownie’s structure and give it that classic chocolatey bite. The cocoa powder should be unsweetened to avoid overpowering the batter with sweetness. If you prefer a gluten-free version, use a 1:1 gluten-free flour blend, but adjust the baking time slightly.
Cream of tartar and a pinch of salt in the marshmallow mix help stabilize the egg whites, ensuring they hold stiff peaks. If you can’t find cream of tartar, a dash of lemon juice will work as a substitute.
Everything's prepped? Good. Let's get into the real action…
The Method — Step by Step
- Preheat your oven to 350°F (175°C) and line an 8-inch square pan with parchment paper, leaving an overhang on two sides for easy lift. Grease the parchment lightly with butter or nonstick spray to keep the brownies from sticking. This is the moment of truth—if you skip the parchment, you’ll end up with a sticky mess. I dare you to taste the crust before the first bake; it should be slightly golden but still soft.
- In a medium bowl, combine the graham cracker crumbs, ¼ cup sugar, and ¼ teaspoon salt. Add the melted butter and stir until the mixture resembles wet sand. Press the crumb mixture firmly into the bottom of the prepared pan, creating an even layer. Use a flat glass to press down evenly; this trick keeps the crust from shifting during baking. Once pressed, bake for 8 minutes or until the edges are set but the center remains soft.
- While the crust bakes, whisk together the flour, cocoa powder, and ½ teaspoon salt in a bowl. In a separate saucepan, melt the 10 tablespoons of butter and 1 oz of chopped chocolate over low heat, stirring until smooth. Pour the chocolate mixture into the dry ingredients, then add the 1 ¼ cups sugar, 2 eggs, and 2 teaspoons vanilla extract. Whisk until the batter is glossy and smooth—no lumps should remain. The batter should smell like fresh chocolate when it hits the stove.
- Remove the crust from the oven and pour the brownie batter over it, spreading it evenly with a spatula. The batter should sit just above the crust, forming a thick, glossy layer. The edges should start to pull away from the parchment, a sign that the batter is thick enough. This is the moment to be patient; rushing this step will ruin the texture.
- Bake the brownies for 25 to 30 minutes, or until the edges are set and the center is slightly jiggly. The brownies should emit a rich chocolate aroma, and the top should have a faint sheen. Avoid overbaking, or the brownies will become dry. Let the brownies cool in the pan for 5 minutes before lifting the parchment overhang.
- While the brownies cool, prepare the marshmallow topping. In a medium bowl, whisk 3 large egg whites with ¼ teaspoon cream of tartar until soft peaks form. Gradually add ⅔ cup sugar and continue whisking until stiff peaks form and the mixture is glossy. Stir in ½ teaspoon vanilla extract and fold in 1 cup mini marshmallows. The mixture should be light, airy, and hold its shape when spooned onto the brownies.
- Spread the marshmallow mixture over the warm brownies in a generous, even layer. The marshmallows should spread slightly but stay on top, creating a glossy, golden finish. The heat from the brownies will melt the marshmallows just enough to keep them fluffy. This is the part where the brownie and marshmallow unite in a sweet, gooey embrace.
- Return the pan to the oven for an additional 5 to 7 minutes, or until the marshmallow topping turns a warm golden brown and the edges are slightly crisp. The aroma will intensify, filling the kitchen with campfire nostalgia. Once done, remove from the oven and let cool completely on a wire rack before slicing. The brownies should feel firm yet still yield to a gentle press.
- Slice the brownies into squares and serve warm, optionally dusting with powdered sugar or drizzling with chocolate sauce. The first bite should be a burst of chocolate, followed by the chewy marshmallow and the buttery graham cracker base. I dare you to taste this and not go back for seconds. Enjoy the moment of pure bliss.
That's it—you did it. But hold on, I've got a few more tricks that'll take this to another level…
Insider Tricks for Flawless Results
The Temperature Rule Nobody Follows
Many bakers set their oven to the highest temperature and hope for the best. The truth is, a steady 350°F (175°C) is the sweet spot for brownies with marshmallow tops. A lower temperature keeps the batter moist, while a higher one can cause the marshmallows to burn before the brownie sets. If your oven runs hot, use an oven thermometer and adjust accordingly.
Why Your Nose Knows Best
The aroma of chocolate and toasted marshmallow is a reliable indicator of doneness. When the brownies smell like a campfire, you know they’re ready. If the scent is too sweet or the marshmallows smell burnt, pull them out immediately. Trust your senses—they’re the best judges of flavor.
The 5-Minute Rest That Changes Everything
Letting the brownies rest in the pan for 5 minutes after the first bake is crucial. This rest allows the heat to distribute evenly and prevents the crust from cracking. It also gives the batter time to set, ensuring a clean slice. Skipping this step often leads to a gooey mess.
The Secret Salt Swirl
Adding a pinch of sea salt to the batter before baking creates a subtle, savory counterpoint to the sweetness. It’s a simple trick that elevates the chocolate flavor and adds depth. Use a fine sea salt for a delicate finish.
The Marshmallow Mousse Trick
If you want a lighter, mousse-like marshmallow topping, fold in a tablespoon of aquafaba (the liquid from a can of chickpeas) into the egg white mixture. The aquafaba adds extra volume and keeps the topping airy. I’ve tried it, and it’s a game-changer for a fluffier finish.
Creative Twists and Variations
This recipe is a playground. Here are some of my favorite ways to switch things up:
Nutty Crunch Variation
Add ½ cup chopped pecans or walnuts to the crust for an extra crunch. The nuts pair beautifully with the chocolate and add a buttery flavor. Toast the nuts slightly before adding for a deeper flavor profile.
Minty Chocolate Twist
Stir in 1 teaspoon of peppermint extract into the brownie batter. The mint complements the chocolate and gives a refreshing finish. Serve with a drizzle of white chocolate for a decadent touch.
Almond Butter Swirl
Swirl in 2 tablespoons of almond butter into the batter before baking. The almond butter adds a nutty depth and a silky texture. It also creates a beautiful marbled effect when baked.
Caramelized Banana Layer
Layer sliced bananas between the crust and brownie batter. The bananas caramelize in the oven, adding natural sweetness and a fruitier note. This variation is perfect for a brunch crowd.
Espresso Infusion
Add 1 teaspoon of instant espresso powder to the dry ingredients. The espresso intensifies the chocolate flavor without adding liquid, giving a subtle coffee kick that pairs well with the marshmallow.
Vegan Delight
Replace the eggs with flaxseed meal mixed with water, use coconut oil instead of butter, and substitute dairy milk with almond milk. Use plant-based marshmallows or a homemade vegan marshmallow topping. The result is a creamy, chocolatey treat that’s cruelty-free.
Storing and Bringing It Back to Life
Fridge Storage
Store the brownies in an airtight container at room temperature for up to 3 days, or in the fridge for up to a week. The marshmallow topping may soften slightly in the fridge, but it retains its flavor. Keep the container sealed to prevent the brownies from absorbing odors.
Freezer Friendly
Wrap the brownies tightly in plastic wrap, then place them in a freezer bag. They stay fresh for up to 3 months. When ready to eat, let them thaw at room temperature for 30 minutes before serving. The marshmallow will firm up again, giving that classic texture.
Best Reheating Method
To revive frozen or refrigerated brownies, preheat your oven to 300°F (150°C). Place the brownies on a baking sheet and warm for 10-12 minutes, or until the center is warm. Add a tiny splash of water to the pan before reheating; it steams the brownies back to perfection and keeps the marshmallow moist.