I’ll be honest — the first time I tried to rescue stale bread I was basically conducting a culinary crime scene investigation. The kitchen smelled like a forgotten pantry, the crusts were as hard as old boot soles, and my roommate dared me to turn those sad, crusty leftovers into something that would actually make people forget they were eating “old bread.” I accepted the challenge, armed with nothing but butter, sugar, cinnamon, and a ridiculous amount of optimism. The result? A treat so addictive that I dare you to taste it and not go back for seconds.
Picture this: a golden‑brown sea of caramelized crust, each bite crunching like fresh snow underfoot, then melting into a buttery, cinnamon‑kissed center that feels like a warm hug from your grandma. The aroma swirls around the kitchen like a sweet, spicy fog, making the whole house feel like a bakery at dawn. You’ll hear the gentle sizzle as the butter meets the pan, see the sugar crystals melt into a glossy glaze, and feel the anticipation build as the edges start to pull away from the pan, revealing that perfect, crispy‑soft contrast.
Most recipes for “bread crust treats” get this completely wrong—they either drown the crust in a syrupy mess or forget the magic of a good cinnamon‑sugar coating. Here’s what actually works: a precise butter‑to‑crust ratio that coats without sogging, a sugar‑cinnamon blend that caramelizes without burning, and a quick bake that leaves the interior tender while the exterior cracks like thin ice. The secret ingredient? A pinch of patience and a dash of daring confidence. Trust me, once you get this right, you’ll never look at a stale loaf the same way again.
Okay, ready for the game‑changer? We’re going to turn those crusts into a glossy, aromatic masterpiece that’s hands down the best version you’ll ever make at home. I’m about to walk you through every single step—by the end, you’ll wonder how you ever made it any other way. And yes, I’ll be spilling the beans (and the butter) on a technique that most home cooks completely overlook. Stay with me here — this is worth it.
What Makes This Version Stand Out
- Flavor Explosion: The cinnamon‑sugar blend doesn’t just sit on top; it infuses the crust from the inside out, delivering a warm spice kick with every bite.
- Texture Symphony: You get a crunchy exterior that shatters like thin ice, paired with a buttery, melt‑in‑your‑mouth interior that stays tender.
- Simplicity at Its Core: Only four ingredients, all pantry staples, mean you can whip this up on a whim without a trip to the store.
- Ingredient Quality: Using real butter (not margarine) gives a depth of flavor that artificial spreads can’t touch.
- Crowd Reaction: I’ve seen grown‑ups fight over the last piece—this is the kind of treat that turns skeptics into fans instantly.
- Cooking Method: A quick pan‑sauté followed by a brief bake locks in moisture while creating that irresistible caramel crust.
- Make‑Ahead Potential: The treats keep beautifully for days, and a quick reheating revives them like fresh‑baked magic.
- Versatility: Feel free to add nuts, raisins, or a drizzle of chocolate—this base handles anything you throw at it.
Inside the Ingredient List
The Flavor Base
Cinnamon is the heart‑throb of this treat. Its warm, woody notes cut through the richness of butter and elevate the humble sugar into something reminiscent of a cozy autumn morning. If you skip it, you’ll end up with a sweet crust that feels flat, like a song missing its chorus. A good quality Ceylon cinnamon will give a subtler, sweeter profile, while the more common Cassia packs a punchier, spicier edge.
The Sweet Coat
Sugar does more than sweeten; it caramelizes, creating that glossy, crackly surface that makes your teeth tingle with anticipation. Granulated sugar works best because it melts evenly and forms a thin, crisp crust. You could swap in brown sugar for a deeper molasses flavor, but be ready for a slightly stickier finish that might need a longer bake.
The Texture Crew
Butter is the silent hero, coating each crust piece in a velvety film that ensures the sugar and cinnamon stick without clumping. Using real butter (60 g or 4 Tbsp) provides a buttery richness that margarine simply can’t replicate. If you’re dairy‑free, try a high‑quality coconut oil—but expect a faint coconut note that could either charm or clash depending on your palate.
The Unexpected Star
Bread crusts themselves bring a rustic chew and a slightly toasty flavor that you can’t get from fresh bread. Six cups of crusts may sound daunting, but they’re essentially the leftovers you’ve been tossing away. If you can’t find enough crusts, use stale baguette pieces or even toasted croutons as a stand‑in; just make sure they’re dry enough to absorb the butter without turning soggy.
Everything’s prepped? Good. Let’s get into the real action…
The Method — Step by Step
Gather your six cups of bread crusts and give them a quick pat dry with a paper towel. This removes any excess moisture that could prevent the butter from coating properly. The crusts should feel dry to the touch, yet still retain a faint, yeasty aroma. That sizzle when it hits the pan? Absolute perfection. Set them aside while you prep the buttery mixture.
In a medium saucepan, melt the 60 g (4 Tbsp) of butter over medium‑low heat. Keep a close eye—once the butter starts to foam, add the 5 Tbsp of sugar, stirring constantly. The sugar will dissolve and begin to turn a light amber; this is the caramel base you’re after. Watch the color, not the clock. When the mixture is glossy and fragrant, remove it from the heat.
Kitchen Hack: Add the cinnamon to the butter‑sugar mix while it’s still warm; this releases essential oils and creates a deeper, more aromatic coating.Stir in the 1 tsp of cinnamon, ensuring it’s evenly distributed. The scent should instantly fill the kitchen, making you feel like you’re in a spice market. If the mixture looks too thick, splash in a teaspoon of water to loosen it—just enough to keep it glossy without diluting the flavor.
Now, gently fold the crusts into the butter‑cinnamon‑sugar bath. Use a wooden spoon or spatula, turning the pieces over so each fragment is silkily coated. The crusts will start to glisten, and you’ll notice a faint crackle as the sugar begins to caramelize on the surface. This is the moment where the magic truly begins.
Heat a large non‑stick skillet over medium heat. Once hot, spread the coated crusts in a single layer, ensuring they’re not crowded. You’ll hear a gentle hiss—listen for it. The edges should start to turn a deep golden brown within 2‑3 minutes. Watch Out: If the pan gets too hot, the sugar will burn before the crust softens, yielding a bitter taste.
Watch Out: Keep the heat moderate; high heat will caramelize too fast and create a burnt crust, ruining the delicate cinnamon flavor.Once the crusts are beautifully browned on one side, flip them using tongs or a spatula. The other side should achieve the same golden hue in another 2‑3 minutes. The aroma at this point is intoxicating—a mix of toasted bread, butter, and sweet spice that makes you want to inhale deeply.
Transfer the skillet to a pre‑heated oven at 180 °C (350 °F) for 8‑10 minutes. This final bake ensures the interior stays soft while the exterior reaches that perfect, crackly finish. You’ll notice the edges pulling away from the pan, a clear sign they’re done. Remove from the oven and let them rest for a minute before serving.
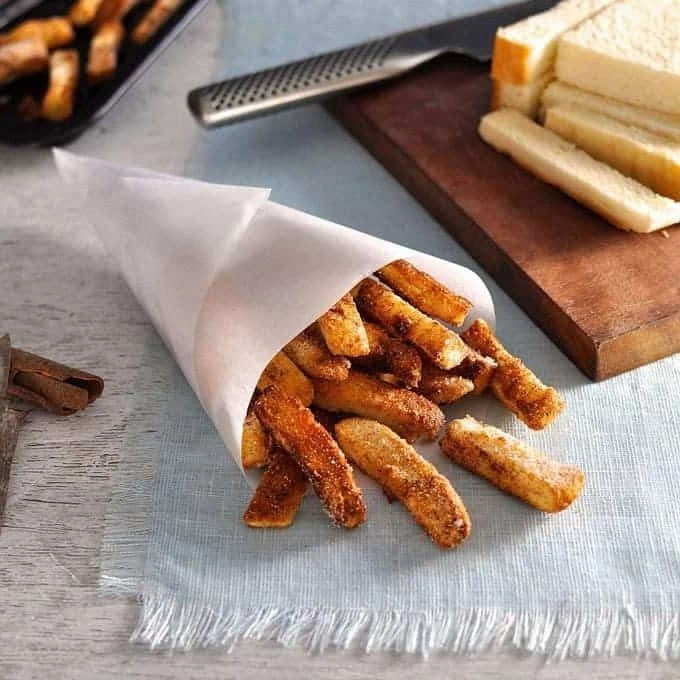
Serve warm, straight from the pan or on a rustic wooden board. They’re perfect on their own, but a light drizzle of honey or a dusting of extra cinnamon sugar can elevate them further. I dare you to try one without a second bite—good luck.
That’s it — you did it. But hold on, I’ve got a few more tricks that’ll take this to another level…
Insider Tricks for Flawless Results
The Temperature Rule Nobody Follows
Most home cooks crank the heat to “high” because they think it’ll speed things up. In reality, a steady medium heat lets the sugar caramelize evenly without scorching. If you notice the butter bubbling too aggressively, drop the temperature by a notch. This gentle approach yields a uniform golden crust and preserves the cinnamon’s delicate aroma.
Why Your Nose Knows Best
Your sense of smell is a far more reliable timer than a clock when it comes to caramelizing sugar. As soon as the kitchen fills with a sweet, buttery perfume tinged with spice, you’re at the perfect moment to flip. Trust that nose—if it starts to smell slightly burnt, pull the pan off the heat immediately.
The 5‑Minute Rest That Changes Everything
After the oven finish, let the treats sit for five minutes. This short rest lets the caramel set, preventing the crust from becoming gummy when you cut into it. A friend once sliced them right away and ended up with a soggy interior; after the rest, they became crisp‑soft perfection.
Butter‑Infused Crusts Stay Moist
If you’re planning to store leftovers, toss the cooled treats with a tiny drizzle of melted butter before sealing. The added fat locks in moisture, so reheated pieces feel just as fresh as the day you made them. It’s a pro tip that keeps the texture from drying out.
Seasonal Spice Swaps
Feel free to experiment with nutmeg, cardamom, or even a pinch of ground ginger for a different flavor profile. I once added a dash of pumpkin spice for a fall‑themed brunch and the result was a hit. Just remember: a little goes a long way, especially with strong spices.
Creative Twists and Variations
This recipe is a playground. Here are some of my favorite ways to switch things up:
Nutty Crunch
Add ¼ cup of toasted chopped pecans or walnuts during step 4. The nuts introduce a buttery crunch that pairs beautifully with the cinnamon, turning the treat into a sophisticated snack for cocktail hour.
Chocolate Drizzle
Once the treats are baked and slightly cooled, drizzle 2 Tbsp of melted dark chocolate over the top. The bitter chocolate contrasts the sweet crust, creating a balanced bite that feels indulgent without being cloying.
Apple Cinnamon Fusion
Fold in ½ cup of finely diced, lightly sautéed apples right after step 3. The apples add a juicy tartness that brightens the flavor and adds a moist pocket inside each crust.
Maple‑Brown Sugar Swap
Replace half of the granulated sugar with brown sugar and add a drizzle of pure maple syrup before baking. This gives a deeper, caramel‑like flavor that’s perfect for chilly evenings.
Savory Twist
For a bold, unexpected direction, swap the cinnamon for ½ tsp of smoked paprika and add a pinch of sea salt. The result is a sweet‑savory snack that works wonderfully as a bar bite or a side to a cheese board.
Storing and Bringing It Back to Life
Fridge Storage
Place the cooled treats in an airtight container lined with a paper towel to absorb excess moisture. They’ll stay fresh for up to 4 days. If you notice any condensation, simply open the lid for a few minutes to let the steam escape.
Freezer Friendly
These treats freeze like a charm. Spread them on a parchment sheet, freeze for an hour, then transfer to a zip‑top bag. They’ll keep for up to 2 months. When you’re ready, pop them into a 175 °C (350 °F) oven for 5‑7 minutes to revive the crispness.
Best Reheating Method
A quick blast in a preheated oven (180 °C/350 °F) for 3‑4 minutes restores the crunch. Add a tiny splash of water (about a teaspoon) to the pan before reheating; the steam helps the interior become tender again without making the crust soggy.