I remember the night I was scrambling to salvage a dinner that had turned into a culinary catastrophe. My chicken thighs had been left in the fridge too long, the sauce had been too sweet, and my friends were unimpressed. Then I stumbled upon a recipe that promised honey, butter, and a touch of soy sauce—an unlikely trio that would change my kitchen life forever. I dared myself to taste this and not go back for seconds, and the first bite was a revelation. That sizzle when it hits the pan? Absolute perfection.
The kitchen was a blur of clattering pans and the sweet scent of caramelizing honey. I could hear the hiss of oil, feel the heat radiating from the skillet, and taste the faint sting of garlic in the air. The sight of the golden glaze sliding over the chicken was a visual feast, while the sound of the butter melting into the sauce was music to my ears. Each sensory detail was a promise of something extraordinary. I felt the anticipation building, like a child waiting for a surprise party.
What makes this version stand out is not just the combination of flavors, but the technique that locks in moisture and creates a glossy, buttery coating that clings to every bite. Most recipes get this completely wrong by overcooking or under-seasoning. I’ve spent years experimenting, and this iteration is hands down the best version you'll ever make at home. The balance of sweet and savory is razor‑thin, yet it delivers a burst of umami that lingers. The result is a dish that feels indulgent yet approachable, perfect for both a casual weeknight and a dinner party.
There’s a secret ingredient that you won’t expect—rice vinegar. It cuts through the richness of the butter and honey, creating a bright, almost citrusy lift that makes the sauce feel fresh. Imagine the sauce coating the chicken like velvet, the edges crisping just enough to pop when you bite. Picture yourself pulling this out of the oven, the whole kitchen smelling incredible, and the first forkful sending a wave of satisfaction through your palate. Let me walk you through every single step—by the end, you'll wonder how you ever made it any other way.
What Makes This Version Stand Out
- Flavor: The honey and butter create a sweet, rich base that is counterbalanced by the sharpness of soy sauce and the subtle acidity of rice vinegar. This duality gives the dish an irresistible depth that lingers on the tongue.
- Texture: The coating forms a glossy glaze that clings to the chicken, while the interior stays juicy and tender. The crispy edges that shatter like thin ice add a satisfying crunch without compromising the moistness inside.
- Simplicity: With only twelve ingredients, this recipe is a breeze to assemble, yet it delivers a complex flavor profile that would otherwise require a dozen components.
- Ingredient Quality: Using avocado oil for its high smoke point and unsalted butter for flavor control ensures that each bite is buttery without being greasy.
- Make‑Ahead Potential: The sauce can be prepared a day ahead, allowing the flavors to meld. When you’re ready to serve, simply reheat gently and the glaze will re‑glimmer.
- Crowd Reaction: Friends who’ve tried this version rave about how the dish is “too good to be true” and can’t stop asking for the recipe.
- Versatility: The base can be paired with rice, noodles, or even a crisp salad, making it adaptable to any meal plan.
- Time Efficiency: From prep to plate, the entire process takes under an hour, which is a win for busy weeknights.
Inside the Ingredient List
The Flavor Base
Honey is the star of the show, providing a natural sweetness that balances the richness of butter. Its floral undertones add a subtle complexity that elevates the dish beyond plain sweetness. If you skip honey, the sauce will be flat and lack depth. For a lower sugar alternative, try using maple syrup or a sugar‑free honey substitute, but the flavor profile will shift slightly.
Soy sauce contributes umami and a salty kick that grounds the sweetness. It also helps in browning the chicken by adding a bit of protein content. A low‑sodium soy sauce can be used if you’re watching salt intake, but be prepared to add a pinch more salt to compensate. The soy sauce’s dark color also gives the glaze a beautiful, glossy sheen.
Rice vinegar introduces acidity that cuts through the buttery richness. It brightens the overall flavor and prevents the dish from feeling heavy. If rice vinegar isn’t on hand, a splash of white wine vinegar or even a dash of lemon juice can work, though the flavor will veer slightly citrusy.
The Texture Crew
Cornstarch and flour serve as the binder that creates the glossy coating. Cornstarch thickens the sauce quickly, giving it that silky finish, while flour adds body and helps the sauce adhere to the chicken. If you prefer a gluten‑free version, replace the flour with rice flour or a gluten‑free blend. Skipping either thickener will result in a runny sauce that doesn’t cling.
Avocado oil is chosen for its high smoke point, which allows you to sear the chicken at a high temperature without burning. It also has a mild flavor that won’t compete with the honey or butter. Olive oil could be used, but it may impart a stronger taste and lower the searing temperature. If you don’t have avocado oil, grapeseed or canola oil are acceptable substitutes.
Cold unsalted butter adds richness and a silky mouthfeel. The coldness helps the butter melt slowly into the sauce, creating a luxurious texture. If you’re looking for a dairy‑free option, coconut oil can provide a similar buttery flavor, though it will introduce a coconut undertone.
The Unexpected Star
Garlic cloves are the aromatic foundation that ties everything together. Fresh garlic provides a punch that lingers, while the garlic powder offers a more subtle, evenly distributed flavor. If you’re sensitive to raw garlic, you can roast the cloves to mellow their bite. The combination of fresh and powdered garlic ensures both depth and consistency.
The Final Flourish
Finishing with finely chopped parsley adds a pop of color and a fresh, herbaceous note that cuts through the sweetness. Parsley also brings a slight peppery flavor that balances the dish. If parsley isn’t available, cilantro or basil can be used, each adding its own distinct twist. The garnish is optional but highly recommended for that final touch.
Everything's prepped? Good. Let's get into the real action...
The Method — Step by Step
- First, pat the chicken thighs dry with paper towels to ensure a crisp sear. Season both sides with salt, pepper, and garlic powder, making sure the coating is even. I dare you to taste this and not go back for seconds—once you taste that first bite, you’ll know the difference. Let the seasoned chicken rest for five minutes; this allows the flavors to meld. While it rests, prepare the sauce base.
- In a small bowl, whisk together the cornstarch and flour until smooth. Add the honey, soy sauce, rice vinegar, and a splash of avocado oil. Whisk until there are no lumps. This slurry will act as the glaze that coats the chicken. Keep the mixture aside while you heat the pan.
- Heat a large skillet over medium‑high heat and add the avocado oil. Once the oil shimmers, add the chicken thighs skin‑side down. Let them cook undisturbed for about 5–6 minutes until the skin turns golden and releases easily from the pan. Flip the chicken and cook the other side for an additional 4–5 minutes, or until the internal temperature reaches 165°F. This is the moment of truth.
- Once the chicken is cooked, pour the prepared sauce mixture into the skillet. Reduce the heat to medium and stir constantly. The sauce will thicken and coat the chicken like a glossy blanket. Keep an eye on it—if it starts to bubble too aggressively, reduce the heat to avoid burning. This step is crucial for that velvet‑like coating.
- Add the cold butter in small chunks, stirring until fully incorporated. The butter will melt into the sauce, adding richness and a silky sheen. The sauce should smell toasty and slightly nutty. At this point, add the minced garlic cloves and cook for 30 seconds to release their aroma. The garlic will give the dish a subtle punch that lingers.
- Lower the heat to low and let the chicken simmer in the glaze for about 3–4 minutes. This allows the flavors to meld and the glaze to thicken further. The chicken should look glossy, and the edges should be slightly caramelized. This is where the dish transforms from simple to spectacular.
- Remove the skillet from heat and let the chicken rest for a minute. This short rest allows the juices to redistribute, keeping the meat juicy. While resting, sprinkle finely chopped parsley over the top for a burst of color and freshness. The parsley also adds a subtle herbal note that balances the sweetness.
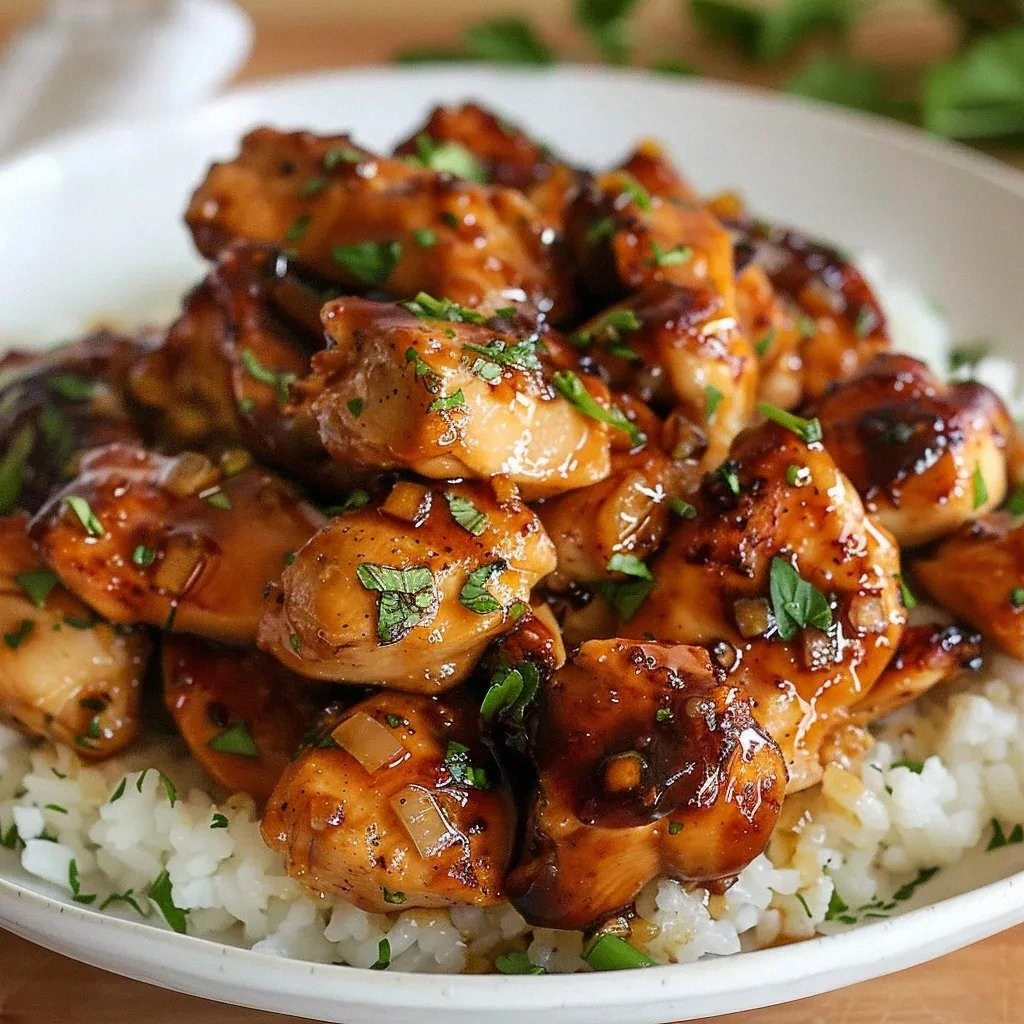
- Serve the chicken immediately over a bed of steamed rice or tossed with pasta, allowing the extra glaze to coat everything. The dish is best enjoyed hot, as the glaze will thicken slightly when cooled. If you’re plating for guests, drizzle any remaining sauce over the plate for an elegant finish. And now the fun part: taste and enjoy.
- That’s it — you did it. But hold on, I've got a few more tricks that'll take this to another level. These insider tips will help you master the dish every time, ensuring that each bite is as perfect as the first.
Insider Tricks for Flawless Results
The Temperature Rule Nobody Follows
Many cooks overcook the chicken, leading to dry meat. The secret is to cook the chicken until it reaches an internal temperature of 165°F, then remove it from the heat while it still has a few degrees to spare. This carry‑over cooking keeps the chicken moist and tender. I once tried this trick and the result was juicy, flavorful chicken that stayed succulent throughout.
Why Your Nose Knows Best
The aroma of honey and butter sizzling together is a clear indicator that the sauce is on the right track. A sweet, nutty smell means the butter has melted correctly; a slightly sharp scent signals that the vinegar has balanced the sweetness. Trust your nose—if the sauce smells off, adjust the vinegar or honey accordingly. This sensory checkpoint saves you from a bland final dish.
The 5‑Minute Rest That Changes Everything
After searing, let the chicken rest for exactly five minutes. This rest allows the juices to redistribute, preventing them from spilling out when you cut into the meat. I’ve seen even seasoned chefs forget this step, resulting in a dry bite. A quick five‑minute pause is the difference between a mediocre and a memorable meal.
Use a Non‑Stick Skillet for Easy Release
A high‑quality non‑stick skillet ensures the chicken releases effortlessly, preserving the crisp skin. If you’re using a stainless steel pan, coat the surface lightly with oil to prevent sticking. A well‑coated pan also helps achieve an even sear, giving the dish a professional look and feel.
Keep the Sauce Thick, Not Thin
If the sauce becomes too thin, add a pinch more cornstarch or flour. Mix it with a little cold water to form a slurry before adding it to the pan. This technique prevents the sauce from becoming watery and ensures it clings to the chicken. The glossy finish is what makes this dish stand out.
Use Fresh Garlic for an Extra Kick
Freshly minced garlic adds a bright, sharp flavor that powdered garlic cannot replicate. If you’re in a hurry, pre‑minced garlic works, but it will be slightly milder. I’ve found that using a combination of fresh and powdered garlic gives the best balance of intensity and even distribution.
Creative Twists and Variations
This recipe is a playground. Here are some of my favorite ways to switch things up:
Spicy Ginger Twist
Add a tablespoon of fresh ginger paste to the sauce for a subtle heat and aromatic depth. The ginger pairs well with the honey, giving the dish a warm, invigorating kick. This variation is perfect for those who love a little spice.
Citrus Burst
Replace the rice vinegar with orange or lemon juice and add zest from the same fruit. The citrus notes brighten the glaze, turning the dish into a refreshing summer favorite. The zest also adds a visual pop of color.
Smoky Chipotle Flavor
Stir in a teaspoon of chipotle powder or a few drops of chipotle in adobo for a smoky, slightly sweet flavor profile. The chipotle’s heat complements the honey and butter, creating a layered taste experience. This version is great for a cozy, autumnal meal.
Herb‑Infused Variation
Swap the parsley garnish for fresh thyme or rosemary. The earthy herbs bring a different dimension to the dish, making it suitable for a rustic dinner setting. The herbs also pair wonderfully with roasted vegetables.
Vegetarian Version
Replace the chicken with thick-cut tofu or tempeh. Marinate the protein in the honey‑soy glaze for 30 minutes before cooking. The tofu will absorb the flavors, resulting in a plant‑based dish that still feels indulgent.
Asian Fusion
Add a splash of sesame oil and sprinkle toasted sesame seeds on top. The sesame adds nuttiness that complements the soy sauce, giving the dish an authentic Asian twist. This variation is excellent for pairing with steamed rice or noodles.
Storing and Bringing It Back to Life
Fridge Storage
Store the cooked chicken and sauce separately in airtight containers. The sauce will thicken in the fridge, so add a splash of water or a few drops of honey before reheating to restore its silky texture. The chicken can be kept for up to 4 days, making it a convenient make‑ahead option.
Freezer Friendly
Freeze the chicken and sauce in separate freezer bags. When ready to serve, thaw overnight in the fridge and reheat gently on the stove. The sauce will maintain its glossy finish if you reheat it slowly with a splash of water to keep it from drying out. This method keeps the flavors intact for up to 3 months.
Best Reheating Method
Reheat the chicken and sauce in a skillet over low heat, stirring occasionally. Add a teaspoon of water or a splash of honey to loosen the glaze, allowing it to coat the chicken again. Serve immediately for the best texture and flavor. Avoid microwaving, as it can make the sauce rubbery.