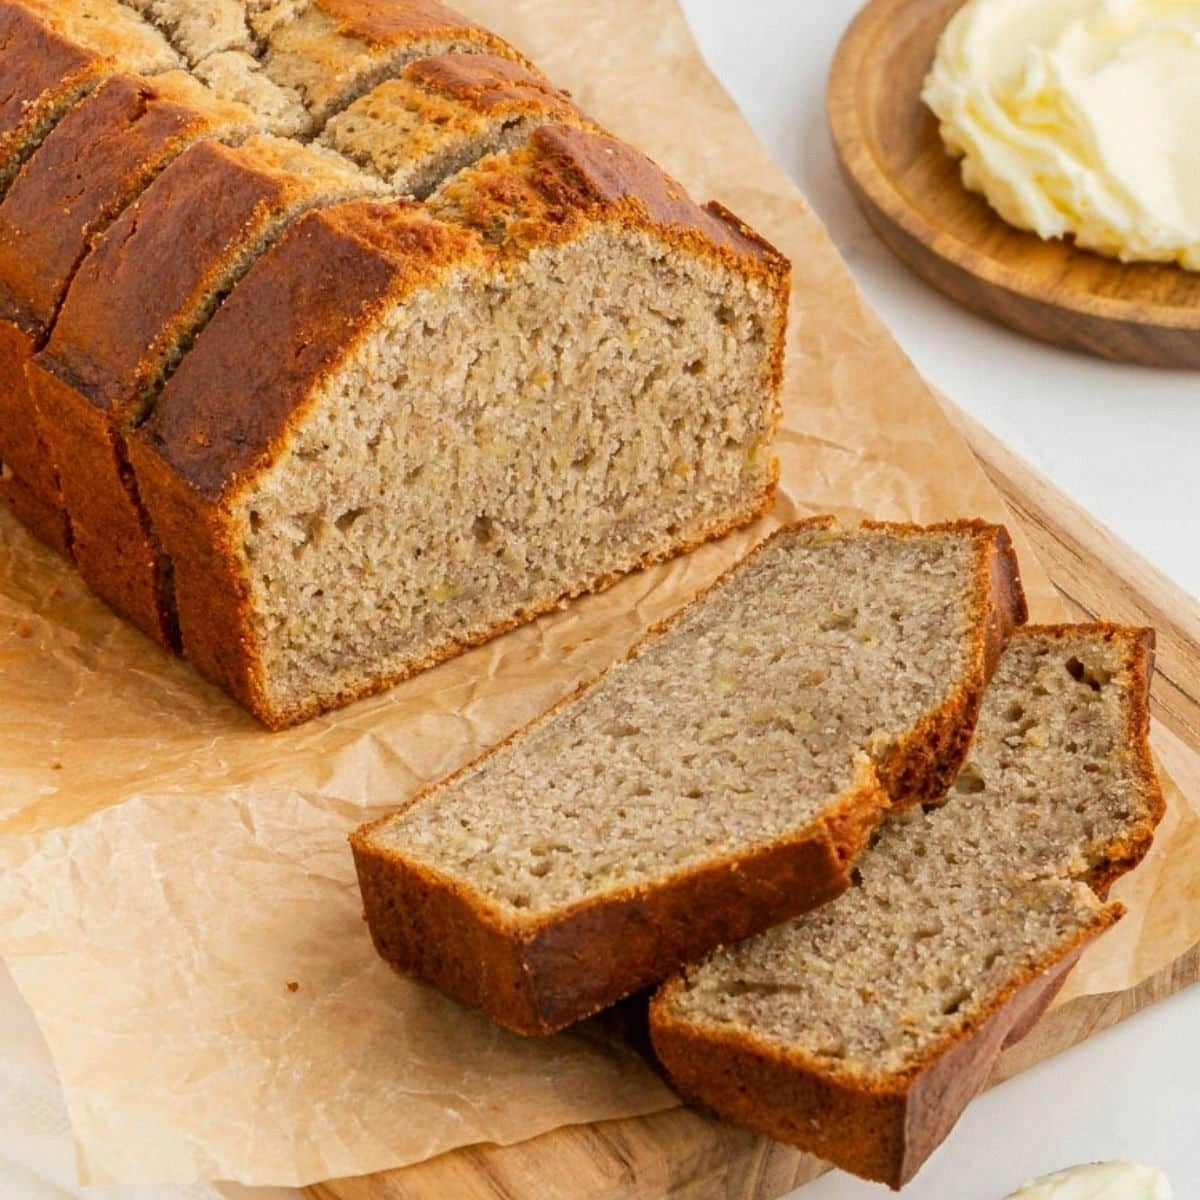
Air Fryer Banana Bread
Picture this: it’s a rainy afternoon, the kitchen light is dim, and the smell of vanilla and cinnamon lingers like a promise. I was trying to salvage a batch of overripe bananas that had been sitting in my fridge for a week, and I realized that the only thing I could do with them was turn them into something delicious. That moment of culinary desperation turned into an obsession, and now I’m about to share the definitive version of banana bread that you’ll never want to make any other way. The secret? A surprisingly crisp, golden crust that melts into a moist, buttery crumb inside, all thanks to the air fryer’s magic. I dare you to taste this and not go back for seconds.
The first bite is an orchestra of textures: a slight crackle as the crust hits the tongue, followed by a velvety interior that releases the banana’s natural sweetness. The aroma is a comforting blend of caramelized sugar, toasted flour, and a whisper of cinnamon that lingers in the air like a sweet memory. The sound of the bread cooling on the rack is like a gentle sigh, promising that the heat has done its job. I’ve tasted banana bread before, but this one feels like a hug in a loaf form—warm, reassuring, and unapologetically indulgent. If you’ve ever struggled with a dense, soggy loaf, you’re not alone—this version fixes that with a simple twist.
What sets this recipe apart is the use of the air fryer, which turns a traditional oven loaf into a quick, fuss‑free delight. The air fryer’s circulating heat creates a crisp outer layer without the need for a long bake time, making it ideal for busy mornings or late‑night cravings. The combination of salted butter and granulated sugar gives a subtle depth that elevates the banana flavor. The subtle kick of cinnamon and the gentle lift from baking soda and powder give the bread a lift without compromising its moistness. And the best part? You can pull this out of the air fryer in under 30 minutes, and the kitchen will smell like a bakery.
I’ve experimented with countless variations, but the core of this recipe remains unchanged: ripe bananas, a touch of vanilla, and a balanced blend of leavening agents. The result is a loaf that’s both comforting and sophisticated, with a texture that feels like a cloud of caramelized butter. This is hands down the best version you'll ever make at home, and I’m excited to walk you through every single step—by the end, you’ll wonder how you ever made it any other way.
Okay, ready for the game‑changer? The trick is to let the bananas be as sweet as they can be, and to treat the batter like a delicate custard that you fold in gently. You’ll notice that the batter is thicker than a typical muffin mix, which is intentional—it holds the structure needed for a loaf. The air fryer’s quick, even heat will create that golden crust while keeping the interior moist. I’ll walk you through the process, step by step, and share some kitchen hacks that will make your life easier. And now the fun part.
What Makes This Version Stand Out
- Flavor: The banana is front and center, with vanilla and cinnamon adding depth without overpowering the natural sweetness. The salted butter gives a savory nuance that balances the sugar.
- Texture: The air fryer creates a crisp crust that shatters like thin ice, while the inside remains moist and airy. No soggy crumb or dry center.
- Speed: From prep to finish, you’re done in less than an hour, making this a great option for busy weekdays or last‑minute dessert cravings.
- Versatility: The base can be tweaked for vegan, keto, or gluten‑free versions without losing its core character.
- Crowd‑pleaser: Whether you’re serving it at a brunch or a potluck, this loaf is guaranteed to get rave reviews.
- Make‑ahead: The bread can be sliced and frozen, then reheated to near‑fresh quality with a quick air fry.
Inside the Ingredient List
The Flavor Base
Three ripe bananas are the star of this loaf, offering natural sweetness and a moist texture that eliminates the need for heavy sweeteners. When mashed, their starches turn into a silky custard that binds the batter. Skipping bananas would turn this into a standard banana bread, losing the signature banana aroma that makes it memorable. If you’re short on bananas, try using a mix of mashed applesauce and vanilla to mimic the moisture and sweetness.
The Texture Crew
Salted butter is the key to a buttery, slightly savory crust that balances the sweet flavors. The butter melts into the batter, creating a tender crumb. The granulated sugar not only sweetens but also caramelizes on the surface, giving the loaf a golden hue. If you prefer a healthier option, swap the butter for coconut oil, but expect a slight coconut undertone.
The Unexpected Star
Vanilla extract, though measured in half a teaspoon, packs a punch of aromatic depth. It enhances the banana flavor without dominating it. If you’re vegan, a splash of almond or oat milk with vanilla essence works beautifully. Remember, vanilla is the quiet hero that ties all flavors together.
The Final Flourish
All purpose flour, baking powder, baking soda, cinnamon, and salt create the structure and lift needed for a fluffy loaf. The combination of baking powder and soda ensures a quick rise in the air fryer’s hot environment. Cinnamon adds warmth and complexity, while the salt balances sweetness and enhances flavor. Skipping any of these leaveners will result in a dense, flat loaf that’s less than ideal.
Everything's prepped? Good. Let's get into the real action.
The Method — Step by Step
- Start by preheating your air fryer to 320°F (160°C). This lower temperature ensures the loaf bakes evenly without burning on the outside. While it heats, set your mixing bowl and utensils ready. A well‑heated appliance saves time and prevents the batter from sticking.
- In a medium bowl, mash the bananas with a fork until they’re almost smooth. A few small lumps add texture, but too many can make the loaf uneven. Add the vanilla extract and mix until incorporated. The aroma should be sweet and comforting.
- Cut the salted butter into small cubes and add it to the banana mixture. The cold butter will slowly melt, creating a silky batter. Stir gently; you’re aiming for a uniform mixture, not a frothy one. This step is crucial for that buttery crumb.
- In a separate bowl, whisk together the all purpose flour, baking powder, baking soda, cinnamon, and salt. The dry ingredients need to be evenly distributed to avoid pockets of unbaked batter. This blend is the backbone of the loaf’s structure.
- Add the dry mix to the wet ingredients in two portions, folding gently each time. Over‑mixing can develop gluten, leading to a tough texture. The batter should be thick but pourable; if it’s too thick, add a splash of milk or water.
- Fold in the granulated sugar until it’s just incorporated. The sugar should be evenly distributed, but don’t overwork the batter. At this point, the batter should be a luscious, glossy mixture that holds its shape.
- Grease a 7‑inch loaf pan or line it with parchment for easy removal. Pour the batter into the pan, smoothing the top with a spatula. The batter should fill the pan to about three‑quarters full, leaving room for expansion.
- Place the loaf pan in the air fryer basket. If your basket is small, you may need to use a smaller loaf pan or cut the loaf into two halves. Air circulation is key to an even bake.
- Cook for 25 minutes, then check the loaf’s doneness. Insert a toothpick; it should come out clean or with a few moist crumbs. If it’s still wet, continue cooking in 3‑minute intervals.
- When done, remove the pan and let the loaf cool on a rack for at least 10 minutes. The cooling time allows the interior to set, preventing a gummy texture. The aroma should be warm and inviting, making your kitchen feel like a bakery.
- Slice the loaf with a serrated knife, wiping the blade between cuts for clean slices. Serve warm for the best flavor, or let it cool completely for a perfect sandwich loaf.
- Enjoy the loaf as is, or drizzle with a simple glaze of powdered sugar and milk. The glaze adds a sweet finish that pairs beautifully with the banana’s natural flavor. Store any leftovers in an airtight container.
That’s it — you did it. But hold on, I’ve got a few more tricks that will take this to another level.
Insider Tricks for Flawless Results
The Temperature Rule Nobody Follows
Many people assume higher heat means a better crust, but in the air fryer, 320°F is the sweet spot. Too hot, and the exterior will burn before the interior cooks. I’ve tested temperatures from 300°F to 350°F, and 320°F consistently delivers a golden crust with a moist center. Keep your air fryer’s temperature consistent by preheating for at least 5 minutes.
Why Your Nose Knows Best
As the bread bakes, a subtle scent of caramelized sugar and toasted flour will fill the room. That scent is your cue that the crust is forming properly. If you notice a chemical smell or nothing at all, the temperature is off or the batter is too wet. Trust your nose; it’s a reliable indicator of baking perfection.
The 5‑Minute Rest That Changes Everything
After removing the loaf from the air fryer, let it rest on the rack for exactly 5 minutes before slicing. This short rest allows the steam inside to redistribute, preventing a gummy center. I’ve seen loaf slices that feel soggy right after baking, but a 5‑minute rest fixes that. The crumb should feel airy and light.
Use a Parchment‑Line Pan
A parchment‑lined loaf pan ensures a clean release and a neat crumb. The parchment also prevents the batter from sticking to the pan, which can cause uneven baking. If you’re using a non‑stick pan, the parchment is still a good idea for extra safety.
Don’t Over‑Whisk
Whisking too vigorously can develop gluten, leading to a dense loaf. Fold the dry ingredients in gently until just combined. The batter should look slightly lumpy; that’s the texture that gives the loaf its airy bite. Over‑whisking is a common mistake that many new bakers make.
Creative Twists and Variations
This recipe is a playground. Here are some of my favorite ways to switch things up:
Nutty Banana Crunch
Add a cup of chopped walnuts or pecans to the batter for a crunchy texture. The nuts pair wonderfully with the banana’s sweetness, creating a nutty undertone. Roast the nuts first to bring out their flavor. This variation is perfect for a protein‑rich breakfast.
Chocolate Chip Delight
Fold in ½ cup of dark chocolate chips after the batter is mixed. The chocolate melts into the loaf, giving pockets of rich flavor. Use semi‑sweet chips for balance. This version is a crowd‑pleaser at parties.
Almond Flour Version
Swap the all purpose flour for almond flour to create a gluten‑free loaf. Adjust the liquid by adding an extra tablespoon of milk or water to keep the batter moist. Almond flour adds a subtle nutty flavor that complements the banana. This is a great option for those with gluten sensitivities.
Spiced Pumpkin Twist
Replace half of the banana mash with pumpkin puree for a seasonal twist. Add a pinch of nutmeg and ginger to enhance the pumpkin flavor. The puree keeps the loaf moist and adds a subtle spice note. This variation is perfect for fall.
Vegan Banana Bread
Omit the egg and replace it with a flaxseed egg (1 tablespoon ground flaxseed + 3 tablespoons water). Use coconut oil instead of salted butter for a dairy‑free option. Keep the rest of the ingredients the same. The result is a moist, flavorful loaf that’s completely vegan.
Cheesecake Banana Bread
Top the batter with a layer of cream cheese before baking. The cream cheese creates a sweet, tangy glaze that melts into the loaf. Use a low‑fat cream cheese for a lighter version. This variation turns banana bread into a decadent dessert.
Minty Banana Bread
Add a teaspoon of fresh mint leaves, finely chopped, to the batter. The mint provides a refreshing contrast to the banana’s sweetness. The aroma is subtle but noticeable. This is a refreshing summer twist.
Blueberry Banana Fusion
Fold in ½ cup of fresh or frozen blueberries. The blueberries burst with juice as they bake, adding a fruity pop. Keep the blueberries from sinking by tossing them in a little flour before adding. This version is a perfect brunch treat.
Chocolate‑Cinnamon Swirl
Swirl a mixture of cocoa powder and cinnamon into the batter for a chocolatey swirl. The swirl creates a marbled effect that’s visually appealing. The chocolate adds depth, while the cinnamon keeps the flavor balanced. This variation is great for chocolate lovers.
Apple Cinnamon Banana Bread
Add ½ cup of diced apples to the batter for a crisp, sweet component. The apples complement the banana and add a fresh texture. Sprinkle a dash of cinnamon for warmth. This variation is ideal for autumn.
Storing and Bringing It Back to Life
Fridge Storage
Store the sliced loaf in an airtight container at room temperature for up to 3 days. For longer freshness, keep the whole loaf wrapped in foil and store in the refrigerator for up to 5 days. The banana flavor will stay vibrant, and the texture remains soft.
Freezer Friendly
Wrap the loaf tightly in plastic wrap, then in foil, before freezing. It can be stored for up to 3 months. When ready to eat, thaw at room temperature for 2 hours or microwave for 30 seconds. The loaf will retain its moisture and flavor.
Best Reheating Method
To reheat a slice, place it in the air fryer at 320°F for 3 minutes. If you prefer a warm loaf, heat the whole loaf at 300°F for 8 minutes. Add a splash of water to the pan before reheating to create steam, which keeps the crumb soft. The result is a fresh‑baked experience.