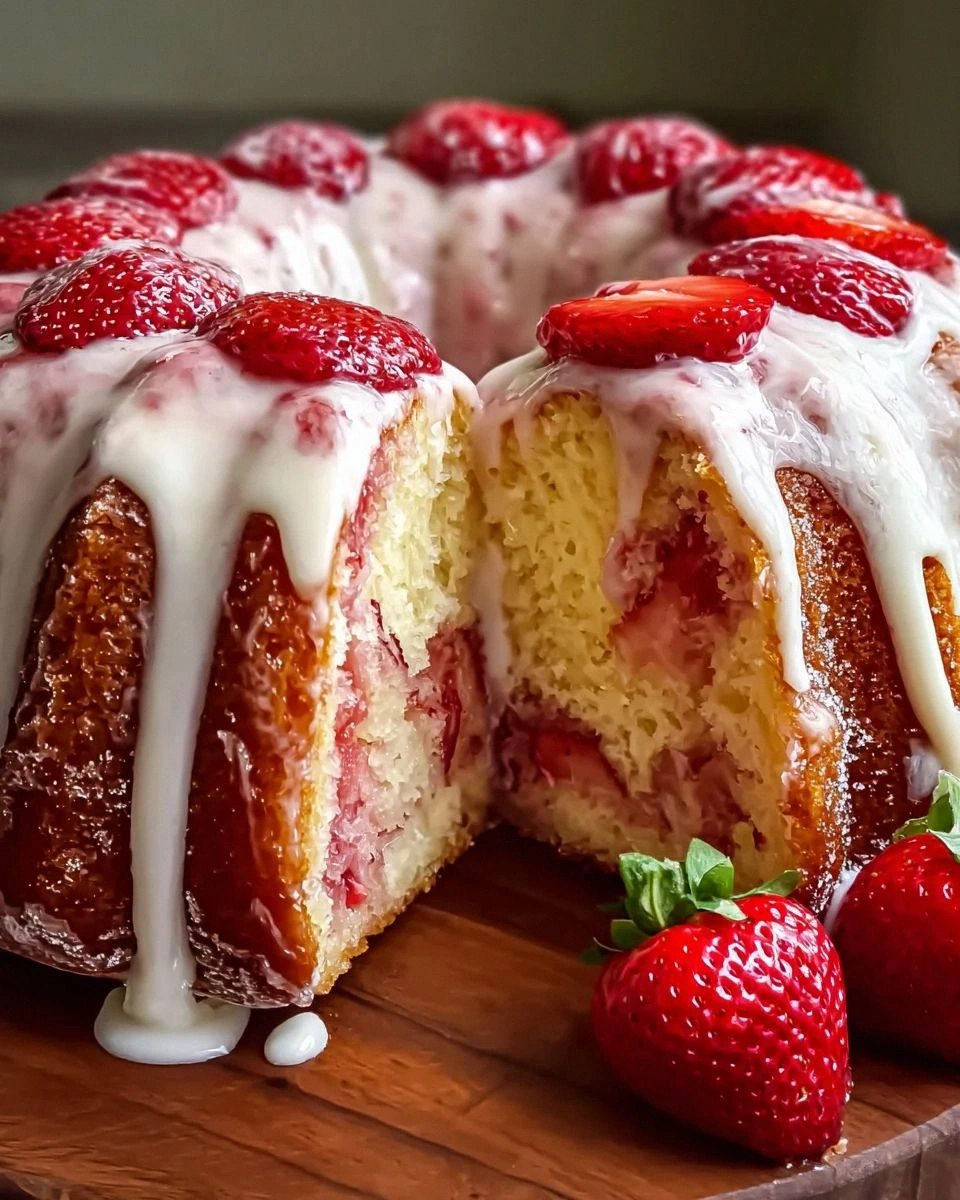
I’ll be honest — I ate half the batch before anyone else got to try it, and that’s because this strawberry cream cheese pound cake is hands down the best version you’ll ever make at home. It all started on a rainy Saturday when I was trying to salvage a busted batch of plain pound cake that tasted like cardboard. I tossed in a handful of fresh strawberries, a block of cream cheese, and a splash of vanilla, and the kitchen instantly transformed into a sweet perfume shop. The result? A cake that smells like a spring garden after a rainstorm, with a crumb that’s as tender as a sigh and a strawberry swirl that’s bright enough to make your taste buds do a little dance.
Picture yourself pulling this out of the oven, the whole kitchen smelling incredible, the top shimmering with a faint golden hue, and a gentle steam rising like a curtain call. The first forkful is a buttery, melt‑in‑your‑mouth texture that gives way to a luscious, slightly tangy cream cheese center, while ribbons of strawberry puree weave through like sunrise through clouds. The crumb is dense enough to feel indulgent but light enough that you could eat a whole slice without feeling like you’ve swallowed a brick. And the best part? It stays moist for days, making it the perfect make‑ahead treat for brunches, picnics, or midnight cravings.
Most recipes get this completely wrong. They either skimp on the cream cheese, leaving a dry, bland cake, or they drown it in fruit, turning it into a soggy mess. I’ve tried the “quick” shortcuts that promise a 20‑minute miracle, and they all ended up as a disappointing crumbly pancake. This version, however, balances the richness of butter and cream cheese with the fresh acidity of strawberries, and the secret technique of folding the puree into the batter at just the right moment ensures that you get pockets of juicy fruit without a soggy bottom.
Okay, ready for the game‑changer? I’m about to reveal a technique that most home bakers overlook: the cream cheese should be softened to room temperature and beaten separately until it’s silky smooth before it meets the butter. This tiny step creates an emulsion that keeps the crumb ultra‑tender and prevents the dreaded “grainy” texture. Let me walk you through every single step — by the end, you’ll wonder how you ever made it any other way.
What Makes This Version Stand Out
- Flavor Explosion: The marriage of sweet strawberry puree with tangy cream cheese creates a depth that’s richer than any plain pound cake.
- Texture Triumph: A dense yet buttery crumb that stays moist for days, thanks to the perfect butter‑cream cheese emulsion.
- Simplicity: Only nine core ingredients, no fancy gadgets, and a single bowl for most of the work.
- Unique Swirl: The strawberry puree is folded in at the end, giving you beautiful marbled ribbons that look as good as they taste.
- Crowd‑Pleaser: Even the pickiest sweet tooth can’t resist the bright strawberry flavor paired with the subtle tang.
- Ingredient Quality: Using real, ripe strawberries and full‑fat cream cheese makes the difference between “good” and “legendary.”
- Method Magic: Creaming butter and cream cheese separately prevents over‑mixing and keeps the crumb tender.
- Make‑Ahead Potential: This cake freezes beautifully, so you can bake it ahead of a big event and simply thaw.
Inside the Ingredient List
The Flavor Base
Fresh strawberries are the heart of this cake. I use about one cup of ripe berries, pureed until smooth, which injects a natural sweetness and a subtle acidity that cuts through the richness of the butter and cream cheese. If you skip the strawberries, you’ll lose the bright, summery flavor that makes this cake sing. For a deeper fruit profile, try adding a tablespoon of strawberry jam to the puree; it intensifies the color and adds a hint of cooked fruit complexity.
The Texture Crew
All‑purpose flour provides the structure, while the modest amount of baking powder gives the cake a gentle lift without turning it into a sponge. Butter, softened and creamed, contributes that melt‑in‑your‑mouth richness, and the cream cheese—full‑fat, not low‑fat—adds a tangy creaminess that keeps the crumb moist. Skipping the cream cheese or using a low‑fat version will make the cake dry and dense, a fate I’ve seen too many “quick” recipes suffer.
The Unexpected Star
A splash of vanilla extract may seem minor, but it acts like a bridge between the sweet strawberry and the buttery base, rounding out the flavors. Even a pinch of salt is essential; it amplifies the sweetness and balances the tang of the cream cheese. If you’re feeling adventurous, a dash of almond extract can add a nutty undertone that pairs beautifully with strawberries.
The Final Flourish
Granulated sugar is the sweetener, but I also dust the finished cake with powdered sugar for a snow‑kissed finish that looks picture‑perfect on any brunch table. A final brush of melted butter before baking creates a glossy crust that shatters like thin ice when you slice into it. If you’re planning to freeze leftovers, wrap the cooled cake tightly in plastic wrap and then foil to lock in moisture.
Everything's prepped? Good. Let's get into the real action…
The Method — Step by Step
Preheat your oven to 350°F (175°C) and grease a 9‑inch loaf pan with butter, then line the bottom with parchment paper. The parchment ensures the cake releases cleanly, and the butter prevents any stubborn sticking that could tear the beautiful top. While the oven heats, take a moment to smell the butter as it softens—that buttery perfume is a promise of what’s to come.
Kitchen Hack: Place the pan on a warm towel for 2 minutes; this prevents the batter from cooling too quickly when poured.In a large mixing bowl, beat together the softened butter and cream cheese until the mixture is light, fluffy, and pale yellow—about 2‑3 minutes on medium speed. This is the moment of truth; the batter should look like a silky cloud, not a curdled mess. Scrape down the sides with a rubber spatula to ensure every bit is incorporated, because missed pockets of butter will create uneven pockets in the final crumb.
Add the granulated sugar gradually, allowing each spoonful to dissolve before adding the next. You’ll hear a faint whisper as the sugar dissolves, and the batter will start to look glossy. This gradual method prevents the sugar from “splintering” the fat, which can cause a grainy texture later on.
One at a time, whisk in the eggs, making sure each egg is fully blended before the next joins the party. The batter should become thick and glossy, resembling a luxurious custard. If you notice the mixture looking curdled, keep beating—eventually it will smooth out as the emulsification completes.
Stir in the vanilla extract and a pinch of salt, then whisk in the strawberry puree until you see beautiful marbled ribbons swirl through the batter. At this point, the aroma of fresh strawberries should be intoxicating, and the color will be a blush pink that hints at the flavor explosion to follow.
Sift together the flour and baking powder over the batter, then gently fold it in using a spatula. This is the trickiest step—over‑mixing will develop gluten and make the cake tough. Watch out for a batter that looks too thick; if it does, add a tablespoon of milk to loosen it just enough for a smooth pour.
Watch Out: Over‑folding the flour will create a dense, rubbery crumb—use a gentle hand and stop as soon as no dry spots remain.Pour the batter into the prepared loaf pan, smoothing the top with a spatula. For an extra glossy finish, melt a tablespoon of butter and brush it lightly over the surface before it hits the oven. This creates a subtle sheen that catches the light and adds a buttery crunch to the crust.
Kitchen Hack: Tap the pan on the counter three times to release any trapped air bubbles; this yields a smoother crumb.Slide the pan into the preheated oven and bake for 30‑35 minutes, or until a toothpick inserted about two inches from the edge comes out clean and the top is a deep golden‑brown. Around the 20‑minute mark, you’ll hear a faint “sizzle” as the butter caramelizes—trust that sound; it means the crust is forming perfectly.
Once baked, remove the cake from the oven and let it rest in the pan for 10 minutes. This short rest lets the steam finish cooking the center gently, preventing a gummy middle. Afterward, run a thin knife around the edges, invert onto a cooling rack, and peel away the parchment paper.
While the cake cools completely, dust the top with a generous snowfall of powdered sugar. The powder not only adds visual appeal but also balances the richness with a whisper of sweetness. Slice with a serrated knife, serve with a dollop of whipped cream if you like, and watch your guests’ faces light up like they’ve just discovered a secret treasure.
That's it — you did it. But hold on, I've got a few more tricks that'll take this to another level…
Insider Tricks for Flawless Results
The Temperature Rule Nobody Follows
Never bake a pound cake straight from a cold kitchen. Bring all refrigerated ingredients—especially butter, cream cheese, and eggs—to room temperature before you start. The reason? Uniform temperature ensures a consistent emulsion, preventing the batter from separating mid‑mix. I once tried to rush the process by using chilled butter; the cake ended up with a grainy texture that was impossible to rescue.
Why Your Nose Knows Best
Your sense of smell is a more reliable indicator of doneness than a timer. Around the 25‑minute mark, the cake should give off a nutty, caramelized butter aroma, and the edges will start pulling away from the pan. If you still smell raw batter, give it a few more minutes. Trust the nose; it never lies.
The 5‑Minute Rest That Changes Everything
After removing the cake from the oven, let it sit in the pan for exactly five minutes before turning it out. This brief pause lets the steam redistribute, preventing a soggy bottom while keeping the crumb tender. Skipping this step results in a crust that’s too firm on the bottom and a crumb that can crumble when sliced.
The Butter Brush Secret
A light brush of melted butter on the top before baking creates a glossy, slightly crisp crust that shatters beautifully when you cut into it. It also adds a subtle buttery flavor that complements the strawberry swirl. For an extra touch, sprinkle a pinch of flaky sea salt on the butter‑brushed surface before it goes into the oven.
The Cool‑Down Flip
Once the cake has cooled on a rack for at least 30 minutes, flip it upside‑down for a final 10‑minute rest. This technique helps the crumb set uniformly and prevents the top from becoming too dry. I discovered this by accident when I stored a cake upside‑down in the fridge and found it was even moister the next day.
Creative Twists and Variations
This recipe is a playground. Here are some of my favorite ways to switch things up:
Lemon‑Berry Fusion
Swap half of the strawberry puree for fresh lemon zest and a splash of lemon juice. The citrus brightens the flavor profile, making the cake perfect for spring brunches. Pair with a dollop of lemon curd for an extra zing.
Chocolate Swirl Delight
Add a swirl of melted dark chocolate after folding in the flour. The bitter chocolate ribbons contrast beautifully with the sweet strawberry, creating a sophisticated flavor duet. This version is a hit at dinner parties where guests love a surprise element.
Almond‑Orange Elegance
Incorporate a tablespoon of almond extract and orange zest into the batter. The nutty undertone pairs wonderfully with the strawberry, while the orange adds a fragrant citrus note. Garnish with toasted almond slivers for texture.
Whole Wheat Health Boost
Replace half of the all‑purpose flour with whole wheat pastry flour. The cake gains a slightly nutty flavor and a boost of fiber without sacrificing tenderness. Ideal for those who want a slightly healthier indulgence.
Berry Medley Madness
Mix in a handful of raspberries and blueberries alongside the strawberries for a mixed‑berry swirl. The different colors create a stunning visual effect, and each bite offers a unique burst of flavor. Perfect for summer picnics.
Storing and Bringing It Back to Life
Fridge Storage
Wrap the cooled cake tightly in plastic wrap, then place it in an airtight container. It will stay fresh for up to five days in the refrigerator. The cream cheese component actually helps retain moisture, so you’ll still enjoy a soft crumb when you slice it out.
Freezer Friendly
Slice the cake into individual servings, wrap each slice in parchment, then foil, and freeze. When you’re ready to indulge, let the slice thaw at room temperature for 20 minutes, then pop it in a 300°F oven for five minutes. The quick heat revives the crust and restores the melt‑in‑your‑mouth texture.
Best Reheating Method
To bring a refrigerated slice back to life, preheat your oven to 325°F, place the slice on a baking sheet, and add a tiny splash of water (about a teaspoon) around the edges. Cover loosely with foil and heat for 8‑10 minutes. The steam created by the water re‑hydrates the crumb, making it feel freshly baked.