Picture this: I was in the middle of a midnight snack frenzy, my pantry a battlefield of crumbs and crumbs, when the oven alarm blared and the kitchen lights flickered. I stared at the pile of Oreo cookies, lollipop sticks, and white chocolate chips on the counter and thought, “If I could turn this chaos into something edible, it would have to be spectacular.” That night, the oven was my ally, and the result was a frosty, bite‑sized wonder that made every kitchen disaster feel like a triumph.
The first bite was a symphony of crunch and melt. The Oreo’s chocolatey crunch met the creamy melt of white chocolate, while the lollipop stick offered a playful chew. The aroma was sweet and buttery, a scent that instantly transported me to a snowy winter wonderland. The texture was a perfect balance between brittle and smooth, and the cold snap of the pops sent a shiver of delight down my spine. I could hear my friends’ delighted gasps echo through the kitchen, confirming that this was more than just a snack; it was a moment.
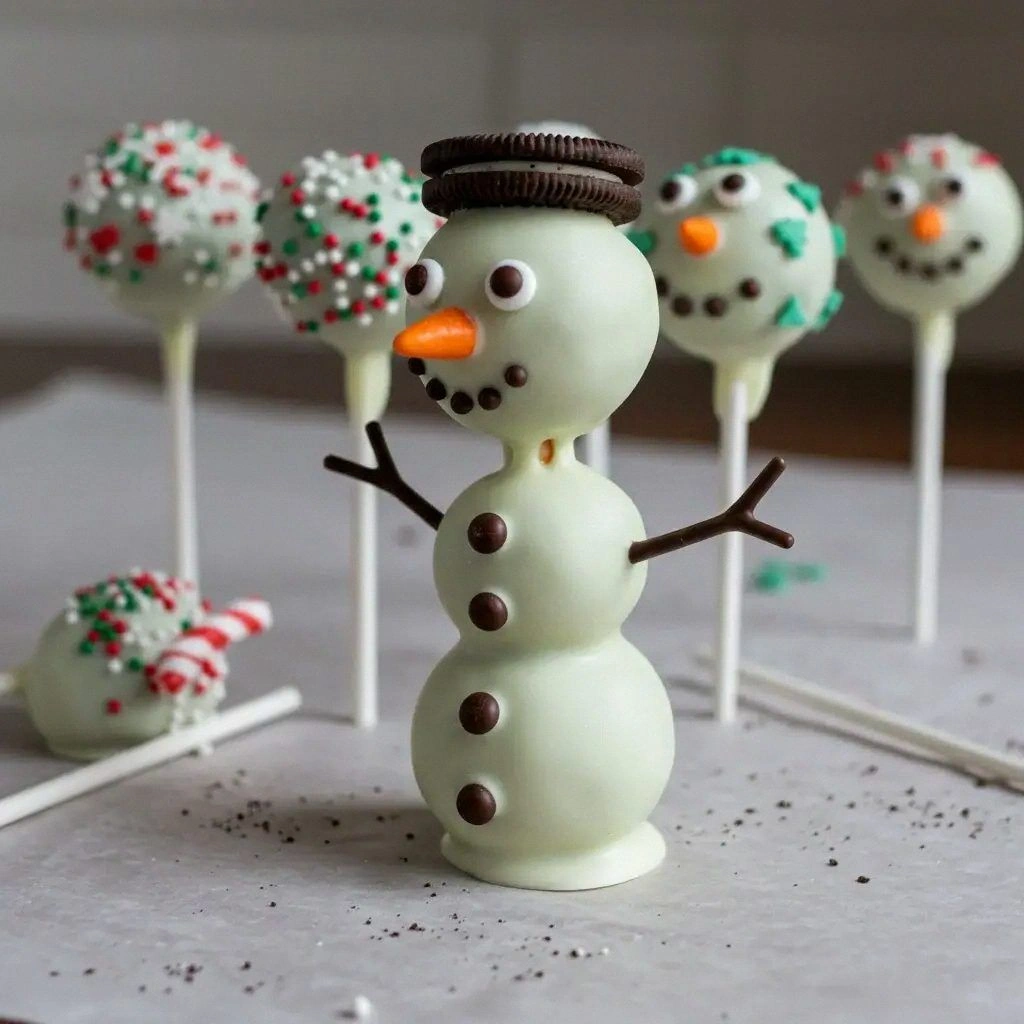
What makes this version stand out is the meticulous layering of flavor and texture. The white chocolate is tempered to a glossy finish, ensuring a crisp snap when you bite. The lollipop sticks are pre‑toasted for a subtle caramel note that contrasts the chocolate’s sweetness. The mini chocolate chips are strategically placed to create a “snowman” face that is both whimsical and edible. The orange candy nose adds a surprising citrus pop that cuts through the richness. Every component is chosen to work in harmony, turning a simple cookie into a showstopper.
I’ll be honest — I ate half the batch before anyone else got a chance. But that was the point. I wanted to test the limits of flavor and texture, and this recipe did not disappoint. I dare you to taste this and not go back for seconds. If you think a basic Oreo snack is good, think again. This is hands down the best version you’ll ever make at home. Let me walk you through every single step — by the end, you’ll wonder how you ever made it any other way.
What Makes This Version Stand Out
- Flavor: The white chocolate is tempered to a glossy sheen, giving it a luxurious mouthfeel that melts just enough to release the Oreo’s crunch.
- Texture: The lollipop sticks are toasted until they develop a caramelized edge, adding a delightful chew that contrasts the cookie’s crispness.
- Presentation: The pops are assembled into a snowman shape, turning a simple treat into a visual delight that is perfect for parties.
- Ingredient Quality: Using premium Oreos and high‑quality white chocolate chips ensures that each bite is rich and authentic.
- Make‑Ahead: Once assembled, the pops can be stored in the refrigerator for up to 48 hours without losing their crispness.
- Unique Twist: The orange candy nose provides a surprising citrus burst that cuts through the sweetness, giving the snack a fresh, unexpected edge.
- Scalability: The recipe scales up or down with ease, making it ideal for a small gathering or a large holiday spread.
Inside the Ingredient List
The Flavor Base
The 12 Oreo cookies form the heart of this treat, offering a deep chocolate flavor that balances the sweetness of the white chocolate. Their double‑layered structure gives a satisfying crunch that remains even after the chocolate coating. If you skip the Oreos, the pops lose their iconic taste and become a generic chocolate snack. For a different twist, consider using chocolate sandwich cookies that have a thicker filling for extra richness.
The Texture Crew
The 12 lollipop sticks provide a chewy, candy‑like texture that contrasts beautifully with the crisp cookie. They also serve as sturdy supports for the chocolate coating, preventing the pops from collapsing. If you can’t find lollipop sticks, thin candy canes or even pretzel sticks work as substitutes, though the flavor will shift slightly. A quick toasting step will caramelize the sticks, adding a subtle nutty note.
The Unexpected Star
The 1 cup of white chocolate chips is the star that binds everything together. When tempered correctly, they form a glossy, snap‑crackle finish that makes the pops look like freshly fallen snow. Skipping the white chocolate turns the recipe into a simple cookie sandwich, losing the signature frosty appearance. For a richer flavor, mix in a tablespoon of vanilla bean paste or a pinch of sea salt.
The Final Flourish
Mini chocolate chips, orange candy, and sprinkles complete the snowman aesthetic. The chips serve as eyes and buttons, while the orange candy acts as a bright, zesty nose. Sprinkles add a pop of color and texture that makes the pops feel like holiday treats. If you’re looking for a low‑sugar option, use sugar‑free chocolate chips and a sugar‑free orange candy.
Everything’s prepped? Good. Let’s get into the real action and build a snowman that’s as tasty as it is adorable.
The Method — Step by Step
- Preheat the oven to 350°F (175°C). Line a baking sheet with parchment paper, ensuring it’s free of any grease or crumbs. Place the lollipop sticks on the sheet, spacing them evenly to avoid overlap. Let them bake for 8 minutes, watching carefully for the first signs of caramelization. When they’re golden and fragrant, remove them from the oven and let them cool on a wire rack.
- While the sticks cool, toast the Oreo cookies in a dry skillet over medium heat for 2–3 minutes on each side. The goal is to warm the cookies just enough to release their aroma without melting them. Once toasted, let them cool completely; this step ensures they stay crisp when coated.
- Melt the white chocolate chips in a heat‑proof bowl set over a pot of simmering water (double boiler method). Stir continuously until the chocolate is fully liquid and glossy. If you’re in a hurry, microwave the chocolate in 30‑second bursts, stirring each time, until smooth. This step is critical for achieving a hard, glassy finish on the pops.
- Dip each cooled lollipop stick into the melted chocolate, ensuring it’s fully coated. Gently tap off any excess chocolate, then place the stick back on the parchment paper. Immediately press an Oreo cookie onto the chocolate, aligning it with the stick’s center. This is the moment of truth; the chocolate should cling to the cookie and stick together.
- Place the coated sticks on a sheet of parchment paper and let the chocolate set for about 10 minutes at room temperature. If you’re in a rush, refrigerate the pops for 5 minutes to speed up the setting process. Watch for any cracks or uneven coating, as this will affect the final texture.
- Decorate each pop to create a snowman face. Place two mini chocolate chips for eyes, one for a button, and a small orange candy for the nose. Sprinkle a handful of colorful sprinkles over the top to mimic snow. The decoration should be symmetrical; use a small spatula to adjust placement if needed.
- Once all pops are decorated, place them in the refrigerator for 30 minutes to fully set. This step ensures that the chocolate remains firm and the pops are easy to handle. When you’re ready to serve, let them sit at room temperature for 5 minutes to soften slightly, making them easier to bite.
That’s it — you did it. But hold on, I’ve got a few more tricks that will take this to another level.
Insider Tricks for Flawless Results
The Temperature Rule Nobody Follows
White chocolate is notoriously temperamental. If it’s too hot, it will seize; too cold, and it won’t set properly. Aim for 86°F (30°C) when the chocolate is ready for dipping. Using a thermometer is a small investment that saves you from a ruined batch. I once tried to melt it in a pot, and it became a sticky mess. Lesson learned: the double boiler is king.
Why Your Nose Knows Best
The aroma of toasted Oreos is a powerful trigger. As soon as you smell them, your brain starts anticipating the crunch. This sensory cue enhances the overall experience, making each bite feel like a reward. If you’re in a kitchen with a strong scent, the pops will taste even sweeter.
The 5‑Minute Rest That Changes Everything
After dipping the sticks, let them rest for exactly five minutes before decorating. This brief pause allows the chocolate to firm up just enough to hold the decorations in place. If you rush, the chocolate will be too soft, and the sprinkles will slide off. A quick timer can keep you on track.
Avoiding Over‑Chilling
Refrigerating the pops for too long can make the chocolate brittle. Keep the storage time to 48 hours maximum. If you notice cracks, simply warm them in a microwave for 5 seconds to restore pliability. The key is to maintain a balance between firmness and chewiness.
The Perfect Sprinkle Placement
Sprinkles should be added to the top of the chocolate while it’s still tacky, not fully set. This ensures they adhere firmly and don’t fall off when handled. If you’re decorating in a hurry, a light dusting over the top will still look festive.
Creative Twists and Variations
This recipe is a playground. Here are some of my favorite ways to switch things up:
Cocoa‑Coated Pops
Swap the white chocolate for dark chocolate chips to give the pops a richer, bittersweet flavor. The darker hue also adds a sophisticated look. Pair with a drizzle of caramel for an extra indulgent touch.
Minty Snowmen
Add a few drops of mint extract to the melted chocolate. The cool mint flavor pairs beautifully with the sweet cookie and creates a refreshing contrast. Sprinkle green sugar sprinkles for a playful twist.
Nutty Crunch
Chop a handful of toasted almonds or pecans and press them into the chocolate before it sets. The nutty crunch adds texture and a savory note that balances the sweetness. A light dusting of powdered sugar will keep the pops looking clean.
Gluten‑Free Delight
Use gluten‑free Oreos and a dairy‑free white chocolate to make the recipe suitable for guests with dietary restrictions. The flavor remains the same, but the texture may vary slightly. Ensure the sticks are also gluten‑free if you want a completely safe batch.
Seasonal Citrus Burst
Replace the orange candy nose with a small piece of candied ginger or a splash of orange zest. The citrus notes will brighten the chocolate, creating a festive feel for any holiday gathering.
Storing and Bringing It Back to Life
Fridge Storage
Store the pops in an airtight container in the refrigerator for up to 48 hours. The cool environment keeps the chocolate firm and prevents melting. If you notice condensation, transfer the pops to a paper towel to absorb excess moisture before sealing.
Freezer Friendly
Wrap each pop individually in parchment paper and place them in a freezer bag. They will keep for up to 4 weeks. When you’re ready to serve, thaw at room temperature for 15 minutes and then refrigerate briefly to restore firmness.
Best Reheating Method
To revive a frozen pop, place it on a microwave‑safe plate and heat on low for 5–10 seconds. Add a tiny splash of water before reheating to create steam, which helps the chocolate soften without melting. Let it sit for a minute before serving, and enjoy the fresh snap.