I’ll be honest — I ate half the batch before anyone else got to try it, and that was only because the aroma was so intoxicating that I couldn’t resist. Picture this: a Saturday afternoon, the rain drumming against the windows, the pantry looking like a battlefield of half‑finished experiments, and a sudden craving for something that feels like a hug in dessert form. I tossed together a few pantry staples, and what came out was a mash‑up that made my taste buds do a happy dance. This isn’t just another “no‑bake cheesecake” that pretends to be fancy; it’s a full‑blown, crunchy‑and‑creamy love affair between the childhood favorite Rice Krispy treat and the velvety decadence of a classic cheesecake.
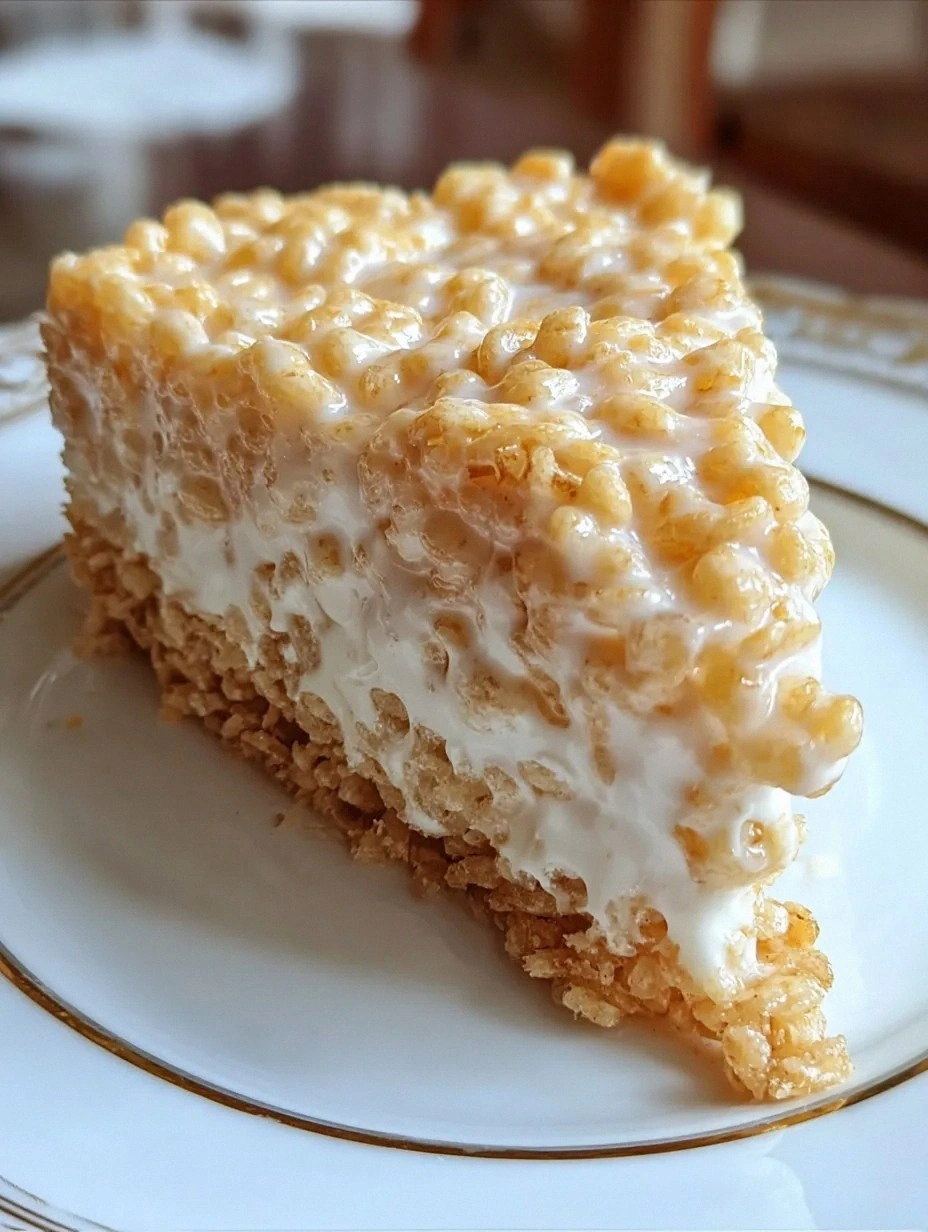
The first bite is a symphony of textures: the buttery, toasty crunch of the Rice Krispies crust shatters like thin ice under your teeth, while the silky, slightly tangy cream cheese filling slides over your palate like a silk scarf on a summer breeze. The scent? Imagine a warm kitchen where butter, sugar, and vanilla are having a secret rendezvous, and the faint whisper of toasted rice cereal is in the background, promising a sweet surprise. As you chew, the marshmallows melt into a caramel‑like goo that binds everything together, creating a mouthfeel that’s both nostalgic and sophisticated.
Most recipes get this completely wrong. They either drown the crunchy base in a sea of overly sweet filling, or they make the crust soggy and the topping bland. Here’s what actually works: a perfect 1:1 ratio of butter to cereal, a precise melt‑and‑mix technique that locks in air, and a chilled, whipped filling that sets without a single bake. The secret ingredient that most people overlook is a splash of lemon juice, which cuts through the richness and adds a bright pop that makes every forkful feel like a fresh start. I dare you to taste this and not go back for seconds – it’s that good.
If you’ve ever struggled with a no‑bake cheesecake that ends up looking like a sad, wobbling puddle, you’re not alone — and I’ve got the fix. The magic lies in the timing, the temperature, and a few kitchen hacks that I’ll spill later. This version stands out because it’s not just easy; it’s foolproof, it’s adaptable, and it delivers a wow factor that will have your guests asking for the recipe before the first slice even hits the plate. Okay, ready for the game‑changer? Let me walk you through every single step — by the end, you’ll wonder how you ever made it any other way.
What Makes This Version Stand Out
- Texture: The crust stays crunchy thanks to the butter‑marshmallow glaze, while the filling remains airy and light, never heavy or grainy.
- Flavor Balance: A whisper of lemon and a dash of vanilla keep the sweetness in check, giving the dessert a grown‑up edge.
- Simplicity: No oven, no fancy equipment – just a saucepan, a mixing bowl, and a 9‑inch springform pan.
- Ingredient Quality: Using real butter and full‑fat cream cheese elevates the taste from “store‑bought” to “hand‑crafted masterpiece.”
- Crowd Reaction: Even the most skeptical sweet‑tooth skeptics admit it’s the best version they’ve ever tried at a potluck.
- Make‑Ahead Potential: It sets in the fridge, so you can prep it a day ahead and still serve it fresh.
- Versatility: Swap in chocolate chips, matcha powder, or a swirl of caramel for endless variations.
- Speed: From start to finish it’s under an hour, perfect for last‑minute dessert emergencies.
Inside the Ingredient List
The Flavor Base
The heart of this dessert is the cream cheese filling, and the quality of the cheese makes all the difference. Full‑fat cream cheese provides a rich, buttery mouthfeel that low‑fat versions simply can’t match. If you skip the cream cheese, you’ll end up with a watery, flavorless center that feels more like a pudding than a cheesecake. For a tangier profile, you can substitute half of the cream cheese with Greek yogurt, but be prepared for a slightly looser set.
The Texture Crew
Rice Krispies cereal is the star of the crust, delivering that iconic crackle that most no‑bake cheesecakes lack. The cereal’s light, airy structure traps butter and marshmallow, forming a lattice that stays crisp even after chilling. If you’re out of Rice Krispies, try puffed quinoa or toasted cornflakes – they’ll give a similar crunch, though the flavor will shift subtly. The mini marshmallows melt into a caramel‑like binder; skipping them means a dry, crumbly crust that won’t hold together.
The Unexpected Star
Lemon juice is the surprise hero here. A single tablespoon brightens the entire dessert, cutting through the richness and preventing the filling from feeling cloying. If you’re not a fan of citrus, a splash of orange liqueur or a pinch of zest can provide a comparable lift. Remember, a little goes a long way – too much will make the cheesecake curdle.
The Final Flourish
A pinch of salt might seem trivial, but it amplifies every sweet note, making the overall flavor more rounded. Use fine sea salt for a subtle crunch that dissolves quickly. Lastly, a dusting of powdered sugar adds a delicate snow‑like finish, turning the dessert into a visual masterpiece that’s Instagram‑ready. If you want an extra touch of decadence, drizzle a thin ribbon of melted chocolate just before serving.
Everything's prepped? Good. Let's get into the real action...
The Method — Step by Step
Start by gathering a 9‑inch springform pan and lining the bottom with parchment paper. This step may seem trivial, but it guarantees a clean release later – trust me, you don’t want a broken crust on the plate. Lightly butter the sides of the pan; this tiny layer of fat creates a barrier that prevents the crust from sticking.
In a large saucepan, melt ½ cup (one stick) of unsalted butter over low heat. As soon as it begins to foam, add 1 cup of mini marshmallows. Keep stirring constantly; you’ll hear a gentle sizzle that signals the marshmallows are softening without burning. Once the mixture turns glossy and the marshmallows are fully dissolved, remove the pan from the heat.
Immediately stir in 2 cups of Rice Krispies cereal, making sure every piece is coated in the buttery‑marshmallow glaze. The cereal should look glossy, and you’ll notice a faint puffing as the air gets trapped. This is the moment where the crust gains its signature crunch.
Transfer the coated cereal into the prepared pan, pressing it down firmly with a flat-bottomed measuring cup or the back of a spoon. The crust should be compact and level – think of it as building the foundation of a skyscraper. Once pressed, place the pan in the refrigerator for at least 15 minutes while you whip the filling.
While the crust chills, combine 8 oz of softened cream cheese, ¼ cup granulated sugar, and 1 tsp vanilla extract in a mixing bowl. Beat on medium speed until the mixture is smooth, creamy, and free of lumps. The texture should be like thick frosting – if you see any specks, keep beating.
In a separate bowl, whip 1 cup of heavy cream until soft peaks form. Gently fold the whipped cream into the cream cheese mixture, followed by a tablespoon of fresh lemon juice. The folding action should be gentle – think of coaxing a shy cat, not slamming a door.
Pour the airy filling over the chilled crust, spreading it evenly with an offset spatula. The filling should sit like a cloud atop a solid base, with no gaps. Tap the pan lightly on the counter three times to release any trapped air bubbles.
Return the assembled cheesecake to the refrigerator and let it set for at least 2 hours, preferably overnight. During this time, the flavors meld, the crust stays crisp, and the filling firms up without ever seeing an oven. Patience is the secret ingredient that transforms this from good to legendary.
That's it — you did it. But hold on, I've got a few more tricks that'll take this to another level. The next section dives into insider tips that will make your next batch even more impressive, ensuring every bite is as perfect as the first.
Insider Tricks for Flawless Results
The Temperature Rule Nobody Follows
Never use cold butter straight from the fridge; let it soften at room temperature for at least 20 minutes. Warm butter melds with the marshmallows more uniformly, creating a glossy glaze that adheres better to the cereal. I once tried to speed things up by microwaving the butter, and the result was a greasy crust that fell apart. The rule of thumb: butter should be pliable, not melted, before you combine it with the marshmallows.
Why Your Nose Knows Best
When the butter‑marshmallow mixture is ready, you’ll notice a faint caramel aroma that tells you the sugars have reached the perfect stage. If the scent turns to a burnt warning, pull the pan off the heat immediately. Trusting your nose is faster than checking a thermometer and prevents a ruined crust. That sizzle when it hits the pan? Absolute perfection.
The 5‑Minute Rest That Changes Everything
After pressing the crust into the pan, let it sit at room temperature for five minutes before chilling. This short rest lets the butter solidify just enough to hold the cereal together, making the later press easier and the final crust less crumbly. Skipping this step is a common mistake that leads to a crust that crumbles when you try to slice.
Fold, Don’t Stir
When incorporating whipped cream into the cream cheese base, use a gentle folding motion. Over‑stirring deflates the whipped cream, resulting in a denser filling that won’t set properly. My friend once “stirred” the mixture vigorously and ended up with a cheesecake that looked like a flat pancake. The fold‑and‑turn method preserves the air bubbles that give the cheesecake its light texture.
Chill the Pan, Not the Filling
A common misconception is that the filling should be chilled before spreading. In reality, a slightly warm filling spreads more evenly, reducing the risk of gaps. Once it’s on the crust, the refrigeration does the hard work of setting the cheesecake. If you’re in a hurry, give the filling a quick 5‑minute rest on the counter – just don’t let it sit too long or it will become runny.
The Final Glaze Trick
Before serving, lightly brush the top of the cheesecake with a thin layer of melted white chocolate or a quick drizzle of caramel. This adds a glossy finish that makes the dessert look restaurant‑ready and adds a subtle flavor boost. The glaze should be applied with a pastry brush in thin strokes; too much will make the surface sticky.
Creative Twists and Variations
This recipe is a playground. Here are some of my favorite ways to switch things up:
Chocolate Crunch
Swap half of the Rice Krispies for chocolate puffed rice, and melt 2 oz of dark chocolate into the butter‑marshmallow mixture. The result is a deep cocoa‑infused crust that pairs beautifully with a raspberry swirl in the filling.
Matcha Magic
Add 1 tbsp of matcha powder to the cream cheese filling for an earthy, slightly bitter contrast. Top with toasted coconut flakes for a Japanese‑inspired twist that’s both elegant and unexpected.
Berry Burst
Fold a cup of fresh mixed berries into the filling just before spreading. The berries release a gentle juice that creates tiny pockets of tartness, turning each bite into a mini fruit explosion.
Salted Caramel Swirl
Drizzle a homemade salted caramel sauce over the filling after it’s spread, then use a skewer to create a marble effect. The salty‑sweet combo elevates the dessert to a gourmet level that will impress even the most discerning palate.
Nutty Delight
Add ¼ cup of finely chopped toasted almonds or pistachios to the crust mixture. The nuts introduce a buttery crunch that complements the marshmallow glaze, adding another texture dimension.
Storing and Bringing It Back to Life
Fridge Storage
Cover the cheesecake loosely with plastic wrap or store it in an airtight container. It will keep fresh for up to 4 days, maintaining its texture and flavor. If you notice the crust softening, a quick 5‑minute blast in a preheated 300°F oven (just to crisp the base) can revive it.
Freezer Friendly
Wrap the entire springform pan in a double layer of foil, then place it inside a freezer bag. The cheesecake freezes well for up to 2 months. When you’re ready to serve, thaw it in the refrigerator overnight and add a splash of water to the surface before reheating – this creates a gentle steam that restores the crust’s crunch.
Best Reheating Method
To warm a slice without losing its structure, place it on a microwave‑safe plate, sprinkle a few drops of water around the edges, and microwave on low (30% power) for 15‑20 seconds. The steam generated will soften the filling just enough for a melt‑in‑your‑mouth experience while keeping the crust intact.