Ever had a kitchen disaster that turned into a culinary revelation? I was in the middle of a holiday feast, juggling a chocolate cake that had just come out of the oven, a jar of cherry pie filling that had been sitting on the counter for days, and a stubborn batch of heavy whipping cream that refused to whip. The oven timer beeped, the cake was still steaming, and my friends were staring at me, waiting for the next bite. I laughed, grabbed a whisk, and thought, “If this is how you make a trifle, I’m going to make it my own.”
Picture the kitchen: the scent of cocoa and cherries swirling together, the sound of a mixer humming like a contented engine, the sight of a glossy chocolate cake slab that looks like a dark velvet blanket, the feel of a chilled glass of cream that tingles against your fingertips. My mouth already tingles with anticipation, and you can almost taste the first bite—a cascade of sweet cherries, a whisper of vanilla, and the rich, airy texture of whipped cream that feels like cloud fluff. If you’ve ever tried a trifle that tasted flat or too sweet, you’ve been missing the secret sauce: a balance of textures and flavors that play a symphony in your mouth.
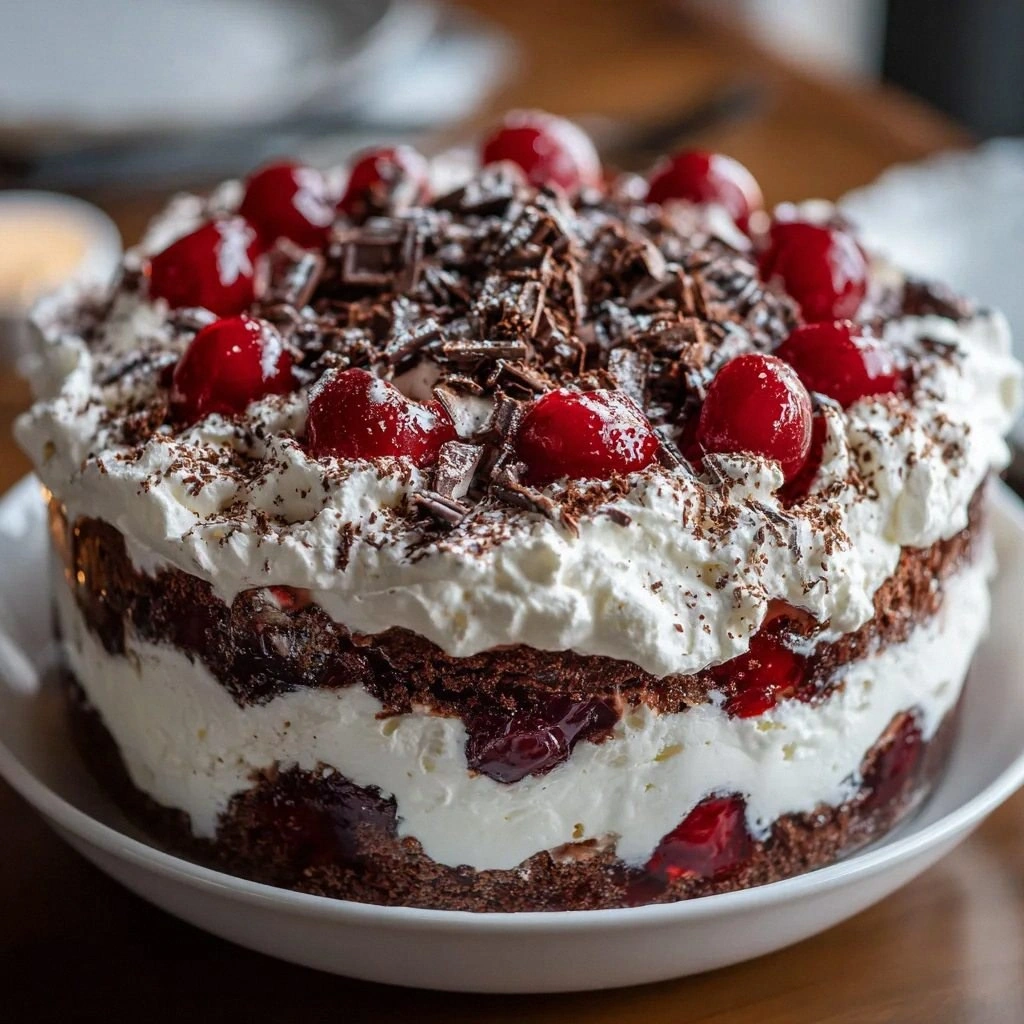
This isn’t just another recipe; it’s a full sensory experience. The chocolate cake is the star, providing a decadent, moist foundation that absorbs the cherry filling like a sponge. The cherries burst with tartness, cutting through the sweetness of the cream. The heavy whipping cream, sweetened just enough with powdered sugar and vanilla, creates a silky layer that lifts the whole dish. The final flourish of chocolate shavings adds a subtle bitterness and a satisfying crunch that makes every bite feel like a holiday gift. I dare you to taste this and not go back for seconds.
And here's the twist: this trifle is so versatile that you can tweak it for any occasion—whether it's a cozy family dinner or a festive gathering with friends. The best part? It’s a game-changer that you’ll want to keep in your pantry for weeks. Let me walk you through every single step—by the end, you'll wonder how you ever made it any other way.
What Makes This Version Stand Out
- Richness: The chocolate cake isn’t just a base; it’s a full-bodied, moist layer that carries the entire dish with its deep cocoa flavor.
- Texture: The interplay of crumbly cake, silky whipped cream, and juicy cherry filling creates a layered mouthfeel that feels like a dessert orchestra.
- Balance: Sweet, tart, and slightly bitter notes are perfectly harmonized, ensuring no single element dominates.
- Ease: No complicated techniques—just assemble, chill, and serve. Even a novice can pull off a showstopper.
- Make‑Ahead: Assemble up to 48 hours in advance; the flavors meld and the layers settle, making it the ultimate no‑stress dessert.
- Visual Appeal: The contrasting colors of dark cake, bright cherries, and white cream make for a stunning presentation that will wow your guests.
- Ingredient Quality: Using high‑quality chocolate cake and fresh cherries elevates the entire dish beyond the ordinary.
- Party‑Ready: It’s a crowd‑pleaser that scales effortlessly—double the servings, double the joy.
Alright, let's break down exactly what goes into this masterpiece…
Inside the Ingredient List
The Flavor Base
Chocolate cake is the foundation, and it does more than just hold the layers together—it infuses the trifle with a deep, bittersweet cocoa flavor that anchors the sweetness of the cherries and cream. If you skip the cake, the dish becomes a flat, one‑dimensional dessert. Instead, consider using a chocolate sponge or a rich chocolate brownie for a twist. When choosing cake, look for a dense crumb; a light, airy cake will absorb the filling too quickly, causing a soggy texture.
The Texture Crew
Heavy whipping cream is the hero that delivers that airy, cloud‑like layer. Whipping it to stiff peaks ensures it holds its shape against the weight of the cake and cherries, preventing collapse. Powdered sugar sweetens the cream without clumping, while vanilla extract deepens the flavor profile, giving a warm, aromatic undertone that complements the chocolate. If you’re lactose intolerant, try a coconut cream alternative, but be mindful that it adds a coconut note.
The Unexpected Star
Cherry pie filling might sound ordinary, but it brings a burst of tartness that cuts through the richness. The acidity balances the sweetness, preventing the trifle from becoming cloying. Use fresh cherries if you can; they’ll add a bright, natural flavor and a pop of color. If you’re short on time, canned cherry filling works, but rinse it to remove excess syrup for a cleaner taste.
The Final Flourish
Chocolate shavings are more than just a garnish; they add a subtle bitterness and a satisfying crunch that elevates the overall texture. Use a vegetable peeler on a dark chocolate bar to create long, elegant ribbons that melt slightly on the tongue. If you want an extra touch of elegance, sprinkle a few dark chocolate shavings over the top right before serving.
Everything's prepped? Good. Let's get into the real action…
The Method — Step by Step
- Begin by chopping the chocolate cake into bite‑size cubes, about 1.5 cm each. The size matters; too large and the layers will be uneven, too small and the cake will fall apart. As you dice, notice the aroma of fresh chocolate rising—this scent alone can turn a simple dessert into a sensory delight.
- Next, pour the cherry pie filling into a medium bowl. If you’re using canned filling, give it a quick stir to break up any clumps. The cherries should be evenly distributed; this ensures each spoonful gets that sweet‑tart punch.
- Whip the heavy cream in a chilled bowl using a hand mixer or stand mixer. Start on low speed, then gradually increase to medium. Add powdered sugar and vanilla extract once the cream begins to thicken. Continue whipping until stiff peaks form—when you lift the whisk, the peaks should hold their shape without drooping.
- Choose a clear, layered glass or a large trifle bowl. This will let you showcase the beautiful strata. Begin with a layer of cake cubes at the bottom, spreading them evenly like a chocolate carpet.
- Add a generous spoonful of cherry filling over the cake. The cherries should sit on top of the cake, not submerged. If the cherries are too wet, gently pat them dry with a paper towel before layering.
- Fold in a layer of whipped cream, using a spatula to create a gentle swirl. This helps blend the flavors without fully mixing the layers, preserving the visual appeal.
- Repeat the cake, cherry, and cream layers until all components are used, finishing with a top layer of whipped cream. Dust the final layer with chocolate shavings, letting them sit on the surface like snow.
- Cover the trifle with plastic wrap or a lid and refrigerate for at least 2 hours, preferably overnight. The chilling process allows the flavors to meld, and the cake absorbs the cherry filling, creating a cohesive, moist dessert.
- Just before serving, give the whipped cream a quick fluff to restore its airy texture. Garnish with an extra sprinkle of chocolate shavings if desired. The final presentation should look like a decadent, layered chocolate forest.
That's it — you did it. But hold on, I've got a few more tricks that'll take this to another level…
Insider Tricks for Flawless Results
The Temperature Rule Nobody Follows
Whipped cream is a temperature‑sensitive hero. If the cream is too warm, it won’t hold peaks; if it’s too cold, it won’t whip properly. Keep your mixing bowl and beaters in the fridge for at least 15 minutes before whipping. A chilled environment ensures the cream emulsifies correctly, giving you a stable, fluffy layer.
Why Your Nose Knows Best
When you’re assembling the trifle, pause and inhale. The aroma of chocolate, cherries, and vanilla should mingle in a harmonious bouquet. If the scent feels off—perhaps too sweet or too bland—adjust by adding a splash of vanilla or a pinch of salt to enhance the flavor profile.
The 5‑Minute Rest That Changes Everything
After you finish whisking the cream, let it rest for 5 minutes before using. This brief pause allows the fat globules to stabilize, ensuring the peaks hold firm when you fold them into the layers. I’ve seen people skip this step, and the result is a collapsed, heavy cream that feels like a sad, flat pancake.
Layering Order Matters
Start with the heaviest layer at the bottom—cake—then alternate. If you put the cherries on the bottom, they’ll dissolve into the cake, losing their bite. The order creates a visual and taste progression that keeps each bite exciting.
Serve with a Twist
Just before serving, drizzle a light chocolate sauce over the top. It adds a glossy finish and a subtle extra chocolate bite that makes the trifle feel even more indulgent. A simple sauce made from melted dark chocolate and a splash of cream will do the trick.
Creative Twists and Variations
This recipe is a playground. Here are some of my favorite ways to switch things up:
Chocolate‑Berry Fusion
Swap cherry filling for a mixed berry compote—strawberries, blueberries, and raspberries. The tartness of the berries adds a fresh, summery feel, making the trifle perfect for a sunny brunch.
Nutty Layer
Add chopped hazelnuts or almonds between the cake and cherry layers. The crunch introduces a new texture, and the nutty flavor complements the chocolate beautifully.
Spiced Delight
Stir a pinch of ground cinnamon or a splash of espresso into the whipped cream. The warm spices or coffee note add depth and complexity, making the dessert feel like a cozy winter treat.
Vegan Version
Use a plant‑based chocolate cake, coconut cream for whipping, and maple syrup as sweetener. This keeps the dessert dairy‑free without sacrificing the rich, indulgent taste.
Mini Trifle Cups
Serve individual portions in clear glasses or jars. This is ideal for parties or for guests who want a bite-sized treat. The layers remain visible and the presentation feels elegant.
Chocolate‑Cherry Cheesecake Layer
Add a thin layer of chocolate‑cherry cheesecake between the cake and cherry layers. This adds a creamy, tangy element that elevates the overall flavor profile.
Storing and Bringing It Back to Life
Fridge Storage
Store the assembled trifle in the refrigerator for up to 48 hours. Keep it covered with plastic wrap or a lid to prevent the whipped cream from drying out. The flavors will continue to meld, making the dessert even more luscious.
Freezer Friendly
If you need to store it longer, wrap the trifle tightly in plastic wrap and place it in a freezer‑safe container. Freeze for up to two weeks. When ready to serve, thaw overnight in the fridge. The texture will stay intact if you re‑whip the cream slightly before topping.
Best Reheating Method
Reheating is usually unnecessary for a chilled dessert, but if you prefer a slightly warmer bite, gently warm the trifle in a water bath for 5 minutes. Add a tiny splash of water to the cream layer before warming; this steams the cream back to perfection, keeping it light and airy.