It was a rainy Sunday afternoon and I was standing in my kitchen, staring at a bag of blood oranges that had just arrived from the farmer’s market. The fruit’s deep crimson skin looked like a bruise, and when I cut it open, the bright, almost electric juice exploded onto the cutting board. I had tried a few cheesecake bar recipes before, but none had captured that punch of citrus that felt like a sunrise in a glass. That was the moment I decided to create a version that would make the whole kitchen smell like a citrus orchard, and trust me, the first bite will make you question why you ever settled for ordinary cheesecake bars.
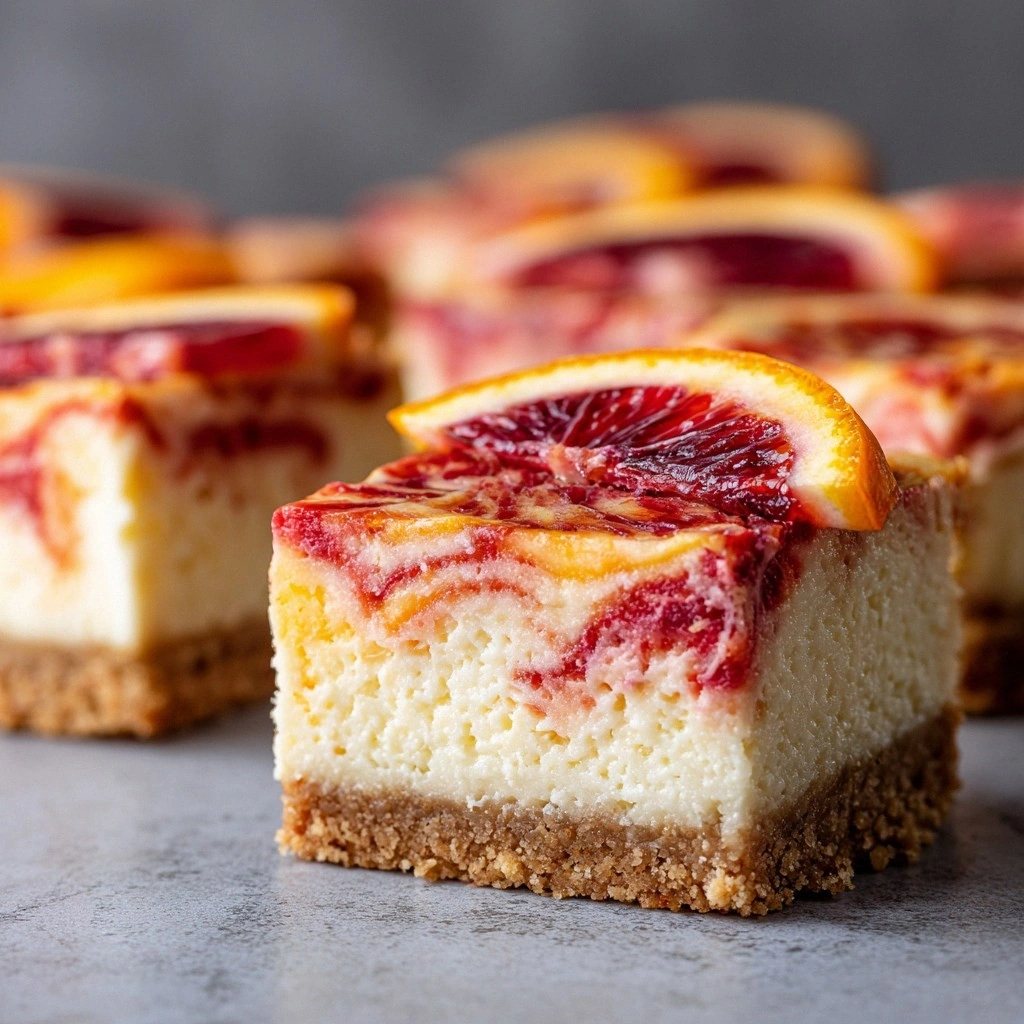
Picture the scene: the orange’s aroma mingles with the buttery crust, a faint sweetness of sugar, and a hint of vanilla that lingers in the air. As the bars bake, the edges puff up just enough to give a subtle crunch, while the center remains silky and almost liquid, like a creamy dream. I’ve spent hours tweaking the ratio of blood orange juice to cream cheese, and the result is a cheesecake that is tangy yet indulgent, bright enough to lift a mood, and dense enough to satisfy the most discerning dessert lover. The texture is a revelation: a buttery base that crumbles in your mouth, followed by a velvety filling that clings to your tongue like a soft, citrus‑kissed cloud.
What sets this version apart from the countless other recipes you’ll find online is the way it balances intensity with subtlety. I dared to use fresh blood orange juice instead of canned, which gives the bars an authentic, almost tart brightness that canned juice can’t match. I also incorporated a small amount of all‑purpose flour into the filling to give it a slightly thicker body without sacrificing that silky mouthfeel. The result? A cheesecake bar that is both visually stunning and practically impossible to finish in one go. I dare you to taste this and not go back for seconds.
If you’ve ever struggled to get the right balance between tang and sweetness, you’re not alone. Many recipes either end up too sweet or too tart, but this one hits that sweet spot like a well‑aimed arrow. Picture yourself pulling these out of the oven, the whole kitchen smelling incredible, and your guests’ eyes widening at the glossy, citrusy sheen. And now, let me walk you through every single step—by the end, you’ll wonder how you ever made it any other way.
What Makes This Version Stand Out
- Flavor: The fresh blood orange juice delivers a natural tartness that cuts through the richness of the cream cheese, creating a balanced profile that’s both refreshing and indulgent.
- Texture: A touch of flour in the filling gives the bars a silky, almost custard-like consistency that melts in your mouth without feeling heavy.
- Visual Appeal: The vibrant crimson hue of the bars is unmistakable, making them a showstopper for any gathering.
- Make‑ahead Friendly: These bars can be assembled, baked, and chilled ahead of time, then reheated or served cold—perfect for last‑minute hosting.
- Ingredient Quality: Using real blood oranges and high‑quality cream cheese elevates the flavor profile beyond store‑bought alternatives.
- Simple Method: The recipe requires just a handful of steps, but each one is crucial for achieving that perfect balance.
- Crowd Reaction: Friends and family who’ve tried it say the first bite is a revelation, and they’re left asking for the recipe immediately afterward.
- Versatility: The bars can be customized with different citrus juices or flavored with herbs, making them adaptable for any palate.
Alright, let’s break down exactly what goes into this masterpiece…
Inside the Ingredient List
The Flavor Base
The crust is the silent hero of these bars, providing a buttery foundation that holds the luscious filling. Graham cracker crumbs are the go-to choice because they add a subtle sweetness and a familiar crunch that pairs well with the citrusy filling. I recommend crushing them finely and mixing them with melted butter and a touch of sugar to create a cohesive base that sets perfectly. If you’re looking for a gluten‑free option, you can substitute the graham crackers with finely ground almonds or oat crackers, but keep in mind the texture will change slightly.
The Texture Crew
The filling’s texture is where the magic happens. Cream cheese is the star—its tang and smoothness create a rich canvas for the blood orange. By folding in a tablespoon of all‑purpose flour, you introduce a subtle thickening agent that prevents the filling from becoming too runny while still maintaining a silky mouthfeel. Eggs bind the mixture together, ensuring the bars hold their shape, and the vanilla extract brings depth and warmth. If you’re a fan of a slightly tangier finish, you can add a pinch of salt to the filling; it enhances the overall flavor profile without overpowering the citrus notes.
The Unexpected Star
Fresh blood orange juice is the unexpected star that elevates this recipe. Unlike bottled juice, fresh juice carries a vibrant, natural acidity that cuts through the richness of the cream cheese, giving the bars a bright, refreshing finish. When you zest the blood oranges, you release essential oils that add a fragrant, aromatic layer to the filling—think citrusy perfume in every bite. If fresh blood oranges are out of season, you can use a blend of fresh orange and a splash of lemon juice to mimic the same bright acidity.
The Final Flourish
A final flourish of blood orange zest on top before baking adds a decorative touch and a burst of citrus aroma. The zest’s essential oils intensify the flavor as the bars bake, creating a subtle glaze that makes the surface shine. If you prefer a more subdued look, you can simply sprinkle a light dusting of powdered sugar after baking for a sweet finish. The key is to keep the crust crisp while the filling remains smooth, ensuring a perfect bite every time.
Everything’s prepped? Good. Let’s get into the real action…
The Method — Step by Step
- Preheat your oven to 325°F (163°C). Line a 9‑inch square baking pan with parchment paper, leaving an overhang on two sides for easy removal. In a medium bowl, combine the graham cracker crumbs, melted butter, and 2 tablespoons of sugar. Stir until the mixture resembles wet sand, then press it firmly into the bottom of the prepared pan. This crust forms the foundation; if it’s too loose, it will crumble during baking.
- In a large mixing bowl, beat the cream cheese on medium speed until it’s light and fluffy. Add the granulated sugar and continue to beat until the mixture is smooth and pale. This step is crucial—over‑mixing can incorporate too much air, leading to cracks. If you’re watching the clock, aim for about 2 minutes of beating.
- Add the eggs one at a time, beating after each addition until fully incorporated. The mixture should be thick yet pourable. Fold in the vanilla extract and the tablespoon of flour. The flour helps stabilize the filling, preventing it from becoming too runny. If you’re feeling adventurous, add a pinch of salt to enhance the overall flavor profile.
- Squeeze fresh blood oranges to obtain 1 cup of juice. Measure the juice carefully; too little will make the filling watery, too much will make it too tart. Add the juice to the cream cheese mixture and stir until fully combined. The filling should be silky and smooth—no lumps. If you see any, run the mixture through a fine sieve.
- Pour the filling over the crust, spreading it evenly with a spatula. Sprinkle the zest of the blood oranges on top, pressing gently to create a decorative pattern. This not only adds flavor but also gives the bars a beautiful, glossy finish.
- Place the pan in the preheated oven and bake for 30–35 minutes. The edges should pull away slightly from the pan, and the center should set but still have a faint wobble. Avoid over‑baking; the bars will continue to set as they cool.
- Remove the pan from the oven and let the bars cool to room temperature. Once cooled, refrigerate for at least 4 hours, preferably overnight, to allow the flavors to meld and the filling to firm up. If you’re in a hurry, chill for 2 hours, but the texture won’t be as smooth.
- Before serving, use the parchment overhang to lift the entire slab out of the pan. Place it on a cutting board and cut into bars or squares. Serve chilled or at room temperature; the bars are best enjoyed when the filling is firm yet creamy.
- Optional: Dust the finished bars with powdered sugar or drizzle a thin line of honey for added sweetness and visual appeal. Store any leftovers in an airtight container in the refrigerator for up to 5 days.
That’s it— you did it. But hold on, I’ve got a few more tricks that will take this to another level. These insider tips are the difference between a good cheesecake bar and a showstopper that will have guests asking for the recipe.
Insider Tricks for Flawless Results
The Temperature Rule Nobody Follows
Many people bake cheesecake bars at a higher temperature, but this can cause the filling to crack or become overly firm. Stick to 325°F (163°C) for a gentle bake that allows the filling to set evenly. I’ve found that a lower temperature also helps preserve the bright, fresh flavor of the blood orange juice, preventing it from caramelizing or losing its natural acidity.
Why Your Nose Knows Best
Before you open the oven, give the bars a quick sniff. A pleasant citrus aroma that mingles with a buttery scent is a sign that everything’s on track. If the smell feels flat or overly sweet, the filling might be over‑baked or the crust under‑cooked. Trust your nose; it’s a reliable guide to the final product.
The 5‑Minute Rest That Changes Everything
After removing the bars from the oven, let them sit in the pan for 5 minutes before cooling. This short rest allows the filling to set further, reducing the risk of cracks when you remove them. It also lets the juices redistribute, ensuring each bite is evenly flavored.
Use a Water Bath for Even Baking
If you’re baking in a large oven or have a tendency for uneven heat distribution, place the baking pan in a larger pan filled with about an inch of hot water. This creates a water bath that keeps the bottom of the bars from over‑baking, resulting in a smoother, more consistent texture.
Freeze and Reheat Like a Pro
When storing these bars in the freezer, wrap them tightly in plastic wrap and then in foil. To reheat, place a frozen bar on a plate, cover with foil, and warm in a 300°F (149°C) oven for 10–12 minutes. This gentle reheating preserves the creamy texture and bright citrus notes.
Creative Twists and Variations
This recipe is a playground. Here are some of my favorite ways to switch things up:
Lemon‑Lavender Bars
Swap the blood orange juice for fresh lemon juice and add a teaspoon of dried culinary lavender to the filling. The floral notes pair beautifully with the citrus, creating a sophisticated flavor profile that’s perfect for spring gatherings.
Chocolate‑Blood Orange Fusion
Fold in 1/4 cup of finely grated dark chocolate into the filling. The bittersweet chocolate complements the bright citrus, while the chocolate chips on top add a delightful crunch.
Almond Crust Variation
Replace the graham cracker crumbs with finely ground almonds and a tablespoon of honey. This nutty crust adds depth and pairs well with the tangy filling, creating a more complex taste experience.
Pistachio‑Rose Bars
Add a handful of chopped pistachios to the filling and drizzle rose water over the top before baking. The earthy pistachio flavor and floral hint of rose water elevate the bars into a luxurious dessert.
Caramelized Blood Orange Bars
Sauté sliced blood oranges in a pan with a pinch of brown sugar until caramelized. Layer the caramelized slices on top of the filling before baking for a sweet, caramel‑citrus combination that’s irresistible.
Storing and Bringing It Back to Life
Fridge Storage
Store the bars in an airtight container in the refrigerator for up to 5 days. The filling remains creamy and the crust retains its slight crunch. For a fresh look, cover the container with parchment paper before sealing.
Freezer Friendly
Wrap each bar individually in plastic wrap, then place them in a freezer‑safe bag or container. They can be frozen for up to 3 months. When ready to enjoy, thaw in the refrigerator overnight before serving.
Best Reheating Method
To bring the bars back to life, preheat your oven to 300°F (149°C). Place the frozen bars on a parchment‑lined sheet and bake for 10–12 minutes, or until warm. Adding a splash of water to the pan before baking creates steam that keeps the filling moist and prevents it from drying out.