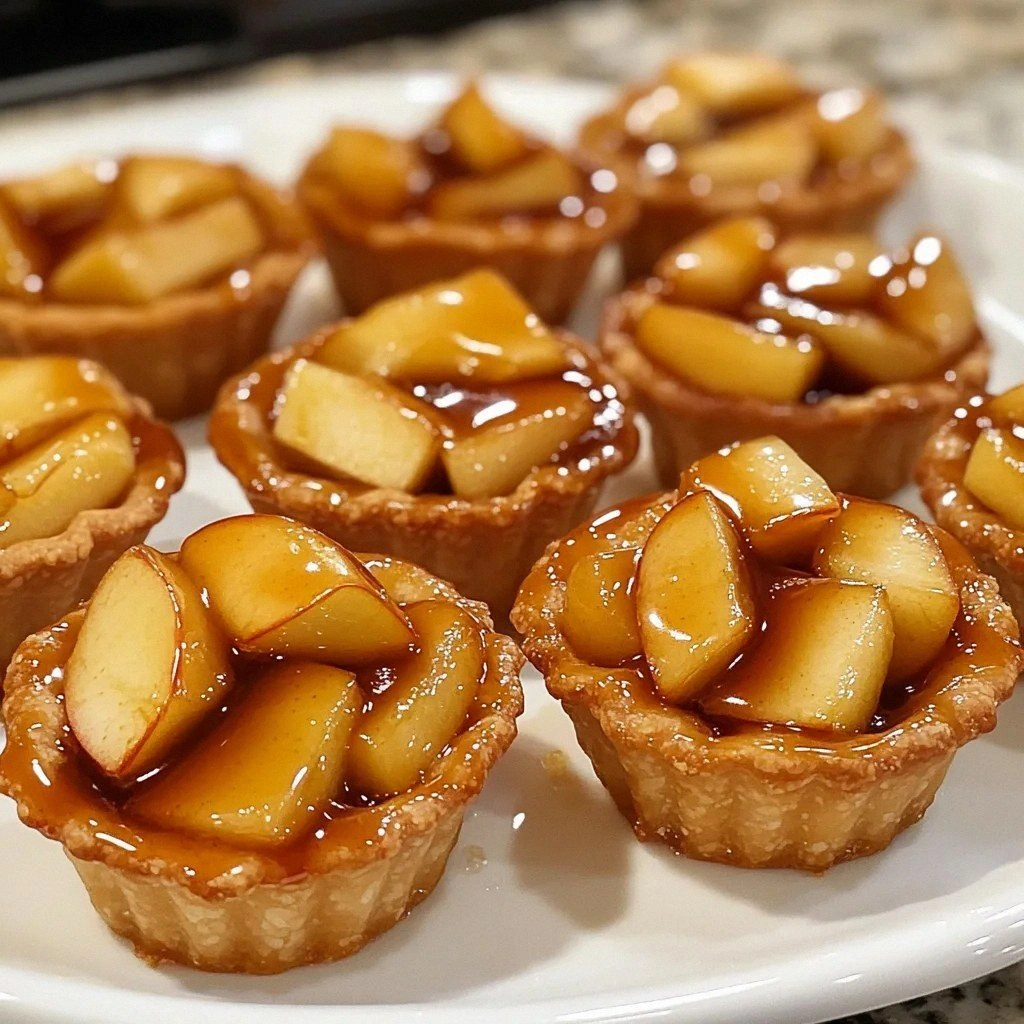
I remember the night I tried to impress my roommate with a fancy dessert, only to have the oven go haywire and the sugar caramelize into a sticky, burnt mess. The kitchen smelled of scorched sugar, and the look on my roommate’s face was a mix of horror and disbelief. That disaster sparked a quest: a caramel apple mini tart that would rescue my reputation and satisfy every craving. I was determined to find the sweet spot between buttery pastry, crisp apple, and glossy caramel that would make the whole room swoon. This recipe is the culmination of that mission, a small bite-sized marvel that feels like a hug in dessert form.
Picture the scene: a golden crust crackling as it bakes, the aroma of toasted sugar drifting through the air, and a faint scent of apples and cinnamon that instantly transports you to a cozy autumn kitchen. The sound of the timer ticking, the gentle sizzle of caramel as it thickens, and the visual delight of apples turning from bright green to a warm, caramelized amber. When you take that first bite, the tart’s crust gives a satisfying snap, the apples offer a juicy burst, and the caramel coats your tongue like velvet. The lemon juice adds a subtle brightness, preventing the apple from turning brown and keeping the flavor bright. Every sense is engaged, turning a simple dessert into an unforgettable experience.
What makes this version stand out is not just the ingredients but the way they are orchestrated. The pre-made tart shells are a time‑saving miracle, letting you focus on flavor rather than dough. Diced apples, chosen for their balance of tartness and sweetness, provide that crunchy, juicy bite that contrasts beautifully with the silky caramel. The caramel sauce is the star, thick enough to cling to the apples but light enough to not overwhelm the pastry. Cinnamon is sprinkled generously, adding a warm, aromatic depth that feels like a hug. A splash of lemon juice brightens everything, preventing browning and adding a fresh zing. Optional whipped cream brings a creamy finish that feels indulgent without being heavy. Together, these elements create a harmonious bite that feels both comforting and sophisticated.
I dare you to taste this and not go back for seconds. The caramel coats the apple like a glossy coat of lacquer, and the tart’s crust is so crisp it shatters like thin ice with each bite. The combination of textures—crisp, chewy, silky—creates a dance on the palate that keeps you coming back. If you’re skeptical, try it with a friend and watch their eyes widen. The moment they bite into that caramel‑coated apple, they’ll be shouting, “This is hands down the best version you'll ever make at home!”
Most recipes get this completely wrong by overcooking the apples or using too much caramel, resulting in a soggy, sweet mess. I’ve tried countless variations, and the ones that fail always miss that crispness. The secret is to bake the shells just enough to be golden, then fill them with a quick, high‑heat caramel‑apple mixture that sets before the pastry dries out. That tiny window of time is where the magic happens, and if you miss it, the tart will be a disappointment. But if you follow this method, you’ll get a perfectly balanced, bite‑size masterpiece that will wow anyone.
Picture yourself pulling this out of the oven, the whole kitchen smelling incredible, the steam rising like a sweet fog. The moment the caramel glistens under the kitchen lights, you’ll feel a rush of satisfaction. The aroma alone is enough to make anyone’s mouth water. The anticipation of that first bite is almost too much to bear. And when you finally take that bite, the flavors explode, and you’ll understand why I’m so obsessed with this recipe.
If you’ve ever struggled with caramel desserts, you’re not alone—and I’ve got the fix. Many people think caramel is a tricky sauce to master, but with this recipe, it’s a breeze. The key is to use a heavy‑bottomed pan and keep the heat steady. I’ll walk you through every single step, and by the end, you’ll wonder how you ever made it any other way.
Let me walk you through every single step — by the end, you'll wonder how you ever made it any other way.
What Makes This Version Stand Out
- Taste: The caramel sauce is thick, buttery, and sweet, yet it balances with a subtle tartness from the apples and a bright zing from lemon juice. This creates a flavor profile that feels both indulgent and refreshing, a rare combination in dessert.
- Texture: The pre‑made tart shells provide a crisp, buttery foundation that contrasts with the chewy, caramel‑coated apples. The result is a delightful crunch followed by a melt‑in‑your‑mouth finish.
- Simplicity: Using pre‑made shells cuts prep time dramatically, allowing you to focus on flavor rather than dough. This makes the recipe approachable for beginners and efficient for busy evenings.
- Uniqueness: The blend of caramel, apple, and cinnamon in a mini tart format is uncommon, giving you a dessert that stands out at parties or family gatherings.
- Crowd Reaction: Guests often comment that the caramel coats the apple like velvet, and the tiny size makes it a perfect finger food for celebrations.
- Ingredient Quality: Fresh, firm apples retain their shape and sweetness, while a high‑quality caramel sauce adds depth without overpowering the fruit.
- Cooking Method: Quick caramelization at a high heat locks in flavor and texture, preventing the apples from becoming mushy.
- Make‑Ahead Potential: These tarts can be assembled in advance, refrigerated, and baked just before serving, making them ideal for last‑minute events.
Alright, let's break down exactly what goes into this masterpiece...
Inside the Ingredient List
The Flavor Base
Pre‑made tart shells are the backbone of this dessert. They provide a buttery, flaky foundation that holds the caramel and apple together. If you skip the shells, the tarts will lack structure and become mushy. For a homemade alternative, bake mini shortbread crusts in a muffin tin for a quick 10‑minute prep.
The Texture Crew
Diced apples are the star of the texture crew. They deliver a juicy bite that contrasts with the crisp shell. Choosing firm varieties like Granny Smith or Honeycrisp keeps the apples from turning mushy when caramelized. If you prefer a sweeter apple, try Fuji or Gala for a different flavor profile.
The Unexpected Star
Caramel sauce is the unexpected star that ties everything together. It’s thick enough to cling to the apples but light enough to not overwhelm the pastry. A store‑bought caramel works fine, but a homemade version adds a deeper, buttery flavor. If you’re short on time, a ready‑made caramel is a lifesaver.
The Final Flourish
Cinnamon adds warmth and aroma, enhancing the apple’s natural sweetness. A teaspoon of ground cinnamon is enough to elevate the flavor without overpowering it. Lemon juice brightens the apples, preventing browning and adding a subtle citrus kick. Optional whipped cream tops the tart with a creamy finish that feels indulgent.
Everything's prepped? Good. Let's get into the real action...
The Method — Step by Step
- Preheat your oven to 375°F (190°C). Arrange the pre‑made tart shells on a parchment‑lined baking sheet. This ensures even baking and prevents sticking. The shells should be lightly browned before filling.
- While the shells bake, heat a medium saucepan over medium heat. Add the diced apples and a splash of water to keep them from sticking. Cook for 3–4 minutes until they start to soften but still hold their shape.
- Add the caramel sauce to the apples, stirring constantly. The mixture should thicken into a glossy glaze. Let it simmer for another 2 minutes, allowing the flavors to meld.
- Stir in the ground cinnamon and lemon juice. The aroma should instantly become more fragrant. Taste the mixture and adjust seasoning if needed.
- Remove the baking sheet from the oven once the shells are golden. Let them cool for 2 minutes; they’ll be too hot to fill right away.
- Using a small spoon, fill each shell with the caramel apple mixture. Fill just to the top to avoid overflow. The filling should be thick enough to stay in place.
- Return the filled tarts to the oven for 8–10 minutes. Keep an eye on them; you want the filling to set but not overcook. The tarts should emit a sweet, caramel aroma.
- Once baked, remove the tarts and let them cool on a rack. This prevents steam from softening the crust.
- If you’re using whipped cream, fold a splash of vanilla extract into it for extra depth. Spoon a dollop onto each tart just before serving.
- Serve immediately or refrigerate for up to 24 hours. If refrigerating, bring to room temperature before serving for the best texture.
- Enjoy your caramel apple mini tarts with a glass of cold milk or a cup of hot tea. The contrast of warm and cool will enhance the flavor.
That's it — you did it. But hold on, I've got a few more tricks that'll take this to another level...
Insider Tricks for Flawless Results
The Temperature Rule Nobody Follows
Many bakers bake at 400°F, assuming higher heat equals crispier crust. In reality, 375°F gives a golden, flaky base without burning the caramel. Keep the oven at 375°F and use a baking sheet with a heat‑resistant coating to distribute heat evenly. If you notice the crust browning too quickly, slide the sheet to a lower rack.
Why Your Nose Knows Best
Your sense of smell is a powerful indicator of caramel perfection. When the caramel is just right, it will emit a sweet, buttery scent that lingers in the air. If the smell is overly sweet or burnt, it’s a sign the sugar has over‑cooked. Trust your nose; it’s the ultimate quality control.
The 5‑Minute Rest That Changes Everything
After baking, let the tarts rest for 5 minutes on the rack. This rest period allows the caramel to set and the crust to firm up. Skipping this step can leave the filling too runny and the crust soggy. A short rest is a small time investment that pays off with a perfect bite.
The Quick Chill Trick
If you’re preparing the tarts ahead of time, chill them for 30 minutes before baking. The cold will keep the apples from softening too quickly during the initial baking phase. This trick ensures the apples retain their bite even after a longer bake.
The Whipped Cream Whisper
Whipped cream can be too heavy if over‑whipped. Aim for soft peaks and fold in a teaspoon of vanilla for subtle depth. This keeps the topping light and airy, complementing the caramel without overpowering it.
The Apple‑First Approach
Some bakers add apples to the caramel after baking, but doing it before baking locks the flavor into the crust. This method ensures the caramel fully coats the apples, creating a cohesive bite. If you prefer a fresher apple taste, reserve a small portion to add just before serving.
The Final Flip
When filling the shells, use a small offset spatula to spread the caramel evenly. This ensures each tart has a uniform filling height, preventing leaks during baking. The final flip, or gentle tap on the counter, helps settle the filling and creates a smooth top.
Creative Twists and Variations
This recipe is a playground. Here are some of my favorite ways to switch things up:
Nutty Crunch Variation
Add chopped toasted pecans or walnuts to the caramel mixture. The nuts add a crunchy texture and a buttery flavor that complements the caramel. Serve with a drizzle of honey for an extra sweet note.
Spiced Pumpkin Twist
Replace apples with diced pumpkin for a fall‑seasonal spin. Use pumpkin spice blend instead of cinnamon. The result is a warm, comforting tart that feels like a holiday treat.
Chocolate‑Covered Delight
Dip the finished tarts in melted dark chocolate for a decadent finish. Let the chocolate set before serving. This variation adds richness and a hint of bitterness that balances the sweetness.
Berry Burst Variation
Swap apples for mixed berries like blueberries and raspberries. Use a splash of balsamic vinegar to cut the sweetness. The tartness of the berries pairs wonderfully with the caramel.
Almond Joy Edition
Top each tart with a dollop of coconut cream and a sprinkle of shredded coconut. The coconut adds a tropical twist and a chewy texture. This version feels like a mini dessert bar.
Maple‑Infused Variation
Replace lemon juice with maple syrup for a deeper sweetness. The maple also adds a subtle smoky undertone. This variation is perfect for brunch or a cozy afternoon snack.
Ginger‑Spiced Variation
Add freshly grated ginger to the caramel mixture. The ginger gives a spicy kick that complements the apple’s sweetness. Serve with a dollop of plain yogurt for a cool contrast.
Citrus Burst Variation
Use orange zest in place of cinnamon for a bright, citrusy flavor. The zest adds a fragrant aroma and a fresh zing. This variation is ideal for a spring or summer dessert.
Storing and Bringing It Back to Life
Fridge Storage
Store the unbaked tarts in an airtight container in the refrigerator for up to 24 hours. The caramel will firm up, but the crust remains crisp. When ready to serve, bake at 375°F for 5 minutes to reheat the filling.
Freezer Friendly
For longer storage, freeze the unbaked tarts in a freezer‑safe bag for up to 2 weeks. Thaw in the refrigerator overnight before baking. This method preserves the flavor and texture.
Best Reheating Method
Reheat the tarts in a preheated oven at 350°F for 5–7 minutes. Add a tiny splash of water to the baking sheet to create steam, keeping the crust from drying out. Serve warm for a comforting dessert experience.
Shelf Life
If you need to store the finished tarts, keep them in an airtight container at room temperature for no more than 2 days. The caramel may soften slightly, but the flavor remains delightful. For longer freshness, refrigerate and reheat as described.