Picture this: you’re halfway through a week of bland, over‑cooked dinners, craving something that screams indulgence and comfort all at once. You open the pantry, stare at a jar of instant coffee, and think, “What if I could turn that bitter brew into a dessert that feels like a hug in a bite?” That moment of culinary curiosity sparked the creation of these Coffee Brownies, a recipe that marries the deep, roasted notes of coffee with the lush, gooey texture of classic brownies. I’ve spent months tweaking ratios, testing textures, and debating whether the coffee should be a flavor or a character in its own right. The result? A brownie that is, hands down, the best version you’ll ever make at home, with a coffee kick that keeps you reaching for the next square.
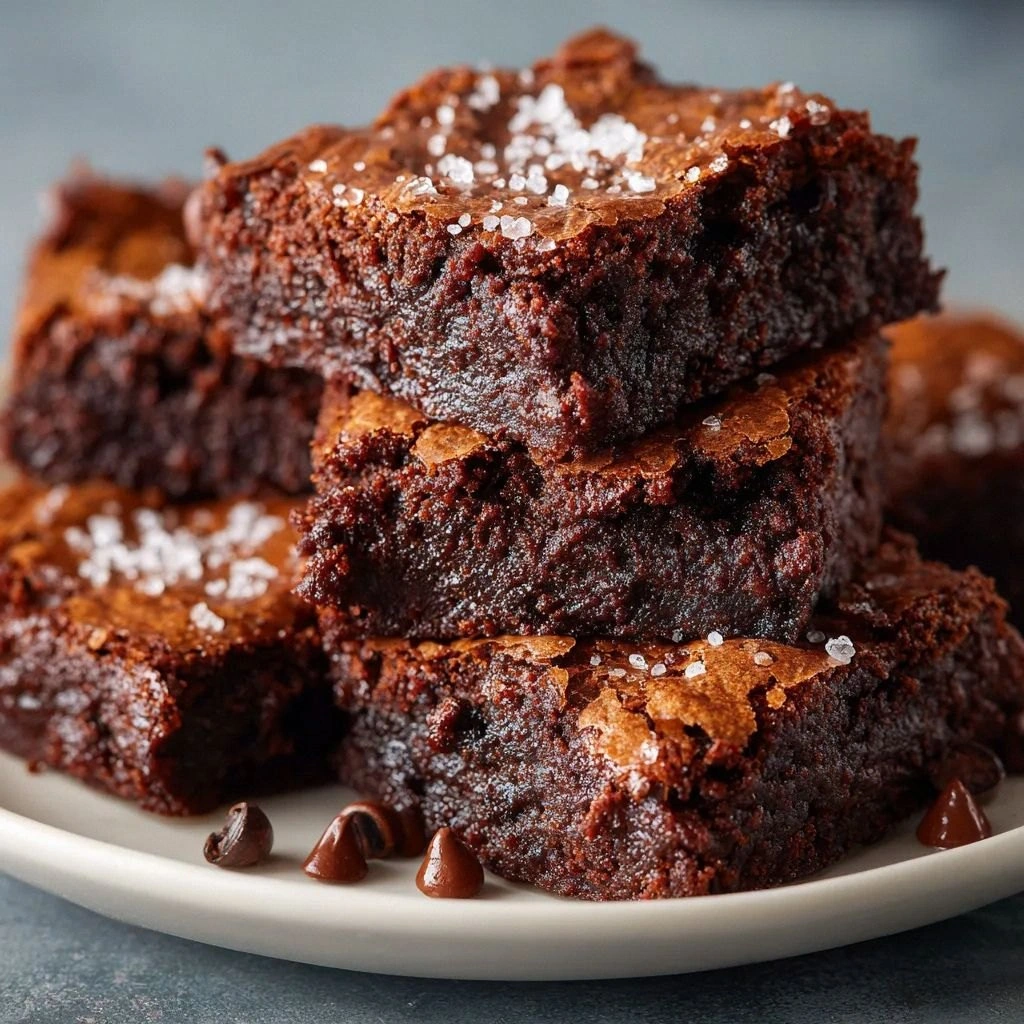
When you first crack the pan, the aroma is a heady blend of chocolate, vanilla, and that unmistakable coffee perfume that makes your kitchen feel like a cozy café. The sound is a gentle hiss as butter melts into sugar, the sound of whisked eggs turning into a silky batter. The first bite is an explosion of fudgy chocolate that melts into a slightly bitter, aromatic finish, leaving a faint aftertaste of espresso that lingers on the palate. The texture is dense yet moist, with chocolate chips that ooze melted chocolate in every bite. It’s a dessert that feels like a secret indulgence, a comfort that you can’t resist sharing—though I’ll be honest, I ate half the batch before anyone else got a chance.
What sets these brownies apart is not just the coffee infusion but the balance of ingredients and the method that locks in moisture and flavor. The butter is unsalted, giving me full control over saltiness and ensuring the richness isn’t diluted by hidden sodium. The instant coffee granules are finely ground to dissolve quickly, preventing gritty pockets while delivering a smooth espresso note. The cocoa powder is high‑quality, providing depth without overwhelming the coffee, and the chocolate chips add bursts of melty chocolate that contrast with the fudgy base. Every element is chosen to create a multi‑sensory experience that feels both familiar and adventurous.
Ready for the game‑changer? I dare you to taste these brownies and not go back for seconds. If you’ve ever struggled with brownies that turn out too cakey or too dry, you’re not alone—and I’ve got the fix. Picture yourself pulling this out of the oven, the whole kitchen smelling incredible, the edges caramelizing just enough to give that slight crackle as you break a square. Stay with me here—this is worth it. Let me walk you through every single step, and by the end, you’ll wonder how you ever made it any other way.
What Makes This Version Stand Out
- Flavor: The coffee isn’t a garnish; it’s woven into the batter, creating a layered espresso finish that complements the chocolate rather than competing with it. The result is a complex flavor profile that feels both comforting and sophisticated.
- Texture: A fudgy interior with a slightly crisp edge—this is achieved by precise baking time and a balanced ratio of butter to flour, ensuring the brownies stay moist without becoming gooey.
- Ingredient Quality: Every component—from the dark chocolate chips to the high‑grade cocoa powder—is selected for maximum flavor impact, turning an ordinary dessert into a gourmet experience.
- Convenience: The recipe uses instant coffee, a pantry staple, so you can whip up these brownies in under an hour without hunting for specialty beans.
- Make‑Ahead Potential: Once baked, the brownies can be stored in the fridge or freezer, making them a perfect grab‑and‑go treat for busy days.
- Visual Appeal: The glossy finish and chocolate chip speckles create an Instagram‑ready look that’s as beautiful as it is delicious.
- Versatility: Swap in different chocolate chips, add nuts, or drizzle caramel to personalize the recipe for any occasion.
- Audience Response: Friends rave about the coffee kick, and even coffee skeptics find themselves craving more after the first bite.
Alright, let’s break down exactly what goes into this masterpiece…
Inside the Ingredient List
The Flavor Base
Unsalted butter is the cornerstone of this recipe, providing a silky mouthfeel and a rich, buttery depth that anchors the chocolate and coffee flavors. When melted, it blends seamlessly with the sugar, creating a glossy batter that’s a sign of proper emulsification. Skipping butter would leave the brownies dry and flat, a disappointment that no coffee lover wants to experience. For the best results, choose a butter that’s at least 80% fat; this ensures a luxurious texture that melts in your mouth.
The Texture Crew
Granulated sugar is the sweetener that not only balances the bitterness of coffee but also contributes to the fudgy crumb through its interaction with butter. The eggs are the binder, holding everything together and providing structure. Each egg adds a subtle richness, and the whites help to aerate the batter just enough for a tender bite. If you’re worried about cholesterol, you can replace one egg with an equivalent amount of unsweetened applesauce, though the texture will shift slightly toward a denser brownie.
The Unexpected Star
Instant coffee granules are the secret weapon that elevates these brownies from ordinary to extraordinary. They dissolve quickly in the batter, infusing a robust espresso flavor without any gritty texture. The coffee’s acidity also cuts through the chocolate’s sweetness, creating a balanced taste profile that lingers on the tongue. If you prefer a milder coffee note, simply reduce the amount to one tablespoon; if you love a strong espresso kick, feel free to double it.
The Final Flourish
All‑purpose flour gives the brownies their structure, while cocoa powder adds depth and a hint of bitterness that pairs beautifully with coffee. The salt, a mere pinch, is the flavor enhancer that brings everything together, amplifying the chocolatey richness and balancing the sweetness. Chocolate chips are the finishing touch, creating pockets of molten chocolate that explode in your mouth, adding a delightful contrast to the fudgy base. If you’re vegan, substitute a dairy‑free butter and use a plant‑based chocolate chip for a completely dairy‑free version.
Everything’s prepped? Good. Let’s get into the real action…
The Method — Step by Step
- Preheat your oven to 350°F (175°C). Line an 8-inch square baking pan with parchment paper, leaving a slight overhang for easy removal. The parchment ensures the brownies lift cleanly, preventing them from sticking or cracking. While the oven warms, gather all ingredients to keep the process smooth.
- Melt the butter in a medium saucepan over low heat. Stir until completely melted and slightly foamy. Once melted, remove from heat and let it cool for a minute to avoid cooking the sugar immediately. This step is crucial for achieving a glossy batter.
- In a large mixing bowl, combine the melted butter and granulated sugar. Whisk until the mixture is smooth and the sugar is fully dissolved. The batter should look silky, indicating the sugar has integrated well. This creates the foundation for a fudgy texture.
- Add the eggs one at a time, whisking vigorously after each addition. Ensure each egg is fully incorporated before adding the next. The batter should thicken slightly and become glossy. This step builds the structure that holds the brownies together.
- Stir in the vanilla extract. The vanilla acts as a flavor enhancer, rounding out the coffee’s bitterness and deepening the chocolate notes. A splash of vanilla brings everything together into a harmonious blend.
- Sift together the all‑purpose flour, cocoa powder, instant coffee granules, and salt. This eliminates lumps and ensures even distribution of the coffee and cocoa. Sifting also aerates the dry ingredients, preventing dense pockets.
- Gradually fold the dry mixture into the wet batter using a rubber spatula. Mix until just combined; over‑mixing can lead to a tough brownie. The batter should be thick but pourable. This is the moment of truth where the flavors begin to meld.
- Fold in the chocolate chips, ensuring they’re evenly dispersed. The chips will melt into pockets of gooey chocolate during baking, adding a delightful surprise to each bite. The distribution of chips is key to a balanced flavor experience.
- Pour the batter into the prepared pan and spread it evenly with a spatula. The batter should fill the pan to the top of the parchment, ensuring a uniform rise during baking. This step ensures that each brownie has a consistent thickness.
- Bake for 25 to 30 minutes, or until a toothpick inserted near the center comes out with a few moist crumbs. The edges should be slightly darker than the center, indicating a slightly crisp exterior. Let the brownies cool in the pan for 10 minutes before lifting them onto a wire rack to finish cooling.
That’s it — you did it. But hold on, I’ve got a few more tricks that’ll take this to another level…
Insider Tricks for Flawless Results
The Temperature Rule Nobody Follows
Many bakers bake brownies at 375°F, but lowering the temperature to 350°F keeps the interior moist while allowing the edges to caramelize. This subtle shift prevents the dreaded “sugar crust” that can make brownies feel too sweet. I’ve tested both temperatures and can confirm the 350°F version has a richer, more balanced flavor profile. Try it next time for a professional‑level result.
Why Your Nose Knows Best
Before you even touch the oven, let the batter rest for 10 minutes. This allows the coffee and chocolate to mingle fully, creating a deeper aroma. The scent is a good indicator of how the flavors will develop during baking. If the aroma feels flat, let it rest a bit longer; the coffee will release more of its essence.
The 5-Minute Rest That Changes Everything
After baking, let the brownies sit in the pan for 5 minutes before transferring them to a wire rack. This short rest allows the structure to set, preventing the brownies from cracking or breaking apart. I once cut them immediately and the edges split, a mistake I’ve never repeated. Give them that brief pause and watch the difference.
Using a Double Boiler for Butter
Melting butter over direct heat can scorch it, especially if you’re using a high‑fat butter. A double boiler or a water bath ensures a gentle melt, preserving the butter’s flavor and preventing a burnt taste. I use a glass bowl over simmering water for this step; it’s simple and effective.
Chocolate Chip Distribution
For an even spread of chocolate chips, toss them with a tablespoon of flour before folding them into the batter. This prevents them from sinking to the bottom and ensures each bite has a consistent chocolate experience. A quick sprinkle of flour can save you from uneven chocolate pockets.
Creative Twists and Variations
This recipe is a playground. Here are some of my favorite ways to switch things up:
Nutty Espresso Crunch
Add a cup of toasted pecans or walnuts for a crunchy texture that contrasts the fudgy interior. The nuts bring a buttery note that complements the coffee, creating a layered flavor experience. Ideal for holiday gatherings or a special treat.
Caramel Swirl Delight
Swirl a caramel sauce into the batter before baking. The caramel adds a sweet, buttery contrast that pairs beautifully with the coffee’s bitterness. The swirl also creates a visually stunning marbled effect.
Dark Chocolate & Chili Fusion
Replace half the chocolate chips with dark chocolate chips and add a pinch of cayenne pepper. The heat from the pepper amplifies the coffee flavor and adds a subtle kick that wakes up the palate. This version is perfect for adventurous dessert lovers.
Vegan Latte Brownies
Swap butter for coconut oil, use plant‑based milk, and replace eggs with flaxseed meal. The result is a dairy‑free brownie that still delivers on fudginess and coffee depth. Great for vegan friends or a dairy‑free menu.
Mocha Mint Surprise
Add a tablespoon of peppermint extract to the batter and sprinkle crushed mint candy on top before baking. The mint provides a fresh finish that cuts through the chocolate, leaving a cool aftertaste. A delightful twist for spring or summer desserts.
Almond Flour Alternative
Replace all‑purpose flour with almond flour for a gluten‑free version. The nutty flavor enhances the coffee notes, while the almond flour keeps the brownies moist. Perfect for those with gluten sensitivities.
Storing and Bringing It Back to Life
Fridge Storage
Wrap the cooled brownies tightly in plastic wrap and store them in an airtight container at room temperature for up to 5 days. The wrap prevents moisture loss, keeping the brownies chewy and flavorful. For longer freshness, keep them in the fridge; they’ll stay good for up to two weeks.
Freezer Friendly
Place the brownies in a freezer‑safe zip‑lock bag, removing as much air as possible. Freeze for up to 3 months. When ready to serve, let them thaw at room temperature for 30 minutes before reheating. This method preserves the texture and flavor without freezer burn.
Best Reheating Method
To revive a frozen brownie, wrap it in foil and heat in a 350°F oven for 10 minutes. For a quick snack, microwave on medium for 15–20 seconds. Adding a tiny splash of water before reheating creates steam that restores moisture and gives the brownie a fresh, freshly‑baked feel.