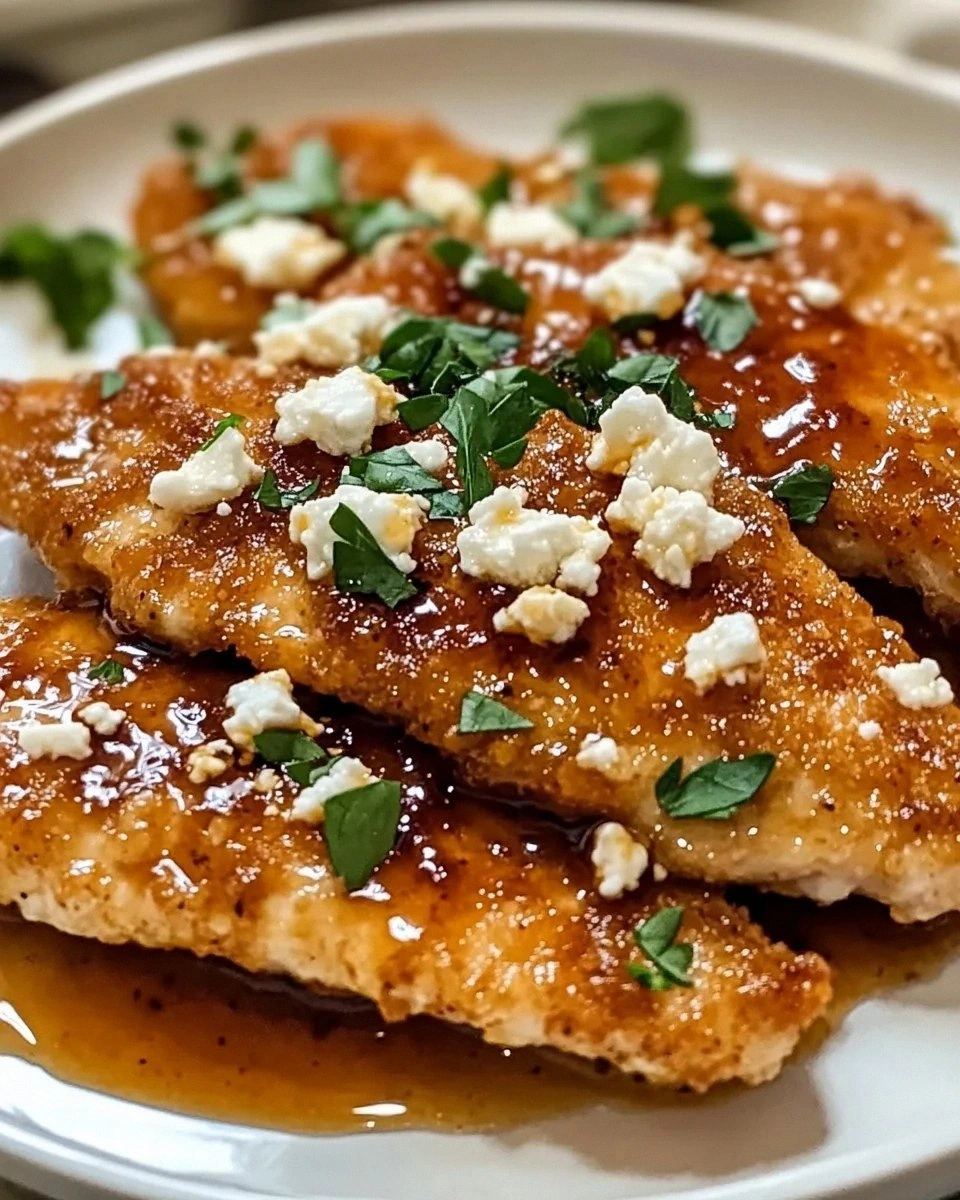
I’ll be honest — I ate half the batch before anyone else got to try it, and that’s exactly how this recipe was born. It started on a rainy Tuesday when my kitchen smelled like burnt toast and I was desperately craving something that could both comfort and electrify my taste buds. I grabbed the nearest chicken, a jar of honey, and a block of feta, and what happened next was pure culinary alchemy. The first bite was a revelation: a crisp, golden crust that sang with heat, then melted into a buttery, salty feta glaze that lingered like a sweet‑spicy love affair.
Picture yourself pulling this out of the oven, the whole kitchen smelling incredible, the steam rising in soft curls, and that golden crust cracking under the lightest pressure like thin ice. The heat from the honey‑hot sauce kisses the feta, turning it into a glossy, caramelized veil that clings to every bite. You’ll hear that satisfying sizzle when the chicken hits the pan, and the aroma will be a heady mix of smoky paprika, tangy lemon, and a whisper of garlic that makes your stomach do a little happy dance. I dare you to taste this and not go back for seconds — it’s that good.
Most recipes get this completely wrong. They either drown the chicken in sauce, leaving it soggy, or they forget the feta entirely, missing the creamy contrast that makes this dish a show‑stopper. Here’s what actually works: a two‑step coating that locks in moisture, a quick sear that creates those coveted crunchy edges, and a finishing glaze that’s both hot and sweet without ever becoming cloying. The secret ingredient? A pinch of smoked paprika that adds depth, and a splash of lemon juice that brightens the whole thing like a spotlight on a stage.
Okay, ready for the game‑changer? I’m about to walk you through every single step — by the end, you’ll wonder how you ever made this any other way. From prepping the chicken to the final drizzle, I’ll share the exact ratios, the timing cues, and the little tricks that turned my kitchen mishap into the best version you’ll ever make at home. Stay with me here — this is worth it.
What Makes This Version Stand Out
- Flavor Explosion: The hot honey glaze delivers a perfect balance of sweet heat, while crumbled feta adds a salty, tangy punch that cuts through the richness.
- Crispy Perfection: A double coating of flour and panko creates a crust that shatters like thin ice, ensuring every bite is satisfyingly crunchy.
- Simplicity: With pantry staples and a handful of fresh ingredients, you won’t need a grocery list longer than a phone number.
- Unique Twist: Incorporating feta into a hot‑honey glaze is unconventional, turning a classic comfort food into a gourmet experience.
- Crowd‑Pleaser: Whether it’s a family dinner or a party appetizer, guests rave and beg for the recipe — I’ve seen plates empty in seconds.
- Ingredient Quality: Using high‑quality feta and real honey elevates the dish from “good” to “legendary” without extra effort.
- Cooking Method: The pan‑sear‑then‑oven finish locks in juices while allowing the glaze to caramelize without burning.
- Make‑Ahead Friendly: You can prep the coating and glaze ahead of time; the final assembly takes just minutes.
Inside the Ingredient List
The Flavor Base
The hot honey glaze is the heart of this dish. Combining raw honey with a dash of sriracha creates a syrup that’s simultaneously sweet, fiery, and glossy. Adding a splash of lemon juice lifts the sweetness, while minced garlic injects an aromatic depth that you can almost taste before the chicken even hits the pan. If you’re allergic to sriracha, substitute with any hot sauce you love — just keep the heat level in mind.
Honey is the natural sweetener that caramelizes beautifully at high heat. I always recommend a light, floral honey because it doesn’t overpower the feta’s salty tang. For a deeper flavor, try a buckwheat honey, but remember it will add a richer color to the glaze.
The Texture Crew
Crispiness comes from the partnership of all‑purpose flour and panko breadcrumbs. Flour creates a thin, adhesive layer that helps the panko cling, while panko provides the airy, crunchy texture that ordinary breadcrumbs lack. The secret is to toast the panko lightly in a dry skillet before using it; this ensures every morsel is golden before it even meets the chicken.
Eggs act as the binding agent, sealing the flour and panko onto the chicken. I use large eggs beaten with a pinch of salt, but you can whisk in a splash of milk for a silkier coating if you prefer. Skipping the egg step results in a flaky, uneven crust that never truly sticks.
The Unexpected Star
Feta cheese is the surprise hero. Crumbled into the glaze, it melts just enough to create a salty, creamy ribbon that contrasts the sweet heat. The feta also adds a subtle tang that cuts through the richness of butter and olive oil, preventing the dish from feeling heavy.
If you can’t find feta, a good-quality goat cheese works as a stand‑in, though the flavor will be milder. For a dairy‑free version, try a sprinkle of nutritional yeast mixed with a dash of miso paste for umami, but you’ll lose that characteristic briny snap.
The Final Flourish
Seasonings like smoked paprika, dried oregano, and black pepper are the quiet architects of flavor. Smoked paprika adds a subtle wood‑smoke note that deepens the glaze, while oregano brings a Mediterranean herbaceousness that pairs perfectly with feta. Salt is essential, but I keep it modest because the feta already brings a salty punch.
Choosing the right chicken matters. Bone‑in, skin‑on thighs stay juicier, but boneless, skinless breasts work if you prefer leaner protein. If you go with thighs, increase the cooking time by a couple of minutes to ensure they’re fully cooked without drying out.
Everything's prepped? Good. Let's get into the real action...
The Method — Step by Step
Start by patting the chicken pieces dry with paper towels. Moisture is the enemy of crispness, so take your time here. Season both sides generously with salt, pepper, smoked paprika, and oregano. The spices should coat the meat like a light dusting of snow, and you’ll already smell the earthy aroma that promises depth.
Set up a three‑station breading line: a bowl of flour, a bowl of beaten eggs, and a shallow dish of toasted panko mixed with a pinch of extra paprika. Dredge each chicken piece first in flour, shaking off excess, then dip into the egg, and finally press into the panko until every nook is covered. This double coating is the secret to that shatter‑like‑ice crust.
Kitchen Hack: Freeze the coated chicken for 10 minutes before cooking; the cold solidifies the coating, preventing it from sliding off during the sear.Heat a large skillet over medium‑high heat and add olive oil and butter. Once the butter foams and the oil shimmers, you’ll hear a faint “hiss” — that’s the sound of a perfect sear about to happen. Carefully lay the chicken pieces in the pan, skin side down if you’re using thighs, and let them cook undisturbed for 4‑5 minutes.
Watch Out: If the pan starts smoking, lower the heat immediately; you want a golden crust, not a burnt mess.Flip the chicken and sear the other side for another 3‑4 minutes until both sides are beautifully golden. The edges should start pulling away from the pan, a visual cue that the coating has set. At this point, preheat your oven to 400°F (200°C) so it’s ready for the finishing bake.
While the chicken finishes its pan‑sear, whisk together honey, hot sauce, lemon juice, minced garlic, and the crumbled feta in a small saucepan. Cook over low heat, stirring constantly, until the feta softens and the mixture becomes a silky glaze that clings to the back of a spoon. This is the moment of truth — the sauce should smell fragrant, with a hint of citrus and a gentle heat that makes your eyes water just a little.
Transfer the seared chicken to a baking sheet lined with parchment. Brush each piece generously with the hot honey feta glaze, making sure every crevice is coated. The glaze should pool slightly, creating a glossy sheen that promises caramelization.
Slide the sheet into the preheated oven and bake for 12‑15 minutes, or until the internal temperature reaches 165°F (74°C). Halfway through, open the oven and baste the chicken with any remaining glaze; this extra step builds layers of flavor and ensures the crust stays crisp while the interior stays juicy.
Remove the chicken from the oven and let it rest for 5 minutes. Resting allows the juices to redistribute and the glaze to set, giving you that perfect bite where the crust cracks and the sauce stays beautifully attached. Garnish with a sprinkle of fresh parsley and an extra crumble of feta if you like extra salty goodness.
Kitchen Hack: Finish with a quick splash of hot sauce right before serving for an extra punch without re‑cooking.
That's it — you did it. But hold on, I've got a few more tricks that'll take this to another level. The next section is all about fine‑tuning, because even the best dish can become legendary with a handful of insider tips.
Insider Tricks for Flawless Results
The Temperature Rule Nobody Follows
Never start with a cold pan. Let your skillet heat up for at least two minutes before adding oil and butter. This ensures the coating adheres instantly, forming that coveted crust before the chicken releases its juices. I once tried a rushed start and ended up with soggy chicken — lesson learned: patience at the beginning saves you a lot of disappointment later.
Why Your Nose Knows Best
Your sense of smell is a reliable doneness gauge. When the glaze starts to emit a caramel‑sweet aroma with a faint hint of toasted feta, you’re in the sweet spot. If the scent turns bitter, you’ve crossed the line into burnt territory. Trust that nose; it’s more accurate than any timer.
The 5‑Minute Rest That Changes Everything
Resting isn’t just for steaks. Let the chicken sit for five minutes after baking; this lets the fibers relax and the glaze thicken slightly, giving you a crisp edge that stays intact when you cut into it. Skipping this step results in a soggy bottom and a loss of that glorious crunch.
Butter‑Oil Balance for Perfect Browning
Using both butter and olive oil combines the high smoke point of oil with the flavor richness of butter. If you use butter alone, it burns before the chicken crisps; if you use oil alone, you miss the nutty depth. The 2‑to‑2 tablespoon ratio is a sweet spot that I’ve tested countless times.
Feta Crumble Timing
Add the feta to the glaze at the very end of the cooking process, just before it reaches a gentle simmer. Adding it too early makes it dissolve completely, losing the delightful texture. A friend tried adding it at the start and ended up with a bland sauce — the feta’s character was gone. Keep it till the last minute for that perfect melt‑and‑crumble effect.
Creative Twists and Variations
This recipe is a playground. Here are some of my favorite ways to switch things up:
Spicy Chipotle Feta
Swap the sriracha for chipotle in adobo sauce and add a pinch of smoked sea salt. The result is a smoky, deep heat that pairs beautifully with the feta’s tang. Perfect for those who love a southwestern vibe.
Herb‑Infused Honey
Infuse the honey with fresh thyme and rosemary a few minutes before making the glaze. The herbaceous notes add complexity and make the dish feel like a rustic Mediterranean feast.
Crispy Chicken Thighs with Pomegranate Molasses
Replace half the honey with pomegranate molasses for a fruity, slightly tart finish. The dark glaze looks stunning on a serving platter and adds a subtle complexity that’s perfect for holiday gatherings.
Gluten‑Free Crunch
Use almond flour in place of all‑purpose flour and gluten‑free panko. The texture stays crunchy, and the almond flavor adds a nutty undertone that complements the feta nicely.
Vegan Version
Swap chicken for thick‑cut cauliflower florets, use chickpea flour for the coating, and replace feta with a crumble of vegan feta or toasted sesame seeds. The hot honey glaze works just as well, delivering a plant‑based crowd‑pleaser.
Storing and Bringing It Back to Life
Fridge Storage
Place cooled chicken in an airtight container and store for up to three days. Keep the glaze separate in a small jar; when reheating, drizzle the glaze back on to retain its glossy shine.
Freezer Friendly
Wrap each piece tightly in parchment, then foil, and freeze for up to two months. To reheat, thaw overnight in the fridge, then bake at 375°F (190°C) for 12‑15 minutes, adding a splash of water before the final glaze to steam the crust back to crispness.
Best Reheating Method
A quick skillet reheat works wonders: heat a thin layer of oil over medium heat, add the chicken, and cover for two minutes to steam the interior, then uncover and finish with a drizzle of fresh hot honey glaze. This restores the crunch without drying out the meat.