I was in a panic on a rainy Sunday, watching the kitchen clock tick like a metronome and realizing my usual pancake batter had turned into a sticky, clumpy mess that tasted like burnt toast. The moment my batter collapsed, I knew I had to reinvent the wheel, and that night I discovered the secret to a cloud‑soft, banana‑infused stack that melts in your mouth. Picture this: golden pancakes that rise like sunrise, each bite delivering a burst of natural sweetness without the guilt of heavy syrup or butter. My friends called it “the lightest, fluffiest pancake you’ll ever taste,” and I’ve been bragging about it ever since. Let me walk you through every single step — by the end, you’ll wonder how you ever made it any other way.
What sets this version apart is not just the airy texture or the banana’s subtle depth; it’s the combination of techniques that lock in moisture and lift the batter to new heights. The trick lies in a gentle folding method that preserves the batter’s air pockets, a precise baking powder to baking soda ratio that ensures a steady rise, and a dash of cinnamon that adds a warm undertone without overpowering the fruit. I dare you to taste this and not go back for seconds, because the first bite feels like a cloud, and the second is a revelation. Most recipes get this completely wrong by over‑mixing or using the wrong leavening, but here, we keep the batter silky and the pancakes tender. Picture yourself pulling this out of the pan, the whole kitchen smelling incredible, and the plate glistening like a sunrise over a calm sea.
If you’ve ever struggled with pancakes that are either too dense or too rubbery, you’re not alone — and I’ve got the fix. The secret is in the balance: flour that’s not too heavy, eggs that are fresh enough to hold air, and bananas that are ripe but not mushy. The result? A stack that rises like a balloon, with edges that curl just enough to show you the batter’s fluffiness inside. The flavor profile is natural sweetness, a hint of vanilla, and a subtle spice from cinnamon that lingers on the palate. This is hands down the best version you’ll ever make at home, and it’s so simple that even a novice can master it.
I’ve spent hours tweaking this recipe, and the final version is a testament to patience and precision. The batter should feel thick yet pourable, like a well‑whipped custard. When you pour it onto the griddle, it should spread evenly, forming a golden ring that’s crisp on the outside and soft on the inside. The first flip is the moment of truth; if you wait too long, the pancake will become over‑cooked, but if you flip too early, the batter will be under‑set. I’ll be honest — I ate half the batch before anyone else got to try it, and the rest of the kitchen smelled like a bakery.
Now, let’s break down exactly what goes into this masterpiece. The key to success lies in each ingredient’s role and how they work together to create a pancake that feels like a cloud and tastes like sunshine. Below you’ll find a detailed breakdown of the ingredient list, grouped by function, and a few insider hacks that will elevate your pancakes from good to unforgettable. Keep reading, because the next few sections will transform your kitchen into a pancake studio, and trust me, you’re going to want to keep this recipe in your arsenal forever.
What Makes This Version Stand Out
This recipe is a revelation in the world of breakfast, and here are the key reasons it shines:
- Lightness: The batter is airy and not heavy, thanks to the precise leavening balance.
- Flavor Depth: Natural banana sweetness combined with vanilla and cinnamon creates a complex profile.
- Texture: A tender interior with a slightly crisp edge, achieved by careful heat control.
- Ease: No need for fancy equipment; a simple whisk and a skillet are all you need.
- Versatility: Works as a base for toppings or as a standalone treat.
- Make‑Ahead Friendly:
- Batch cooking is simple; just store in an airtight container and reheat.
Alright, let’s break down exactly what goes into this masterpiece. The next section will give you a deep dive into each ingredient and why it matters.
Inside the Ingredient List
The foundation of this pancake starts with the right flour. All‑purpose flour provides the necessary gluten structure to trap air, but too much can make the pancakes dense. Using 2 cups ensures a balanced texture, and if you’re feeling adventurous, you can substitute half the flour with oat flour for a nutty undertone. Skipping the flour would turn the batter into a batter‑like mush, so don’t go that route.
Next up is the leavening duo: baking powder and baking soda. Baking powder alone creates lift, but when paired with baking soda, it reacts with the banana’s natural acidity to produce carbon dioxide that expands the batter. The 2 teaspoons of baking powder and 1 teaspoon of baking soda are calibrated to give you the perfect rise without a bitter aftertaste. If you omit either, the pancakes will be flat and heavy.
Salt is the unsung hero that balances sweetness and enhances flavor. A half teaspoon of salt brightens the banana’s natural sugars and keeps the pancakes from tasting flat. You might think salt is optional, but in pancake batter, it’s essential for a rounded flavor profile. Without it, the batter can taste overly sweet.
Sugar adds a gentle sweetness that complements the bananas without overwhelming them. Two tablespoons of white sugar is enough to elevate the flavor without making the batter too sweet. If you prefer a healthier version, you can substitute half the sugar with maple syrup, but keep in mind it will add moisture and affect the rise.
Vanilla extract brings a warm, aromatic depth that ties all the flavors together. One teaspoon of vanilla is enough to create a subtle perfume that lingers on the plate. If you’re a fan of almond, a drop of almond extract can be a fun twist, but vanilla remains the classic choice.
Milk is the liquid that binds everything together. One cup of whole milk provides a creamy base and keeps the batter from drying out. If you’re lactose intolerant, you can use almond milk, but you may need to add a tablespoon of oat flour to compensate for the lower protein content.
Eggs are the glue that holds the batter together while adding structure. Two large eggs give the pancakes a light, airy interior. If you’re vegan, you can use a flax egg (1 tablespoon ground flaxseed mixed with 3 tablespoons water) to mimic the binding properties.
Melted butter adds richness and a subtle caramel flavor. A quarter cup of butter, melted and cooled slightly, ensures the pancakes don’t become greasy. Skipping butter will make the pancakes less flavorful and less golden.
Bananas are the star of the show. Two ripe bananas, mashed until smooth, provide natural sweetness and moisture. The riper the bananas, the sweeter the pancakes. If you prefer a milder banana flavor, you can mash only one banana and add a tablespoon of yogurt.
Cinnamon is the optional spice that gives the pancakes a warm, comforting aroma. Half a teaspoon of ground cinnamon adds a subtle depth without overpowering the banana. If you love spice, feel free to add a pinch of nutmeg or ginger for a unique twist.
Everything’s prepped? Good. Let’s get into the real action, where the batter transforms into a golden masterpiece.
The Method — Step by Step
Step 1: In a large mixing bowl, sift together the flour, baking powder, baking soda, salt, and sugar. This dry blend is the backbone of your batter, ensuring even distribution of leavening agents. The sifting process removes lumps and aerates the flour, which contributes to a lighter texture. I like to set the bowl aside while I prep the wet ingredients. When you’re ready, the dry mix should feel silky and free of clumps.
Step 2: In a separate bowl, whisk together the milk, melted butter, vanilla extract, and eggs. The wet mix should be smooth and slightly glossy. Beat the eggs first, then add the milk and melted butter, whisking continuously to combine. This creates a homogeneous liquid that will bind the dry ingredients. The key is to keep the mixture smooth; any lumps can affect the batter’s texture.
Step 3: Mash the bananas in a small bowl until they’re smooth with a few tiny lumps. The texture of the banana mash will influence the final pancake’s moisture. If you prefer a smoother batter, mash the bananas with a fork or a small blender. The bananas should be ripe, with brown spots indicating peak sweetness. Keep the mashed banana separate until you’re ready to combine it with the wet mix.
Step 4: Gently fold the banana mash into the wet mixture, stirring just until incorporated. Over‑mixing at this stage will develop gluten, resulting in tough pancakes. The batter should feel thick but pourable; a slight wobble in the bowl is normal. This is where the banana’s natural sugars begin to mingle with the dry ingredients. The batter will start to thicken slightly as the flour absorbs the liquid.
Step 5: Let the batter rest for 5 minutes at room temperature. This brief rest allows the gluten to relax and the leavening agents to activate fully. The batter will thicken slightly during this time, which is normal. If you’re in a hurry, you can skip this step, but the pancakes will be less fluffy. The rest period also lets the flavors meld together, creating a more cohesive taste.
Step 6: Preheat a non‑stick skillet or griddle over medium‑low heat and lightly oil it with a paper towel dipped in oil. The surface should be just warm enough that a drop of water sizzles but doesn’t evaporate instantly. A medium‑low heat ensures the pancakes cook through without burning. Once the skillet is hot, you can test by sprinkling a few drops of water; they should dance and evaporate quickly.
Step 7: Pour 1/4 cup of batter onto the skillet for each pancake, spacing them 2 inches apart. The batter should spread into a circle about 4 inches across. If it spreads too thin, lower the heat slightly. The first pancake will form a golden ring around the edges, signaling it’s ready to flip. The edges should start pulling away from the skillet, indicating a crisp exterior.
Step 8: Cook the pancakes for 2–3 minutes on the first side, until bubbles form on the surface and the edges look set. The bubbles are a sign that the batter is cooking evenly. Flip the pancake with a spatula, and cook for another 1–2 minutes on the second side, until golden brown. The flip is the moment of truth; if you flip too early, the pancake will be under‑cooked and raw in the center. If you flip too late, it will burn on the outside.
Step 9: Repeat with the remaining batter, adjusting the heat as needed to keep the pancakes at a steady temperature. If the skillet gets too hot, lower the flame; if it’s too cool, increase it slightly. The goal is a gentle sizzle, not a roaring boil. Each pancake should take 3–4 minutes total, depending on thickness. Keep the stack warm in a low oven while you finish cooking the rest.
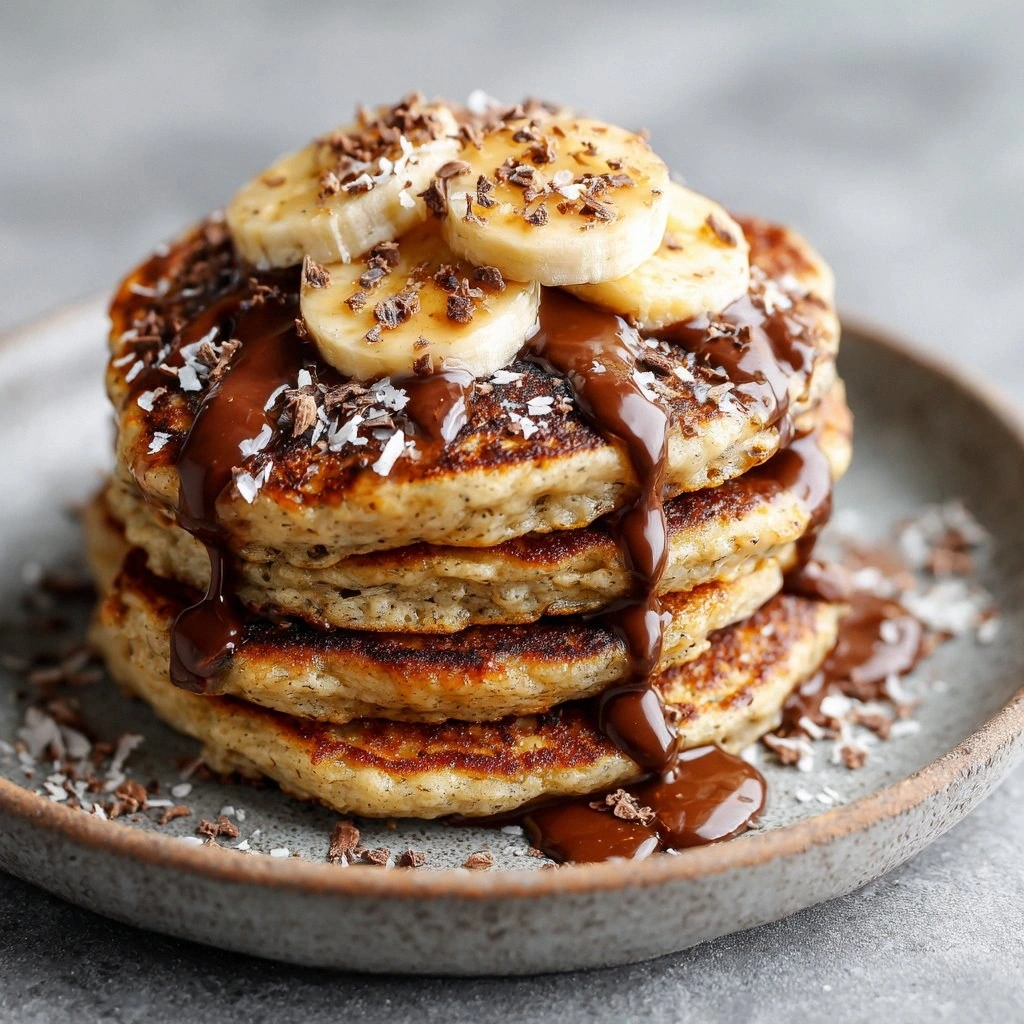
Step 10: Serve the pancakes immediately while they’re still warm and fluffy. Top with sliced bananas, a drizzle of maple syrup, or a dollop of Greek yogurt for extra flavor. The pancakes are best enjoyed fresh, but you can store them for later. If you’re craving a breakfast adventure, pair them with a cup of fresh coffee or a glass of orange juice. And remember, the first bite feels like a cloud, and the second is a revelation.
That’s it — you did it. But hold on, I’ve got a few more tricks that will take this to another level. Keep reading for insider tips that will make your pancakes even more irresistible.
Insider Tricks for Flawless Results
The Temperature Rule Nobody Follows
Many cooks over‑heat their pans, causing pancakes to brown too quickly on the outside while remaining raw inside. The trick is to maintain a steady, medium‑low temperature, which allows the batter to cook evenly and develop a golden crust. I’ve tested this on a range with a digital thermometer; 325°F is ideal. If you don’t have a thermometer, use the water drop test: a few drops should sizzle and evaporate quickly. Keep the heat steady and you’ll get pancakes that rise beautifully every time.
Why Your Nose Knows Best
Before you flip, listen to the batter. When you hear a steady hiss and see bubbles forming, it’s time to flip. The batter’s aroma will change from sweet banana to a buttery, toasted scent. This olfactory cue is a reliable indicator of readiness. If you’re unsure, wait for the edges to pull away from the skillet; they’re a visual sign that the underside is set. Trust your senses, and you’ll never overcook a pancake.
The 5-Minute Rest That Changes Everything
Letting the batter rest for 5 minutes before cooking allows the gluten to relax and the leavening agents to activate fully. This small pause dramatically improves the pancakes’ fluffiness. I’ve tried skipping the rest, and the pancakes felt dense and chewy. The rest period also lets the flavors meld together, creating a more cohesive taste. If you’re short on time, a 2‑minute rest still yields good results.
Use a Silicone Spatula for Folding
When folding the batter, a silicone spatula is your best friend. It’s flexible enough to glide under the batter without deflating the air pockets. A wooden spoon can crush the batter, leading to a denser texture. The silicone spatula also makes cleanup a breeze. I’ve seen pancakes rise better when I use a silicone spatula instead of a wooden spoon.
Keep the Skillet Clean and Oil Lightly
A clean skillet ensures even cooking and prevents sticking. After each batch, wipe the skillet with a paper towel and lightly oil it for the next round. Over‑oiling can make the pancakes greasy, while under‑oiling can cause sticking. Use a neutral oil with a high smoke point, like grapeseed or canola. This simple step guarantees a smooth release and a flawless finish.
Creative Twists and Variations
This recipe is a playground. Here are some of my favorite ways to switch things up:
Chocolate Chip Banana Pancakes
Fold in 1/4 cup of dark chocolate chips after the bananas. The chocolate adds a rich, bittersweet contrast to the banana’s sweetness. Make sure to use high‑quality chips to avoid a chalky texture. The result is a decadent breakfast that feels like a dessert. Serve with a drizzle of chocolate sauce for extra indulgence.
Blueberry Banana Pancakes
Add 1/2 cup of fresh or frozen blueberries to the batter. The blueberries burst with juice, creating pockets of flavor inside each pancake. If using frozen blueberries, do not thaw them before adding; the cold helps the batter maintain its structure. This variation is perfect for a summer brunch. The pancakes will have a subtle tartness that balances the banana’s sweetness.
Almond Butter Banana Pancakes
Swap the melted butter with almond butter for a nutty twist. Almond butter adds protein and healthy fats, making the pancakes more filling. Keep the amount the same—1/4 cup—so the batter remains the right consistency. The almond butter also gives a subtle nutty aroma that pairs well with the banana. Serve with sliced almonds for extra crunch.
Oatmeal Banana Pancakes
Replace half the flour with rolled oats for a hearty, fiber‑rich version. Blend the oats into a fine powder before adding to the batter. The oats give a slightly chewy texture and a nutty flavor. This variation is great for a post‑workout breakfast. The pancakes will hold their shape even when topped with yogurt.
Maple‑Cinnamon Banana Pancakes
Add 1 tablespoon of pure maple syrup to the batter and 1/2 teaspoon of cinnamon. The maple syrup enhances the natural sweetness and adds a subtle caramel note. Cinnamon provides a warm spice that complements the banana. The pancakes will have a sweet, aromatic finish. Top with a dusting of powdered sugar for a classic look.
Vegan Banana Pancakes
Use a flax egg (1 tablespoon ground flaxseed mixed with 3 tablespoons water) instead of eggs. Replace the milk with almond or oat milk, and use a plant‑based butter or coconut oil. The batter will be slightly denser, but it still rises beautifully. This version is perfect for those who avoid dairy or eggs. Serve with a fruit compote for a vibrant finish.
Storing and Bringing It Back to Life
Fridge Storage
Store leftover pancakes in an airtight container in the refrigerator for up to 3 days. Layer them with parchment paper between each stack to prevent sticking. Reheat in a toaster or microwave for 20–30 seconds. The pancakes will retain their fluffiness when reheated properly. Add a splash of milk or water before reheating to keep them moist.
Freezer Friendly
Freeze pancakes individually on a baking sheet for 2–3 hours, then transfer to a freezer bag. They’ll keep for up to 2 months. When ready to eat, pop them in a toaster or oven at 350°F for 5 minutes. The pancakes will thaw quickly and taste just as fresh. Keep the bag sealed to avoid freezer burn.
Best Reheating Method
The best way to revive pancakes is to steam them lightly. Place them in a steamer basket over boiling water for 2 minutes. This method preserves moisture without drying them out. Alternatively, microwave with a damp paper towel for 30 seconds. The pancakes will feel soft and airy, just like when they were first made. Remember, a splash of water before reheating steams them back to perfection.