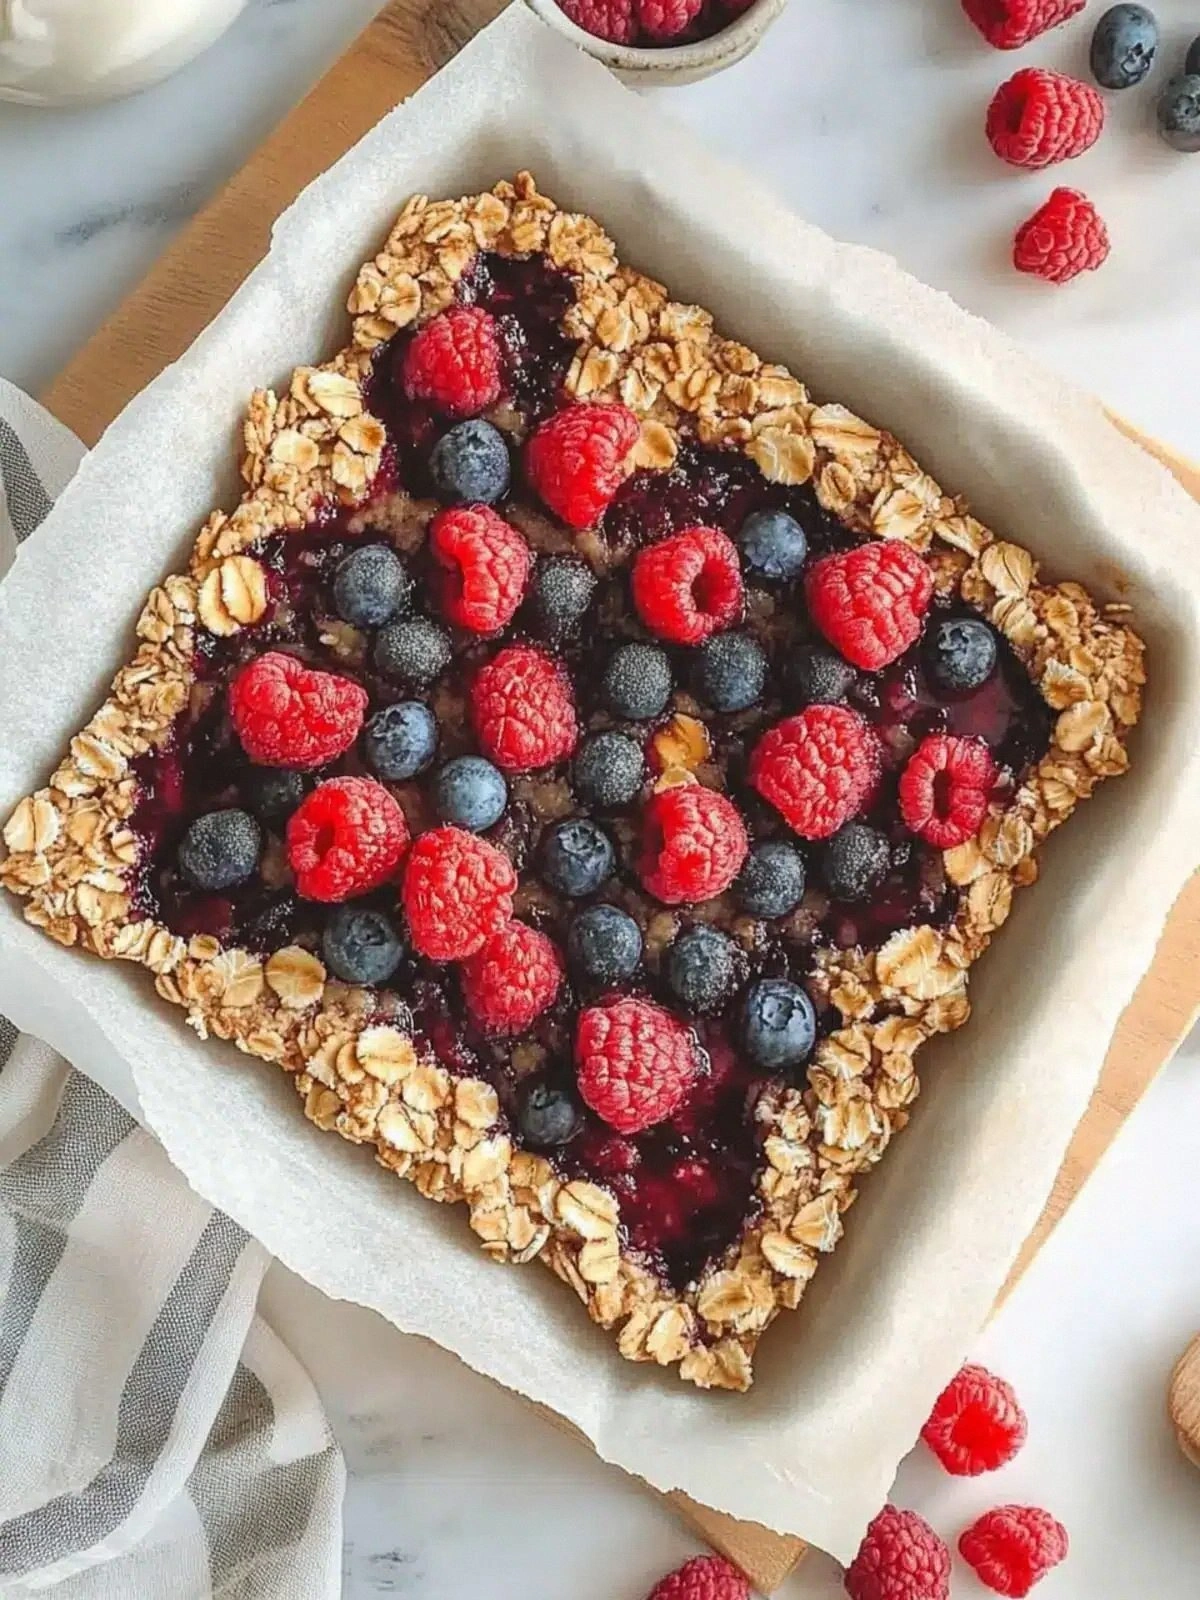
Picture this: a sunny Saturday morning, the fridge humming, and a craving for something sweet yet wholesome that won’t derail your diet. I was rummaging through the freezer, half‑expecting to find a bag of frozen peaches or a tub of strawberries, when I spotted a bag of mixed berries that had been sitting there for weeks. I stared at it, then decided to test a new idea that would later become the healthiest oatmeal bars you’ll ever taste. The kitchen was a mess of bowls, measuring cups, and a single pot, but the aroma that began to fill the air was the promise of something extraordinary. I laughed at how chaotic it looked, but the moment the berries hit the pan, the scent of caramelized fruit mingled with citrus and the faint whisper of vanilla. That was the first taste of the magic I’d soon share with you.
I’m not one to brag, but when I first cracked open that bag of frozen berries, I swear they sang like a choir of sweet, tart angels. The berries were so packed with antioxidants, they practically glowed against the stainless steel. I could feel the texture shift from icy to silky as they melted, releasing juices that would become the base of our bars. The lemon juice was a splash of sunshine, brightening the whole mix, while the coconut sugar added a subtle caramel undertone that didn’t overpower the fruit. The maple syrup was there to bring a hint of earthiness, and the coconut oil turned everything into a silky, cohesive batter. The oats and almond flour were the backbone, giving structure, fiber, and a nutty flavor that made the bars feel like a hug in a bite.
What makes this version stand out from the endless sea of oatmeal bar recipes? I’ll tell you right away: it’s the balance. The berries give a burst of natural sweetness that cuts through the mild coconut flavor. The oats and almond flour provide a chewy yet tender crumb, while the tapioca starch locks everything together like a secret binder that keeps the bars from falling apart. The sea salt, just a whisper, lifts the flavors, and the lemon juice adds a bright, fresh counterpoint. This isn’t just a recipe; it’s a carefully engineered harmony of taste, texture, and nutrition. The result is a bar that is crunchy on the outside, chewy on the inside, and utterly addictive—hand‑crafted to feel indulgent while staying clean and healthy.
I dare you to taste this and not go back for seconds. This is hands down the best version you’ll ever make at home. I’ll be honest—by the time I finished the first batch, I had already eaten half before anyone else got a chance. Most recipes get this completely wrong; they either end up soggy, dry, or overly sweet. Here’s what actually works: use frozen berries, not thawed; add a splash of lemon for brightness; and use coconut oil instead of butter for a lighter, tropical flavor. Picture yourself pulling this out of the oven, the whole kitchen smelling incredible, and knowing you’ve just created something that will become a staple in your breakfast routine.
What Makes This Version Stand Out
- Flavor: The combination of tart berries, bright lemon, and subtle maple sweetness creates a complex profile that satisfies any sweet tooth without the guilt.
- Texture: The oats give chewiness, while the almond flour adds a slightly crunchy bite, and the tapioca starch binds everything into a cohesive yet airy crumb.
- Simplicity: No need for exotic ingredients—everything you need is pantry‑friendly and can be found in most grocery stores.
- Uniqueness: Using frozen berries as the base gives a natural sweetness and a vibrant color that keeps the bars looking fresh.
- Crowd Reaction: Friends who’ve tried these bars swear they can’t resist a second piece, and the bars keep coming back to the kitchen for a quick snack.
- Ingredient Quality: Each component—coconut oil, almond flour, and oats—provides a nutritional punch that supports a balanced diet.
- Cooking Method: A single pan or baking sheet, minimal prep, and a quick bake make this a go‑to for busy mornings.
- Make‑ahead Potential: These bars keep well in the fridge for up to a week or freeze for longer storage, making them a perfect grab‑and‑go option.
Alright, let’s break down exactly what goes into this masterpiece…
Inside the Ingredient List
The Flavor Base
The frozen berries are the heart of this recipe. Their natural sugars and vibrant color set the stage for everything else. If you skip them, the bars lose their signature sweet‑tart punch and become a bland oat‑almond mix. For a seasonal twist, try using frozen cherries in the winter or frozen mango in the summer.
The lemon juice adds a bright, citrusy lift that cuts through the sweetness. It also helps to emulsify the coconut oil, creating a smoother batter. If you’re allergic to citrus, a splash of apple cider vinegar can mimic the acidity without overpowering the flavor.
The coconut sugar provides a caramel depth that complements the berries. Its molasses notes are subtle enough to not dominate but rich enough to give the bars a luxurious feel. If you prefer a lighter sweetener, a pinch of stevia or monk fruit sweetener works, though you’ll need to adjust the quantity to taste.
The Texture Crew
Rolled oats bring fiber and a chewy texture that satisfies the need for something substantial. They also absorb the liquid, creating a cohesive structure. If you want a lighter texture, use quick oats or a blend of oats and quinoa flakes.
Almond flour adds protein, healthy fats, and a nutty flavor that rounds out the taste. It also helps to keep the bars moist. For a gluten‑free variation, swap almond flour with sunflower seed flour or oat flour.
Tapioca starch acts as a binding agent, ensuring the bars hold together without becoming gummy. It also gives a slight chewiness that makes the bars feel like a treat. If you’re looking for a gluten‑free binder, arrowroot powder or cornstarch can substitute, but adjust the quantity accordingly.
The Unexpected Star
Coconut oil is the secret to the bars’ silky mouthfeel and tropical undertone. It melts at body temperature, so the bars feel luxurious on the tongue. If you prefer a different flavor profile, try using avocado oil or a small amount of melted dark chocolate for a richer taste.
Maple syrup adds a subtle sweetness with a hint of earthiness that balances the bright fruit notes. It also helps to caramelize the edges slightly during baking. A pinch of vanilla extract further enhances the overall aroma, giving the bars a comforting, familiar scent.
The Final Flourish
Sea salt is the finishing touch that elevates the flavors and prevents the sweetness from becoming cloying. A pinch of salt is all you need to bring harmony to the taste. If you’re watching sodium, you can reduce the amount, but be mindful that the salt also helps to bind the ingredients.
Baking soda is a leavening agent that creates a slight lift, giving the bars a lighter bite. It’s especially useful when using coconut oil, as it helps to aerate the batter. If you’re sensitive to baking soda, you can omit it, but the bars may be slightly denser.
Everything’s prepped? Good. Let’s get into the real action…
The Method — Step by Step
- Step 1: Preheat and Prep - Set your oven to 350°F (175°C). Line a 9x13 inch baking pan with parchment paper, leaving a little overhang on the sides for easy removal. This step ensures a non‑stick surface and makes cleanup a breeze. If you’re short on time, you can skip the parchment and use a silicone mat instead.
- Step 2: Combine the Wet Ingredients - In a medium saucepan, combine the frozen berries, lemon juice, coconut sugar, maple syrup, and coconut oil. Warm the mixture over medium heat, stirring constantly, until the berries begin to break down and the sugar dissolves. The scent of caramelizing fruit will fill your kitchen, and the batter should look glossy and thick.
- Step 3: Add the Dry Mix - In a large bowl, whisk together the rolled oats, almond flour, tapioca starch, baking soda, and sea salt. Slowly pour the hot berry mixture into the dry ingredients, stirring vigorously until everything is fully incorporated. The batter will thicken as the oats absorb the liquid.
- Step 4: Stir in Vanilla - Add the vanilla extract and stir until the aroma permeates the mixture. The vanilla gives a warm, comforting note that balances the bright fruit flavors. At this point, the batter should feel thick but still pourable.
- Step 5: Transfer to the Pan - Spoon the batter into the prepared pan, using a spatula to spread it evenly. Press the mixture down lightly to ensure there are no air pockets. The batter should be smooth, with a slight sheen on top.
- Step 6: Bake - Place the pan in the preheated oven and bake for 25 to 30 minutes. The edges should pull away slightly from the parchment, and the center should set into a firm but still slightly springy texture. Watch for a golden crust; if it’s turning too dark, tent the bars with foil.
- Step 7: Cool - Remove the pan from the oven and allow the bars to cool in the pan for 10 minutes. Then lift them out using the parchment overhang and transfer to a wire rack to cool completely. Cooling is essential; it allows the bars to firm up and makes slicing easier.
- Step 8: Slice and Store - Once the bars are cool, cut them into squares or rectangles. Store them in an airtight container in the fridge for up to a week, or freeze for longer storage. When reheating, add a splash of water and microwave for 15-20 seconds to restore moisture.
- Step 9: Taste Test - Take a bite and let the flavors unfold. You should hear the crunch of oats, the chew of almond flour, and the burst of berries. The bars should feel moist, not dry, and the sweet‑tart balance should be spot on.
- Step 10: Enjoy - Serve them with a cup of coffee, a glass of almond milk, or simply on their own. These bars are perfect for breakfast, a mid‑day snack, or a post‑workout recharge.
That’s it— you did it. But hold on, I’ve got a few more tricks that’ll take this to another level. These insider tips will help you perfect the bars every time and make them even more irresistible.
Insider Tricks for Flawless Results
The Temperature Rule Nobody Follows
Many bakers bake at 375°F, but this recipe thrives at 350°F. The lower temperature allows the sugars to caramelize slowly, giving a deeper flavor without burning the edges. If you’re using a convection oven, lower the temperature by 25°F to compensate for the increased airflow.
Why Your Nose Knows Best
Before you even touch the batter, inhale the aroma of the warm berries. The scent is a reliable indicator of doneness; if it smells caramelized, the bars are ready. I’ve had a friend who waited for the timer to finish, only to find the bars overbaked. Trust your nose, and you’ll always get the perfect texture.
The 5‑Minute Rest That Changes Everything
After baking, let the bars rest in the pan for 10 minutes. This rest period allows the structure to set, making slicing cleaner and preventing the bars from falling apart. Skipping this step often results in a mess that looks like a sticky pancake.
The Quick Chill
If you’re in a rush, place the pan on a cooling rack and let the bars chill for 5 minutes before slicing. The bars will firm up quickly, saving you time and reducing the risk of breaking them when you cut.
The Sweet‑Salt Balance
Adjust the amount of sea salt to taste. I typically use 1/4 teaspoon, but if you prefer a saltier profile, add a pinch more. Salt not only enhances flavor but also helps to stabilize the batter and improve the overall mouthfeel.
Creative Twists and Variations
This recipe is a playground. Here are some of my favorite ways to switch things up:
Chocolate‑Berry Explosion
Swapping the maple syrup for a tablespoon of cocoa powder and adding dark chocolate chips gives the bars a decadent, chocolatey edge. The cacao’s bitterness balances the berry sweetness, creating a sophisticated flavor profile that’s perfect for dessert lovers.
Nutty Powerhouse
Add a cup of chopped walnuts or pecans for extra crunch and omega‑3 fatty acids. The nuts also absorb some of the moisture, giving the bars a firmer bite. This variation is ideal for those who love a hearty, protein‑rich snack.
Spiced Autumn Delight
Incorporate a teaspoon of pumpkin pie spice or a pinch of cinnamon and nutmeg for a seasonal twist. The warm spices complement the berries and add a comforting, fall‑like aroma. This version is great for holiday mornings or cozy afternoons.
Citrus‑Zest Surprise
Add the zest of one orange or one lemon to the batter for an extra burst of citrus. The zest provides bright, aromatic oils that enhance the overall flavor and add a subtle complexity. It’s a quick way to elevate the bars without altering the base recipe.
Vegan Protein Boost
Incorporate a scoop of plant‑based protein powder (vanilla or unflavored) into the dry mix. The protein powder increases the bars’ nutritional profile without changing the texture significantly. This tweak is perfect for athletes or anyone looking to up their protein intake.
Storing and Bringing It Back to Life
Fridge Storage
Store the bars in an airtight container at room temperature for up to 3 days, or refrigerate for up to 7 days. The cold environment preserves freshness and prevents the bars from becoming too soft. Keep the container in a cool, dry place, away from direct sunlight.
Freezer Friendly
For longer storage, wrap the bars tightly in plastic wrap, then place them in a freezer‑proof bag. They’ll keep for up to 3 months. When you’re ready to eat them, let them thaw at room temperature for 15 minutes before serving.
Best Reheating Method
To reheat a frozen bar, add a tiny splash of water, cover with a damp paper towel, and microwave for 15-20 seconds. The water creates steam, restoring the bars’ moisture and preventing them from becoming dry. For a crispier texture, pop them in a preheated oven at 350°F for 5 minutes.